
Chicken Stock
Roasted Chicken Broth recipe and directions to can the jars of stock with a pressure canner to make them shelf-stable.
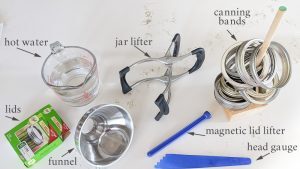
Equipment
Ingredients
- 3 lbs chicken legs or wings
- 2 onions quartered
- 5 carrots
- 3 celery stalks
- 3 quarts cold water
- Olive Oil
- Salt and Pepper
Instructions
HOW TO MAKE HOMEMADE CHICKEN STOCK
- Preheat oven to 450°
- Place chicken pieces, onions, carrots, and celery on a baking sheet
- Drizzle with olive oil, sprinkle with salt and pepper, and rub to coat the pieces in the olive oil
- Roast for 30 minutes
- Remove chicken and vegetables and put them in a crockpot or a large stockpot.
- Add cold water
- Slow cook on low for 24 hours in your crockpot or 3-4 hours at a slow simmer on the stovetop.
- Strain meat and vegetables from the broth and chill the broth, to allow the excess fat to harden and be removed.
- If desired, remove the chicken meat from bones and put it in cupcake tins to freeze for your pups! (Make sure you don't include any onions into these chicken meat pupcakes)
- You can add the chicken bones back to the crockpot with cold water to just cover and 1/4 cup of cider vinegar to cook for another 24 hours to make chicken bone broth.
HOW TO CAN CHICKEN BROTH OR STOCK
- Prepare Jars and Lids
- Bring your stock or broth to a simmer.
- Check the rims of your canning jars to ensure no cracks or chips.
- Wash jars, lids and other canning tools well. I always run my jars, lids, headspace gauge, lid lifter and funnel through the dishwasher right before I use them. If washing well before canning, I put them on a clean baking tray and set them in the oven (not on) just to keep them clean and out of the way until I am ready to use them. I put the stack of lids sideways in a small bowl so that any water left on them from the dishwasher drips off of them. The lids will rust if water settles on them.
- One-half hour before canning, heat the jars so that they aren't cold. If you wash them in the dishwasher right before canning, just leave them in the dishwasher until you are ready to fill them.
- Fill your canner with about 3 inches of water. Put the lid on the pot and bring the water in the pot to a simmer over medium heat and keep the water simmering.
- Check your screw bands and discard any that are rusted or bent. Set your screw bands aside
- Boil water and pour over the lids. Don't put the lids into boiling water on the stove.
- Prepare your work surface: I lay out a clean cloth onto which I place the container holding the hot lids, head gauge, magnetic lid lifter, funnel a bowl of white vinegar and a clean cloth or paper towel, jar lifter, and the screw bands. Set a trivet out for the hot pot of stock or broth.
- Bring your pot of hot broth to your work surface.
- Take one jar from the dishwasher. Or, using your jar lifter or hot mitt, lift one hot jar out of the oven. Place on the work surface.
- Keep your pressure canner at a low simmer throughout this process.
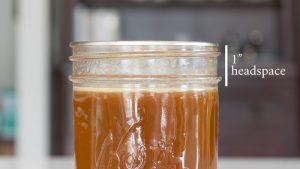
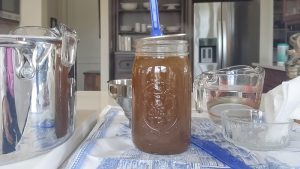
- Using your funnel and insert, ladle the hot broth into the jar. leaving a 1" headspace. That 1" headspace is really important, so add a bit or take out a bit so that you have just 1" between the top of the jar and the top of the broth.
- Wipe the rim of the jar and threads with the vinegar, which will remove any stock or fat that may be on the rim of the jar. Without a clean, fat-free rim, your jars will most likely not seal...which will make you very sad.
- Use your magnetic lid lifter to lift a lid from the hot water and place it on the jar.
- Place a screw band on the jar and ensure it is aligned with the threads and screw until just fingertip tight, which means to tighten, just with the strength in your fingers, not putting your whole hand on to tighten. You want it to be on firmly but not as tight as possible.
- Using your jar lifter, place this jar back into your pressure canner and retrieve another hot jar, repeating the process until all jars are filled.
- Make sure you have the correct level of water in your canner. In my Presto Pressure Canner, there are some little hashmarks/identations which let me know where my water level should be. Use a long spoon or butter knife to feel for that hashmark, and adjust the water level as appropriate.
- When you get down to your last 2-3 canning jars, check the water level of your canning pot and if you need more water in your canner, add water to the pot from the hot jars that you are pulling out to fill.
- Place the lid on your canner and lock it into place.
- Leave the weight off of the vent pipe.
- Bring the water to a boil over medium-high heat. When you see and hear the steam venting out of the vent pipe in a strong and steady stream, start your timer for 10 minutes.
- At the end of 10 minutes, place the weight over the vent pipe.
- If you are using a weighted-gauge pressure canner at altitudes of 1,000 ft or below, slowly bring the pressure up to 10 lbs. (Consult an altitude chart for altitudes above 1,000 ft, or if you are using a dial gauge canner)
- I find that if I start easing the temperature back when the gauge starts reading 8.5 - 9 lbs, I can ease into the 10 lbs without going too much over.
- Once your gauge reaches 10 lbs, start your timer. (processing time of 20 minutes for pints or 25 minutes for quarts. If you have a mix of pints and quarts, set your timer for a processing time of 25 minutes.)
- Stay near your stove to monitor your gauge. You don't want to fall below 10 lbs or rise too far above 10 lbs. You will have to nudge your stove's heat control just in the tiniest increment to find the sweet spot.
- If you do fall below 10 lbs, you need to start your timer again. It must process for the designated time at 10 lbs.
- When the processing time is complete, turn off your stove and let the canner cool on its own. I find that it takes about 25-30 minutes for that to happen. You will know that the canner has cooled when the Air Vent/Cover Lock drops down on its own.
- Once the pressure has returned to zero, and the cover lock drops down, wait an additional 2 minutes.
- Then, remove the weight from the vent, unlock and remove the lid, making sure to open it away from you so that you don't get a face full of steam.
- Let the jars sit in the canner for 10 minutes to adjust to room temperature.
- Using your jar lifter, lift the jars from the canner, holding them as level as possible without tilting.
- Place the jars, 1-2 inches apart, on a cooling rack or cutting board somewhere where they won't be disturbed. Let sit for 24 hours.
- Listen for the lids to pop. Remove any jars on which the lid has not popped and place them in the refrigerator.
- After 24 hours, remove the bands and wipe down your jars. Check that all lids have sealed. They will curve downward and will not give when pressed.
- Once again, jars that haven't sealed must be reprocessed or refrigerated.
- Store jars in a cool, dark place.
Video
Notes
The ingredients in this recipe will fit into one slow cooker. If you do have a second slow cooker, I would definitely double the recipe.
Nutrition
Serving: 4ouncesCalories: 39kcalCarbohydrates: 1gProtein: 4gFat: 2gSaturated Fat: 1gPolyunsaturated Fat: 1gCholesterol: 23mgSodium: 29mg
Well, what did you think?Please rate this recipe here! It helps other readers and also helps to support our site.