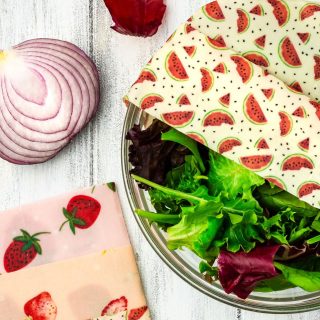
Beeswax Food Wraps
Beeswax Food Wraps are a fantastic replacement for single-use plastic wrap or aluminum foil. They’re reusable, which means you save money and reduce waste in the long run. And, not for nothing, they are easy to make!
Equipment
- Hammer and/or mortar & pestle to crush pine rosin. It is helpful if the rosin and mortar & pestle are frozen before trying to crush as the rosin becomes sticky the warmer it gets.
- Microwave
- Oven
Ingredients
FOR BEESWAX FOOD WRAPS
- 100 % cotton fabric 3 colors or patterns, ½ yards each (Walmart has precut ½ yard cotton fabric for around $1-2)
- 1 ½ cups White Beeswax pellets food grade
- ½ cup crushed Pine Resin food grade
- 1 ½ tablespoons Jojoba Oil
- Microwave-safe container or jar
- 2- inch art brush
- Baking tray
- Parchment paper
- Fabric scissors or pinking shears
- Fabric tape measure or ruler
- Optional: Poster Board to draw and visualize sizes
- Optional: Marker for drawing sizes
FOR GIFT WRAPPING
- 2 pieces of 12×12 natural cardstock
- White printer paper for “How To” label and “Care instructions”
- Glue stick
- Tape
- Scissors
- How To Use Beeswax Food Wraps Label
- How to Care for Beeswax Food Wraps Label
Instructions
FOR BEESWAX FOOD WRAPS
- Preheat the oven to 150°F (66°C). If 200°F is your lowest setting, that’s fine.
- Cut your cotton fabric into squares, circles, or rectangles depending on how you would like them to be used. If you will be giving the food wraps as gifts, cut your fabric into 3-4 different sizes as it makes for a nice variety gift set. I’ve included some common sizes for beeswax food wraps farther down in this post.
- Once you have your shapes cut, add the resin to a microwave-safe container and microwave for about three minutes and then one-minute intervals after that until melted.
- Carefully take out the resin using a pot holder and add the beeswax and jojoba oil. Continue to microwave until melted starting with two minutes and then one-minute intervals afterwards, stirring occasionally.
- While the wax mixture is heating up, place parchment paper on a baking tray and arrange your fabric to fit inside the tray. You will most likely need to do multiple batches in the oven depending on your sizes.
- Once the beeswax mixture is melted, brush one even layer onto the fabric making sure to brush to the edges. If it starts to solidify do not worry, it will absorb and melt into the fabric once in the oven.
- Place the fabric into the oven for five minutes so that the beeswax can seep into the fabric.
- Take the wraps out of the oven and brush from the center to the edges to ensure even coverage.
- Peel off the wrap once it’s cool enough to handle and place onto a fresh sheet of crumpled parchment or hang to dry if you prefer. Once cooled, you can trim up any uneven edges or loose strings.
- *Note: If the wraps do not stick perfectly at first you can scrunch them up to help activate the wax mixture and then try again to seal the edges with the warmth of your hands.
FOR GIFT WRAPPING BEESWAX FOOD WRAPS
- Print and cut the Beeswax “How to Use” label and “Care Instructions” using these links: Beeswax Wraps How To and Beeswax Food Wraps Care Instructions.
- Cut 4 ½ inch strips of the natural cardstock and glue the “How to” label in the center leaving ¼ inch above and below the label.
- Fold the cardstock on each side of the label also leaving approximately ¼ inch on each side.
- Flip the cardstock so the label is facing down. Start with your biggest wrap, place it face down, and use the folds in the cardstock as guides to fold it inward. Repeat with the next size down, folding it around the biggest piece, and continue the process with any other wraps.
- Close up the back and secure it with tape. With the glue stick, glue the care instructions to the back.
- You will get two 4 ¼” strips from the natural 12″ x 12″ cardstock, there are two “How To” labels and three “Care Instructions” on the printable pages.
Notes
TO REFRESH YOUR BEESWAX FOOD WRAP:
If your wrap becomes worn-looking or starts cracking, refresh it by placing it between two pieces of parchment paper and ironing on low heat (no steam). Place it on a rack to cool. Tried this? Love it? Let us know how it was!