How to Wax Amaryllis Bulbs
Waxing amaryllis bulbs is a simple and rewarding DIY project that transforms these stunning flowers into a self-sustaining, soil-free centerpiece. By coating the bulbs in paraffin wax, you create a decorative and low-maintenance way to enjoy amaryllis blooms. Perfect for home décor or as a unique handmade gift, waxed amaryllis bulbs require no watering and will bloom beautifully with minimal effort.
Equipment
- A bowl to soak Amaryllis bulbs
- Double Burner or something similar, see note 1
- Aluminum foil recommended,, but not required
Ingredients
- Amaryllis bulbs see note 2
- Paraffin wax 1 lb will coat 6 bulbs
- Acrylic Spray Paint
- Painter's Tape
- Thermometer
Instructions
- Soak the Amaryllis for 6 hours. Don't oversoak the bulbs, or they may rot.
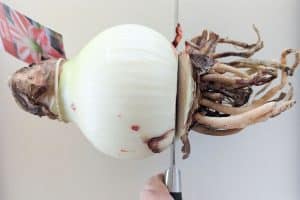
- After 6 hours, dry the bulbs and trim off the roots just where they meet the bulb. You'll want a flat surface on the bottom of the bulb, so stand it up to make sure it stands straight. Take off as little of the actual bulb as possible.
- Chop the paraffin wax into small pieces, which helps it melt quickly.
- Melt the paraffin wax in a double boiler or something similar over low heat. It is easier to fully coat the bulbs if the container holding the wax is narrow rather than wide, which forces the wax to be deeper. See the warning about paraffin wax in the notes.
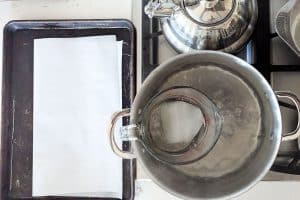
- While the wax is melting, use aluminum foil and/or baking sheets to cover as much of your stove and counter as possible. You will be extra thankful you did this after you are done! I learned the hard way how messy it is to clean many little wax drops.
- Line a cookie sheet with parchment paper. If you have a variety of bulbs, try to keep the tags attached to the green or place them on the parchment paper so you can keep track of which bulb is which.
- While you want the wax to melt, you want to keep it from getting too hot. The ideal wax temperature for dipping the amaryllis bulbs is around 120℉ (48.9°C). I turned the stove off once the wax temperature reached 120℉ (48.9°C) and then would turn it back on once the wax seemed less smooth.
- Hold the amaryllis bulbs by their neck or any green leaves and dip them in the wax. You want to walk a fine line between waxing it and overheating the bulb. I would quickly dip each bulb about 10 times and then let it cool down before dipping it again. Place the bulb cut side down on a piece of parchment paper between each set of 10 dippings. All told, I dipped each bulb approximately 70 times.

- Once your bulbs are fully coated, set them aside to cool
- You can add color to the waxed bulbs once they are cool with spray paint!
- Tape any green leaves/stems with painter's tape to shield them from the paint. Use several light coats of paint so you don't get drips.

Notes
Note 1
You need some sort of double burner to melt the paraffin wax. A double boiler consists of a heatproof container or pot placed over a larger saucepan filled with simmering water, which provides gentle, indirect heat to melt the wax gradually. Paraffin wax is highly flammable and has a flash point of approximately 390°F (199°C). Direct heat from a stovetop burner can cause it to overheat quickly, potentially igniting. I used a four-cup glass measuring cup in a pot of boiling water. The second time, I also put a rubber trivet at the bottom of the pot. If you have an empty aluminum or tin can, that'd be a great option, as you could just dispose of it afterward.Note 2
Look for Amaryllis bulbs that don't grow too tall. I have listed quite a few in the article. With just the bulb as the base, Amaryllises that grow too tall are likely to tip over.Risks Of Melting Paraffin Wax and Steps to Reduce Risk
Melting paraffin wax on the stovetop requires caution, as it is highly flammable if overheated. If the wax reaches its flash point of approximately 390°F (199°C), it can ignite, creating a serious fire hazard. Additionally, hot wax can cause severe burns if spilled or splattered, and overheating it may produce smoke and fumes that can be harmful when inhaled. Always melt paraffin wax over low heat using a double boiler rather than placing it directly on a burner to minimize risks. This helps distribute heat evenly and prevents scorching. Use a candy or candle thermometer to monitor the temperature. Never leave melting wax unattended, as it can quickly overheat. Keep the wax away from gas burners, open flames, and high heat sources, and use an old or dedicated pot rather than good cookware, as wax can be difficult to clean. Never use water in the case of a wax fire, as it can cause the flames to spread. Instead, smother the fire with baking soda or a metal lid. Having a fire extinguisher nearby when working with flammable materials is always a good idea. Tried this? Love it? Let us know how it was!