Sourdough Starter Recipe
Make your own sourdough starter with this comprehensive, step-by-step guide. This recipe is designed to help both novice and experienced bakers develop a robust and lively starter from scratch, using simple ingredients like flour and water. Over the course of a week or more, you'll learn to cultivate a healthy community of wild yeast and beneficial bacteria, essential for baking delicious, tangy sourdough bread.
Equipment
- Scale
Ingredients
Day 1
- 100 grams whole wheat or rye flour
- 125 grams filtered tap or bottled spring water, warm (not hot)
Day 3 through 6
- 400 grams unbleached all-purpose flour, rye flour, whole wheat flour, or a mix, divided, 100 grams per day
- 460 grams filtered tap water or bottled spring water, divided, 115 grams per day, warm (not hot) Using water that is too hot can kill or ruin the starter.
Day 7 and going forward
- unbleached all-purpose flour, rye flour, whole wheat flour or a mix
- filtered tap water or bottled spring water
Instructions
Day 1
- Weigh your empty glass jar (in grams) and note the jar weight. I write it on my jar.
- In a glass jar add 100 grams flour and 125 grams of warm water and mix until combined.
- Cover the jar and let it sit for 24 hours in a warm spot (75°F+/24°C+). Don't cover the jar air-tight as you want gases to escape.
Day 2
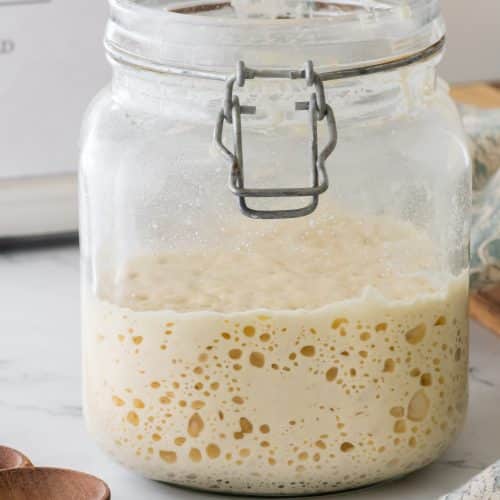
- No need to do anything on Day 2 but check on the starter. You should start to see some air bubbles forming.
Day 3
- Air bubbles should be present throughout and on top of the starter. If not then let it continue to rest for one more day.
- If air bubbles are present, remove all but 75 grams of the starter and discard. By knowing the weight of your jar, you'll remove enough so that the jar with the starter on the scale weighs the gram weight of the jar plus 75 grams or set your tare to zero and remove until only 75 grams are left.
- Time for the first feeding! Note that we are using all-purpose flour or an all-purpose blend from here on out.Add 100 grams of flour and 115 grams of warm water, mix, replace the lid, and set it back into a warm spot for 24 hours.
Days 4-6 (or up to day 13 if possible or needed)
- Repeat steps 2 and 3 from Day 3. Every 24 hours, remove all but 75 grams of the starter, discard it, and add back 100 grams of flour and 115 grams of water.
- If you can, stir the starter 2-3 times a day for about 1 minute to aerate it. The natural yeast loves oxygen and this will help the starter to double faster. This aeration is only needed to get the starter established You shouldn't need to stir once the starter is established after about 1- 2 weeks unless your starter seems to be getting sluggish.
Day 7 (or 14) and Going Forward - Starter Maintenance
- Feeding An Established StarterOnce your starter is established, if you plan to use it frequently, you must feed it with equal parts flour and water daily.Feeding takes less than 5 minutes a day and helps to keep your starter active and alive. This is done by removing a portion of the starter and discarding it, then adding flour and water equally. My Starter's Daily Feeding is this:I discard all but 10 grams of the starter Then I add 50 grams each of a 30% rye/70% all-purpose flour mix and 50 grams of water.Mix until combined and repeat daily if using frequently
Storing your starter
- If you plan on baking daily, you must discard and feed your starter daily. In this case you can leave your starter out at room temperature. The amount you use in your recipe can be your discard.
- If you don’t plan on using your starter for a while you can store it in the fridge between feedings. When you are ready to use it, allow your starter to sit until it's at room temperature, then discard and feed it until it becomes bubbly and active again. Depending on the length of time in the fridge (such as more than a week) you may have to discard and feed it twice a day until it becomes active again.
Nutrition
Serving: 1gCalories: 16kcalCarbohydrates: 3gProtein: 0.5gFat: 0.1gSaturated Fat: 0.01gPolyunsaturated Fat: 0.03gMonounsaturated Fat: 0.01gSodium: 0.4mgPotassium: 7mgFiber: 0.2gSugar: 0.01gVitamin A: 0.2IUCalcium: 1mgIron: 0.2mg
Well, what did you think?Please rate this recipe here! It helps other readers and also helps to support our site.