
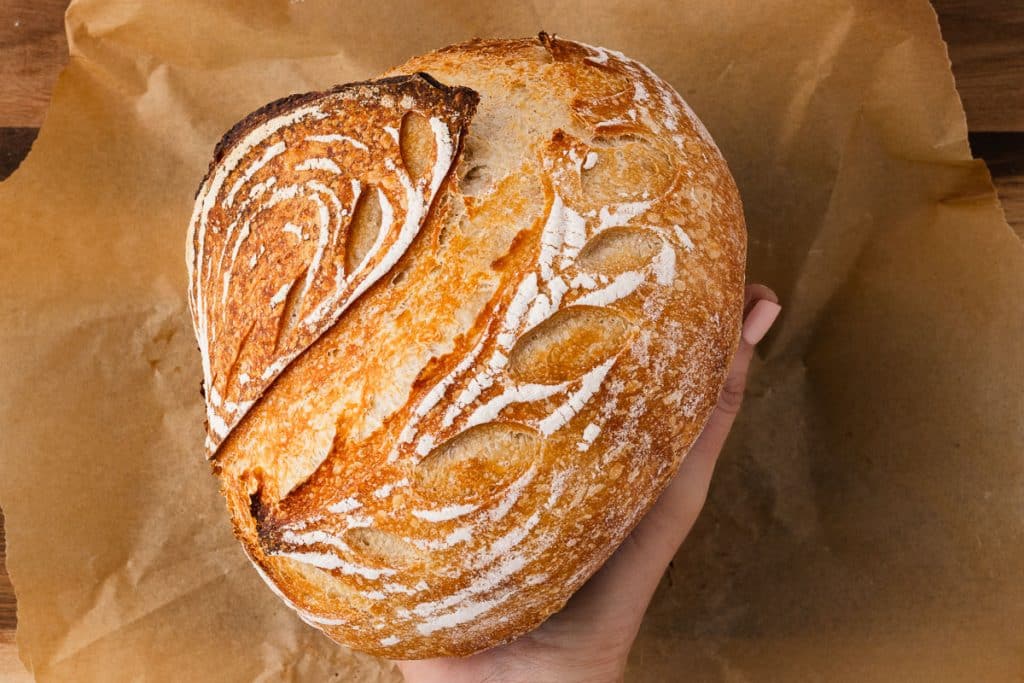
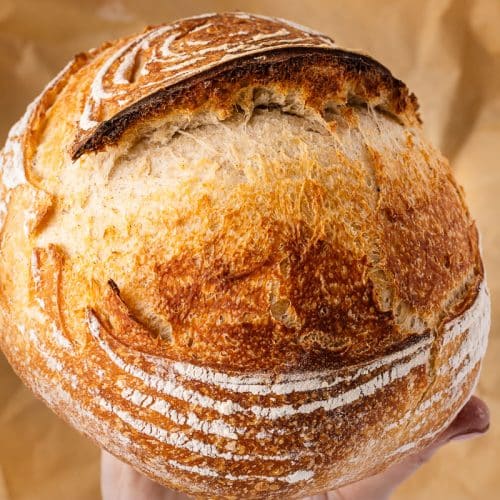
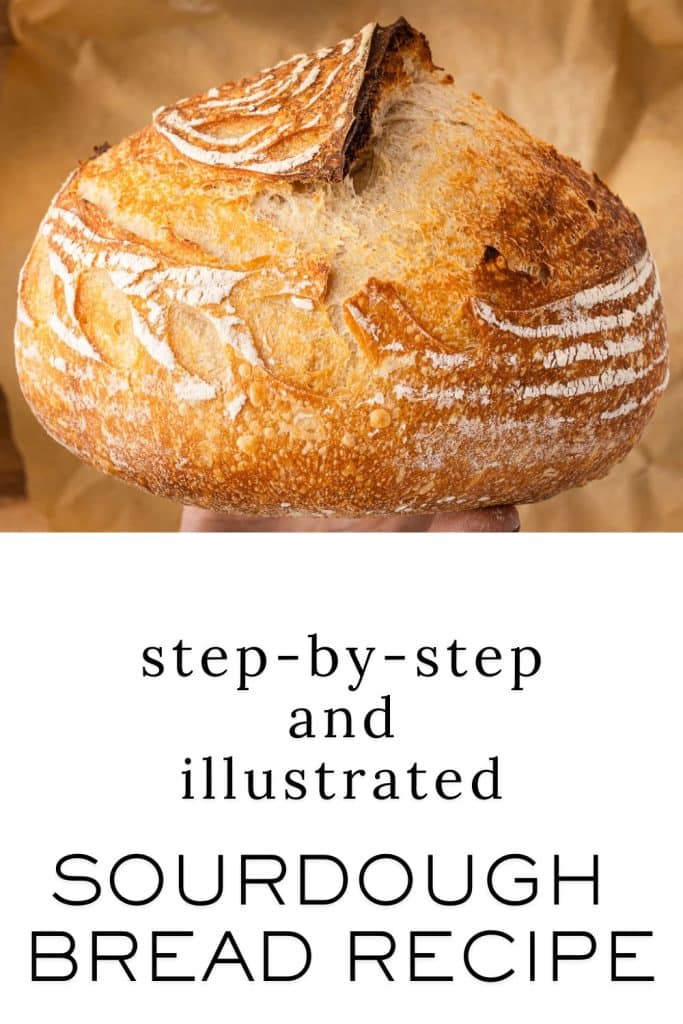
Easy Sourdough Bread Recipe


There’s something rewarding about baking your own sourdough bread. The process may seem intimidating at first, but once you get the hang of it, it becomes a rewarding ritual that fills your kitchen with warmth and the delicious aroma of freshly baked bread. This easy sourdough bread recipe for home bakers who want a straightforward method without complicated techniques. With just a few simple ingredients and a bit of patience, you’ll have a beautifully crusty loaf with a soft, tangy interior.
This recipe follows a classic approach, allowing the natural fermentation process to develop deep flavors and a perfect texture. From preparing the levain to baking in a Dutch oven, each step in this Easy Sourdough Bread Recipe is simple yet essential to achieving that signature sourdough crust and chewy crumb. Whether you’re new to sourdough baking or looking for a reliable go-to recipe, this guide will walk you through each step for success. Plus, I’ll share some helpful tips to ensure your bread turns out just right every time!
Just a heads up…this is a lengthy article. You’re probably wondering how an EASY Sourdough Bread Dough recipe can need so much information! But, I’ve shown the process step-by-step for making and baking this Easy Sourdough Bread Recipe. I’ve included some common terms you’ll hear when baking sourdough bread and the equipment needed. I also share tips for success and commonly asked questions and answers.
The bottom line is that I tried to include EVERYTHING I WISH I HAD KNOWN WHEN I STARTED BAKING SOURDOUGH BREAD! Don’t get overwhelmed! Check out the table of contents below to help you navigate. The printable recipe doesn’t include all the photos, but do pop back here and look at the pictures as you go along.
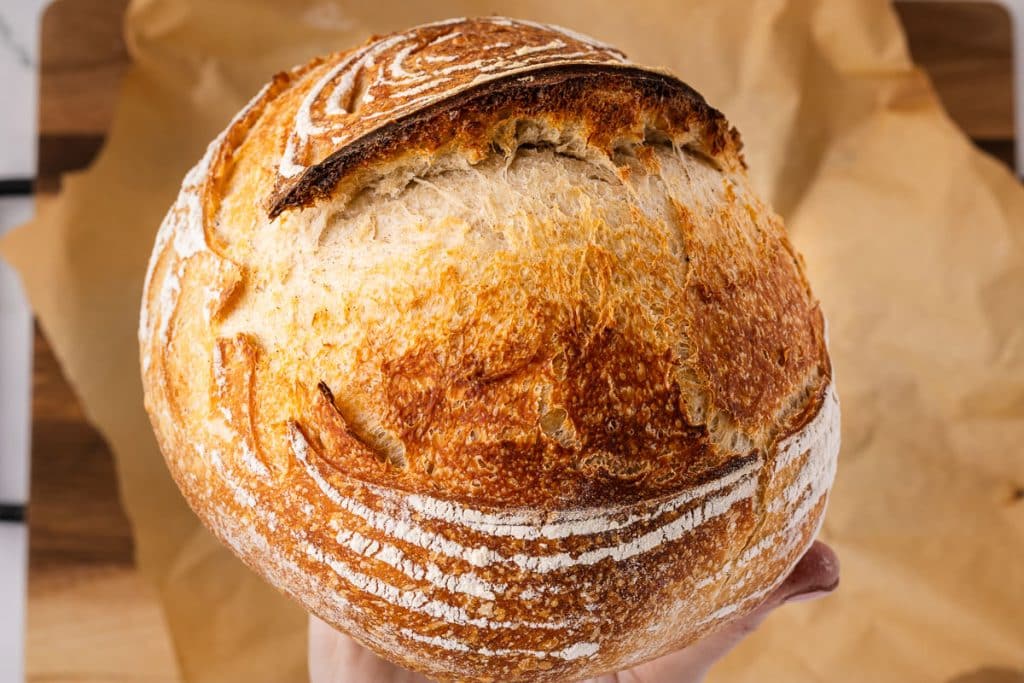
Table of Contents
Why You’ll Love This Easy Sourdough Bread Recipe
This easy sourdough bread recipe is simple and reliable. It delivers a bakery-quality loaf right from your kitchen. With its crisp, golden crust and chewy, tangy interior, it’s everything you love about artisan bread—without the expensive price tag.
The natural fermentation process breaks down gluten and phytic acid, making it gentler on the stomach compared to conventional bread. Unlike commercial bread, sourdough bread has a slower glucose release, which helps regulate blood sugar levels. The fermentation process enhances the bioavailability of minerals like iron, zinc, and magnesium, while the beneficial bacteria from the starter help promote healthy gut flora.
This specific Sourdough bread recipe uses easily found all-purpose flour instead of bread flour. With standard flour, the average cost of a loaf of sourdough bread baked at home is $1 to $2, compared to store- or bakery-bought bread, which averages $5 – $8 per loaf.
Plus, the hands-on time is minimal, making it perfect for beginners and experienced bakers.
Terms to Know When Baking Sourdough Bread
Understanding key sourdough baking terms will help you navigate the process more confidently. Here are some important definitions:
Starter & Levain
- Sourdough Starter – A natural culture of wild yeast and lactic acid bacteria, maintained with regular feedings of flour and water. This culture is what makes sourdough rise instead of commercial yeast. If you don’t already have one, here is our recipe, instructions for making your sourdough starter, and tips for feeding it and keeping it healthy.
- Levain—A portion of the sourdough starter is mixed with fresh flour and water and allowed to ferment before being added to the dough. It’s essentially a portion of dough that is prepared before mixing the final bread dough and is used to help the bread rise.
- Bread Protein – While this Sourdough Bread recipe doesn’t require bread flour, you will get the best results with 11.5% protein all-purpose flour, which makes it strong enough to develop a good structure while yielding a slightly tender crumb. Protein in flour is crucial because it directly affects gluten development, which determines the bread’s structure, texture, and chewiness. Not all brands of flour list the protein percentage on the bag, but King Arthur Bread does, and it is 11.5%. It is my go-to all-purpose flour brand for that reason.
Dough Development
- Autolyse is the process of mixing flour and water and letting it sit for 30 minutes to one hour. It happens before you add salt and levain, helps develop gluten, and improves dough texture.
- Gluten Development – The process of strengthening the dough’s protein structure, which traps gas and gives the bread its shape and texture. The stretches and folds we perform in this recipe help strengthen the gluten.
Fermentation & Proofing
- Bulk Fermentation – The first and longest rise, where the dough ferments and develops flavor. Stretch and folds happen at the beginning of this stage to build strength.
- Stretch and Fold is a technique for strengthening gluten without kneading. During bulk fermentation, the dough is gently stretched and folded over itself at intervals.
- Cold Proofing (Retardation) – Allowing the dough to ferment slowly in the refrigerator for enhanced flavor and better oven spring.
Shaping & Baking
- Preshaping – Gently forming the dough into a loose round shape before the final shaping which helps with structure.
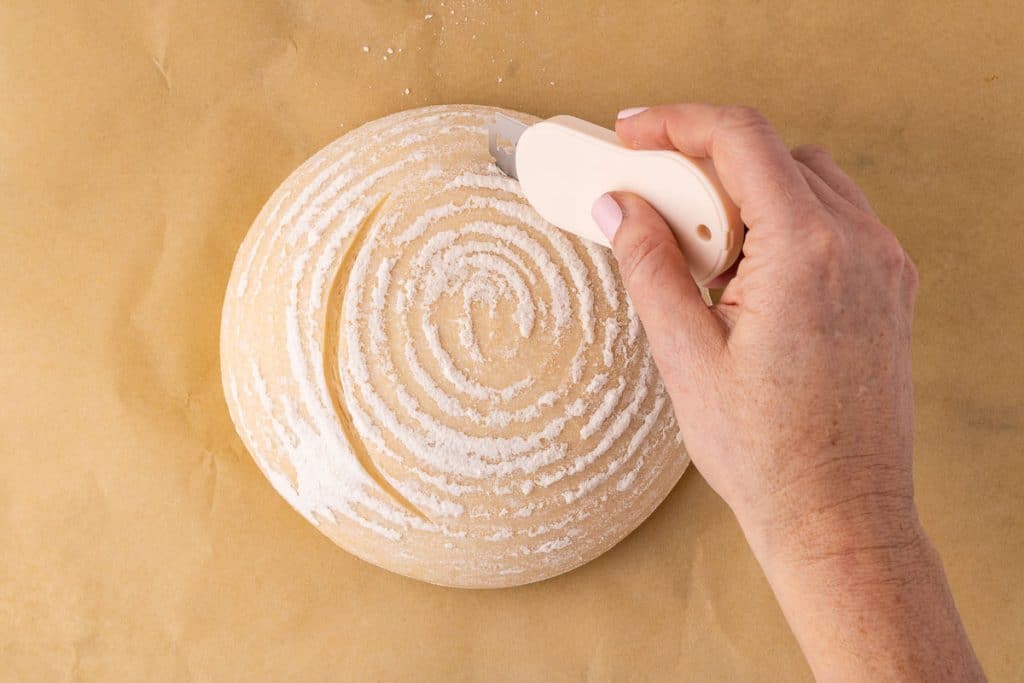
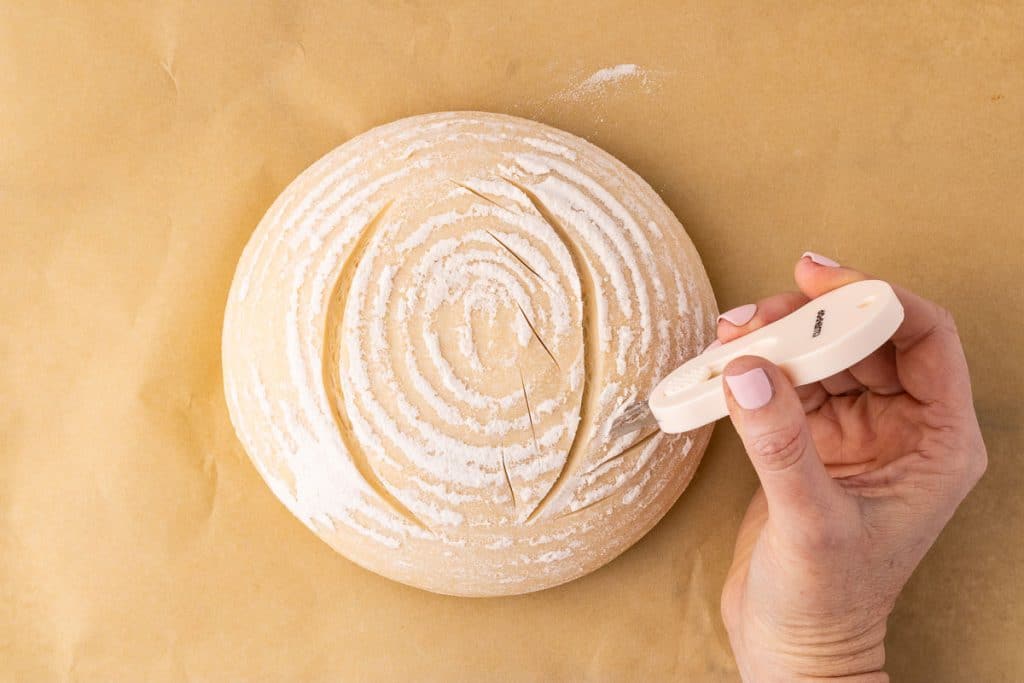
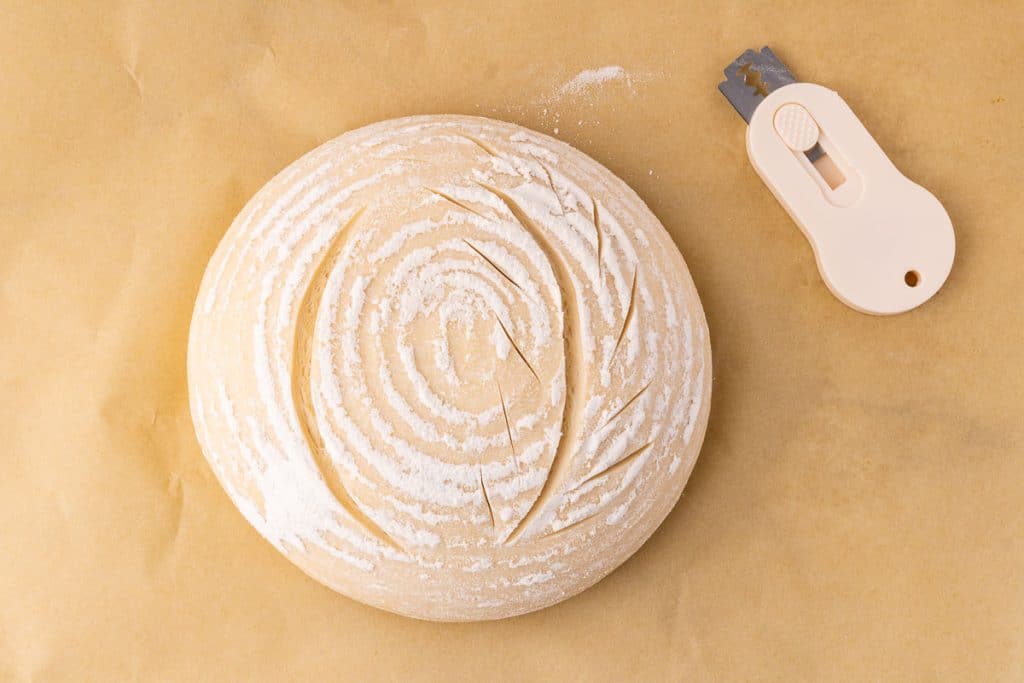
- Scoring: Slashing the dough before baking with a sharp blade (lame) allows it to expand properly in the oven.
- A banneton is a round or oval-proofing basket that supports and shapes sourdough during its final rise. It’s typically made of coiled rattan, wicker, or cane, and often lined with linen.
- Boule – French for “ball,” a boule is a round, dome-shaped loaf of bread with a crisp crust and a soft, airy interior. It is one of the most traditional shapes for artisan bread, including sourdough.
- Oven Spring – The rapid rise of dough in the oven due to heat-activated yeast and steam before the crust sets.
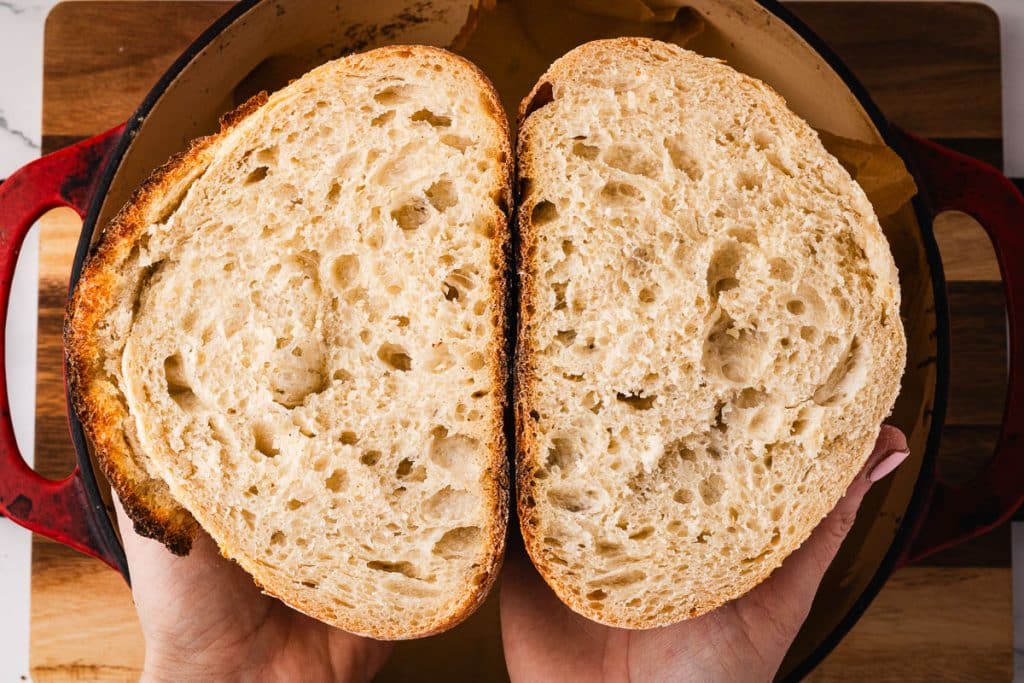
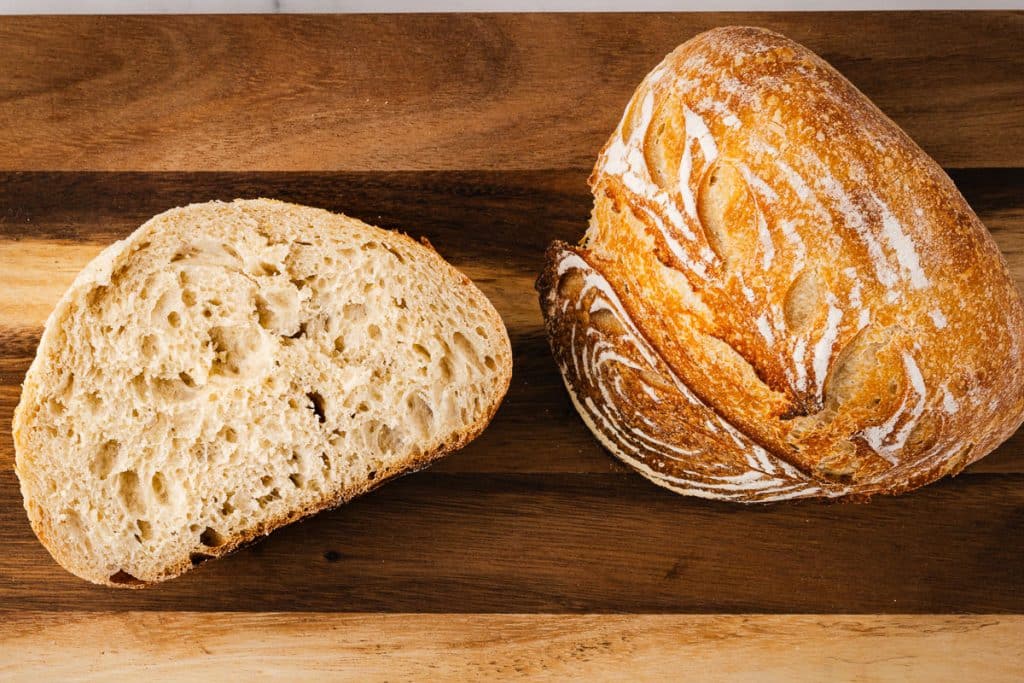
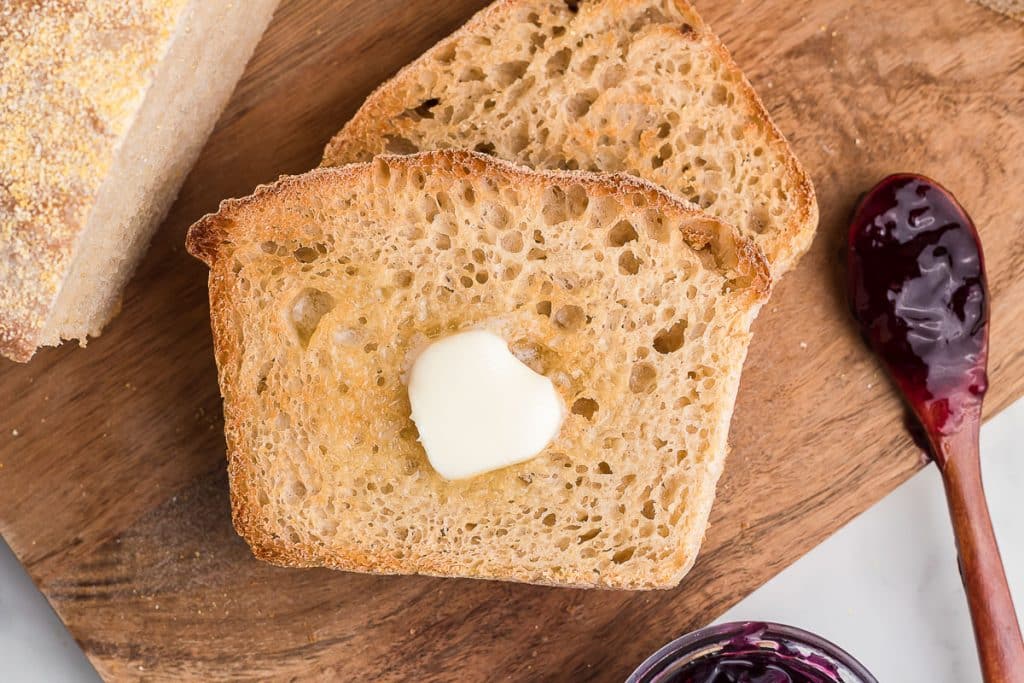
- Crumb – The interior texture of the bread. An “open crumb” means large, irregular holes, while a “tight crumb” is more uniform.
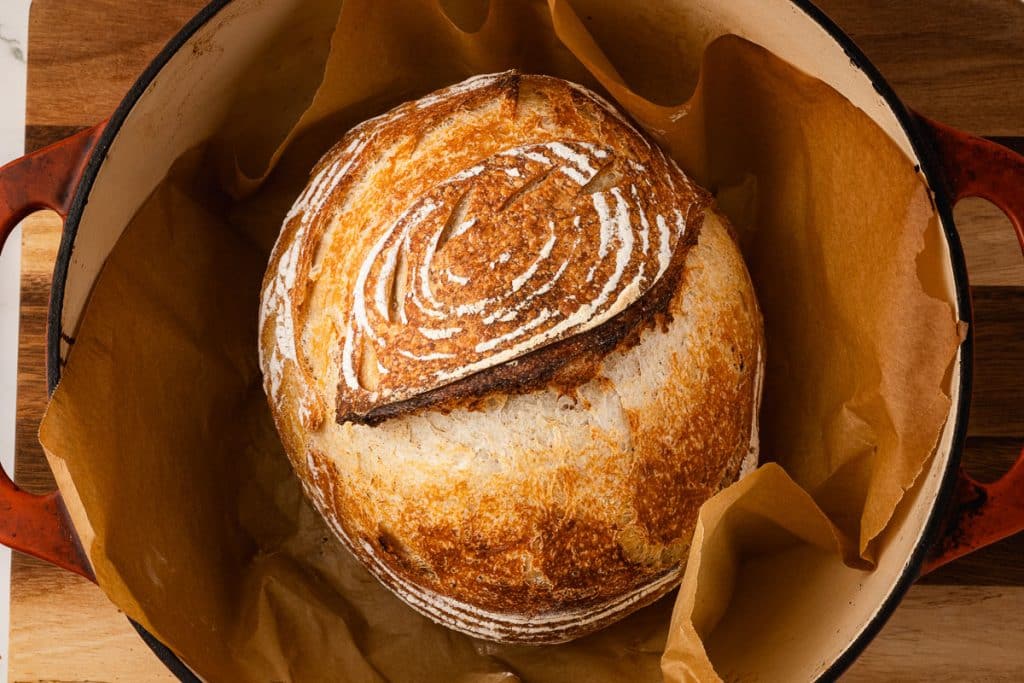
- Dutch Oven Baking – A method of baking sourdough inside a preheated Dutch oven to trap steam, resulting in a crispy crust and better oven spring.
The Heart of Sourdough: Understanding the Starter
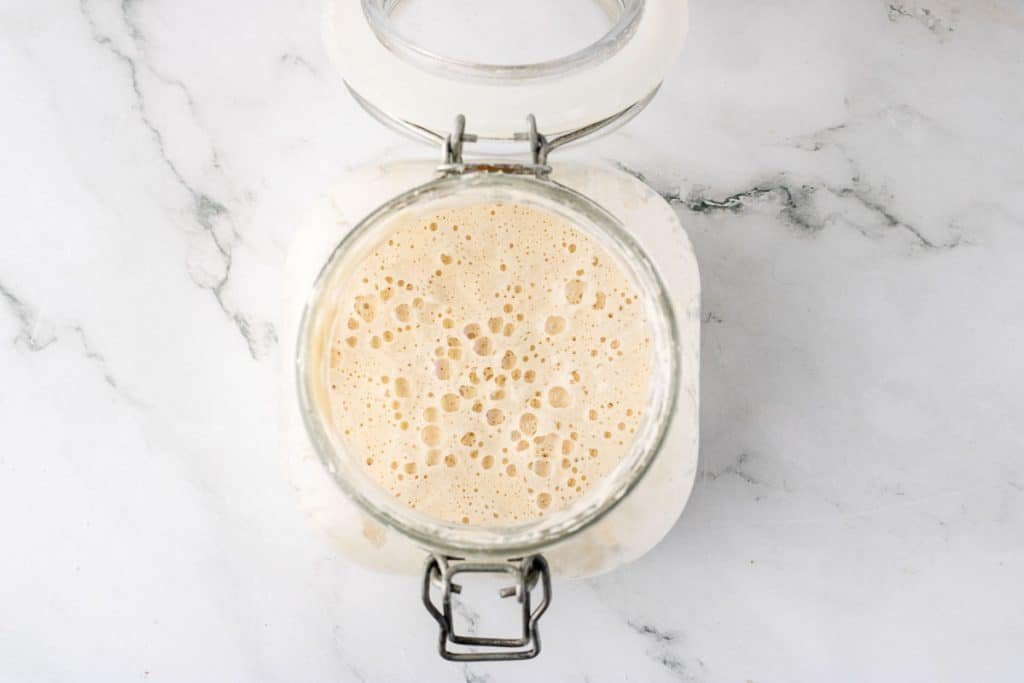
A sourdough starter is a natural leavening agent made by fermenting flour and water, capturing wild yeast and beneficial bacteria from the environment. Unlike commercial yeast, a sourdough starter provides a natural way to make bread rise while developing complex flavors and improving digestibility. It’s the heart of sourdough baking and creates the characteristic tangy taste and open crumb texture.
Regular feedings of flour and water are required to maintain its strength and fermentation activity and to keep it active and healthy. If you keep your starter at room temperature, it will be actively fermenting and needs daily feeding. To do this, discard about half of the starter to prevent it from growing too large and becoming unbalanced. Then, feed it by adding equal parts flour and water by weight (e.g., 50g starter + 50g water + 50g flour). Mix well and let it sit at room temperature until it becomes bubbly and doubles in size.
This is only a brief overview of sourdough starters. For a more complete article and a recipe for making and maintaining your own starter, check out our Sourdough Starter Recipe.
Make Sure Your Starter is Ready When You Are!
To ensure your starter is at peak activity when you mix your dough, feed it 4-12 hours before baking, depending on your environment and feeding schedule. I know that is a long time frame, but the goal is to use the starter when it has doubled in size, is bubbly, and has a slightly domed top before it begins to collapse.
If you keep your starter at room temperature, feed it about 4-6 hours before mixing your dough. In warmer environments above 75°F (24°C), it may peak in 3-4 hours, while in cooler environments, it might take 6-8 hours to reach full activity. There are no hard and fast rules; you just need to know your environment and starter.
If your starter is stored in the fridge, take it out the day before baking. Discard a portion and feed it once, let it rise, discard, and then feed it again in the morning to ensure it’s fully active. It should be ready to use once it has risen for 4-6 hours after the final feeding.
For an overnight fermentation approach, feed your starter before bed and use it first thing in the morning when it has peaked. This works well in cooler environments where the starter rises more slowly.
You’ll know your starter is ready when it has doubled in size, is filled with bubbles, has a slightly domed top, and passes the float test (a spoonful should float in water). It should also have a mildly tangy aroma—neither too acidic nor unpleasant. Timing your feedings properly ensures your starter has the best leavening power for baking delicious sourdough bread.
If you store your starter in the fridge because you don’t bake daily, it only needs to be fed about once a week. When feeding, remove it from the refrigerator, discard half, and refresh it with equal parts flour and water. Let it sit at room temperature for a few hours until it shows bubbles before returning to the fridge. When you’re ready to bake, remove it a day before, feed it, and allow it to become bubbly and active before using it in your dough. Proper feeding ensures a strong, well-balanced starter that helps your sourdough bread rise and develop great flavor.
Hydration
A term you will hear relative to a sourdough starter is hydration. Hydration refers to the ratio of water to flour by weight in a sourdough starter. It determines the consistency of the starter and affects its fermentation speed, activity, and how it interacts with your dough. The most common starter hydration level is 100% hydration, meaning equal parts flour and water by weight (e.g., 50g water and 50g flour). Our easy sourdough bread recipe uses a 100% starter.
Equipment Needed to Bake Sourdough Bread at Home
Some of these links may be Amazon affiliate links and I may earn a small commission from the sale of these products to help defray the costs of operating this site, but the price you are charged is not affected. You can see my full disclosure policy here.
I always hesitate to buy tools and equipment with single, specific purposes. You will need some ‘general’ multi-use tools and a few sourdough-specific items. I’ve noted the items are MUST HAVES, other than bowls and an oven, which goes without saying.
- Bowl Scraper – Useful for handling sticky dough, but you can shape it with your hands if needed.
- Digital Scale—This is essential for precise measurements, as sourdough baking relies on weight rather than volume. It’s a MUST-HAVE.
- Dough Whisk or wooden spoon—These help incorporate ingredients without overmixing, though I tend to use my hands for most mixing.
- Rice Flour – to prevent sticking to the banneton during colding proofing. Honestly, there really isn’t a great ‘other option’ for this. Rice flour is unique in its ability to prevent the dough from sticking because it doesn’t absorb moisture like other grain flour. And, after all the work you’ve put into your dough up to that point, you’d be heartbroken if it stuck to the banneton. For that reason alone, rice flour is a MUST-HAVE.
- Banneton (Proofing Basket) – Supports the dough during the final proofing stage and helps maintain its shape. A bowl lined with a floured tea towel is an alternative, although it prevents airflow. The natural rattan material of a banneton allows air to circulate around the dough, reducing excess moisture on the surface. This helps form a thin, dry skin, which makes scoring easier and improves crust development. A bowl with a cloth traps more moisture, which can make the dough stick. Once again, after all the effort you’ve put into your dough, bannetons are relatively inexpensive. While not a must-have, it is a HIGHLY RECOMMENDED. There are several ‘kits’ on Amazon that include the banneton, the lame, and the bowl scraper, among other things. Finding an option for at least those three is nice.
- Dutch Oven – Traps steam during baking, creating a crispy crust and excellent oven spring. A lidded cast iron Dutch oven is ideal, and make sure that all parts of it (i.e., the knob) are heat safe to 450°F (232°F). I have Le Creuset Dutch Ovens, but I prefer to use my plain Lodge 5-qt cast iron Dutch Ovens to bake my bread…I don’t fret about them being in the heat for extended periods. I know some folks bake sourdough boules on baking stones or steel, but I haven’t. If you go the flat stone or steel route, you need to provide a steam source in your oven. You MUST HAVE one or the other, and I HIGHLY RECOMMEND a cast iron Dutch Oven.
- Parchment Paper or Silicone Sling—This makes transferring the dough to the VERY HOT Dutch Oven easier and safer and prevents sticking. While parchment paper is fine, I recommend the slings. Before I went the sling route, I had experienced parchment tearing when removing the bread from the Dutch oven. Not only are the slings the perfect size and inexpensive, but they are more economical and environmentally friendly in the long run, as you will not be able to reuse the parchment paper. Whatever route you choose, this is a MUST HAVE.
- Razor Blade or Sharp Knife (Lame)—This tool scores the dough before baking, allowing controlled expansion in the oven. It is not a necessity, but it is nice to have. You could also use a knife with a sharp, thin blade.
- Instant-Read Thermometer – Helps check if the bread is fully baked (internal temp should be 200-210°F).
- Cooling Rack – Allows air circulation around the bread after baking to prevent a soggy crust.
- High-Heat Oven Mitts—Just about any Sourdough Bread recipe that is baked in a lidded Dutch oven will require you to reach in and remove the lid midway through. The lid will have been in the oven for a good hour at 450°F, so it will be very hot. If that makes you anxious, I recommend these gloves. My husband bought them for me when I first started baking Sourdough Bread, and they have kept my hands and fingers burn-free.
Tips for Success with this Easy Sourdough Bread Recipe!
- Maintain a Strong Starter
- Feed your starter regularly to keep it active and bubbly.
- Use it at peak activity—when it has doubled and is full of bubbles.
- Use a Digital Scale
- Precision is key in sourdough baking. Weighing ingredients ensures consistent hydration and fermentation.
- Control Fermentation Temperature
- Bulk fermentation works best at 75-80°F (24-27°C).
- Fermentation will take longer in a cooler environment; in a warmer environment, it will speed up.
- Give Your Dough Enough Time
- Rushing bulk fermentation leads to dense bread. Let the dough rise 30-50% in volume, not necessarily double.
- Cold-proofing in the fridge for 12-48 hours enhances flavor and makes shaping easier.
- Handle the Dough Gently
- Overhandling or over-kneading can deflate air pockets.
- Stretch and folds build gluten without overworking the dough.
- Hydration Makes a Big Difference
- If you’re a beginner, start with lower hydration (65-70%) for easier shaping.
- Score Your Loaf Properly
- Use a sharp blade or lame to score at a 30-45° angle.
- A deep main slash (¼-½ inch) allows expansion, while shallow decorative cuts add design.
- Bake in a Preheated Dutch Oven
- A lidded Dutch oven traps steam, creating a crisp crust and good oven spring.
- Preheat the oven with the Dutch oven in it for at least 30 minutes at 450°F (232°C) before baking.
- Let Your Bread Cool Before Slicing
- Cutting too soon releases steam, making the crumb gummy.
- I know it is hard, but to set the texture properly, try waiting at least 1 hour before slicing.
- Practice Patience & Experiment
- Each bake teaches something new about hydration, fermentation, and shaping.
- Keep notes on what works best in your kitchen for better consistency.
Step-by-Step Instructions with a Suggested Schedule
This suggested schedule for this Easy Sourdough Bread Recipe assumes you want to bake your bread on Sunday. It is a flexible sample schedule that you can adjust to suit your lifestyle, but it gives you a sense of timing.
1. Make Sure Your Starter is Active (feed it earlier in the day on Friday)
- Feed your starter with a 1:1:1 or 1:2:2 ratio, and keep it in a warm place so that it is at its peak around 7 p.m. that evening.
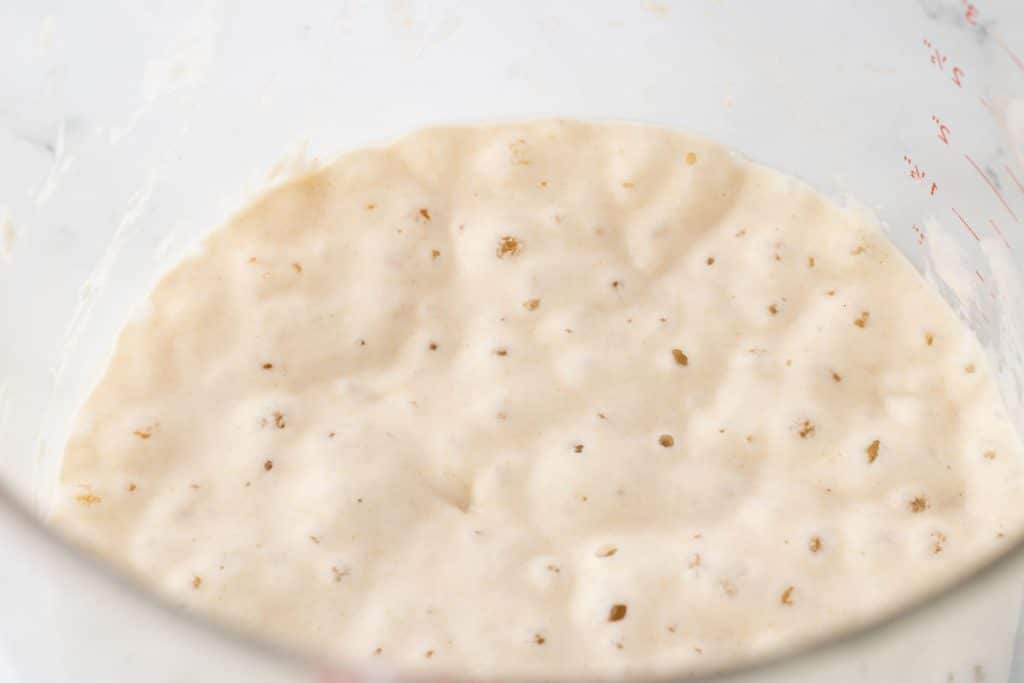
2. Prepare the Levain (7 p.m. Friday)
- Mix 50g white flour, 50g water, and 10g active sourdough starter in a small bowl.
- Stir well until thoroughly combined.
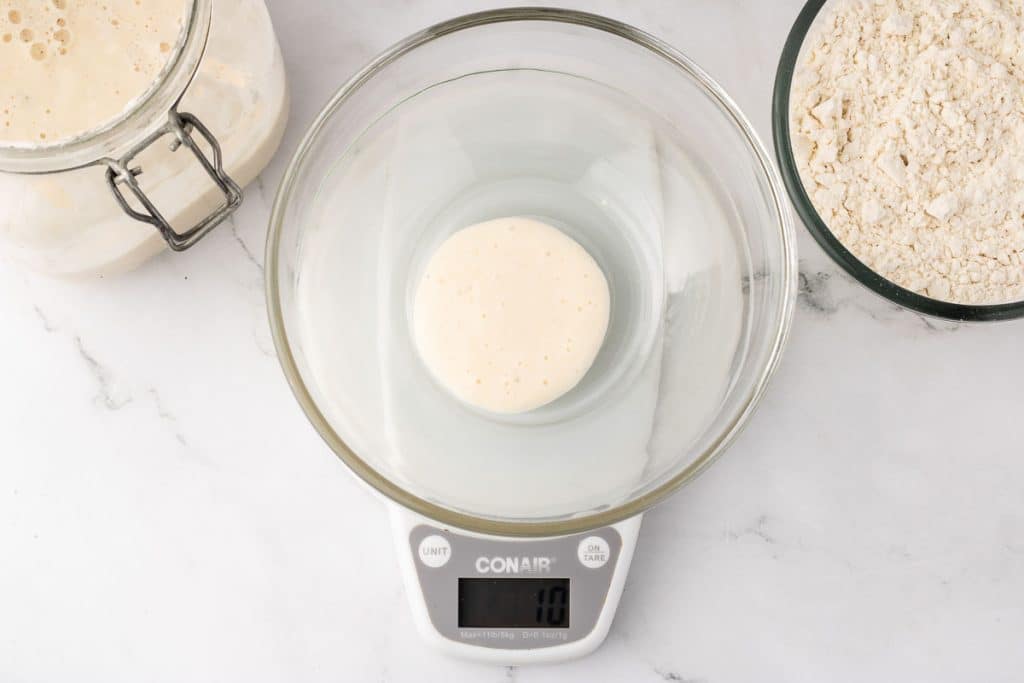
- Cover loosely and let it sit at room temperature for 12 hours until bubbly and active.
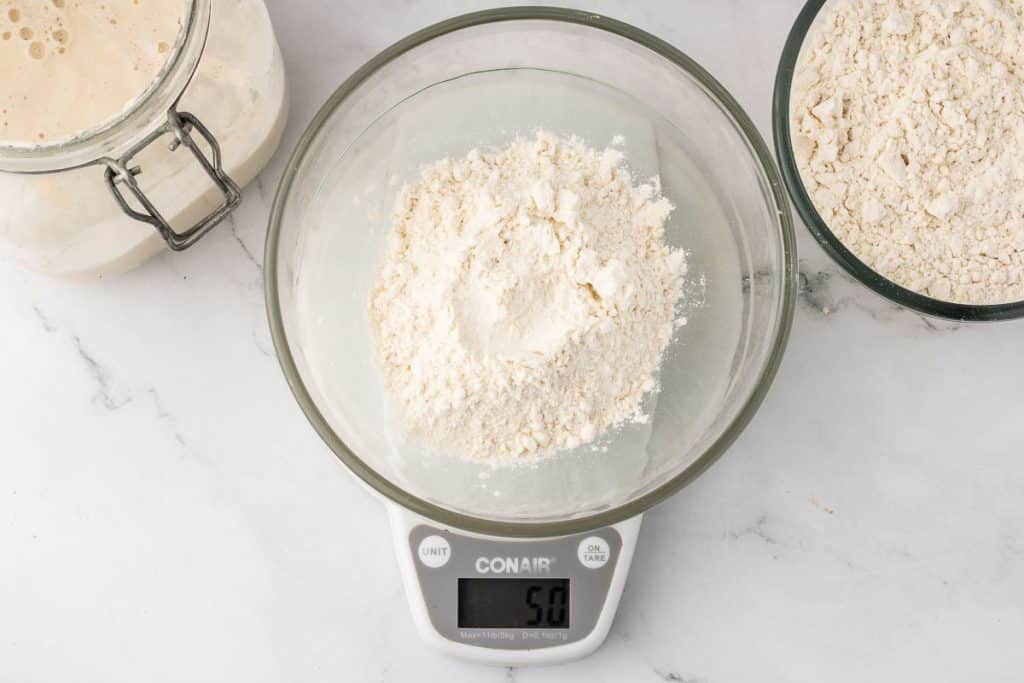
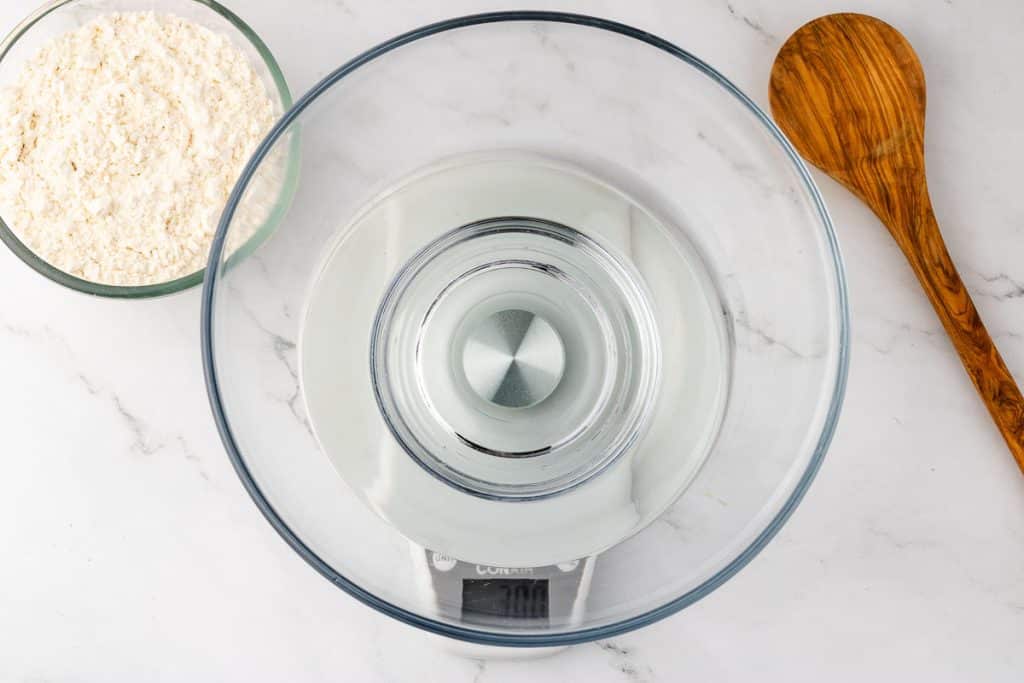
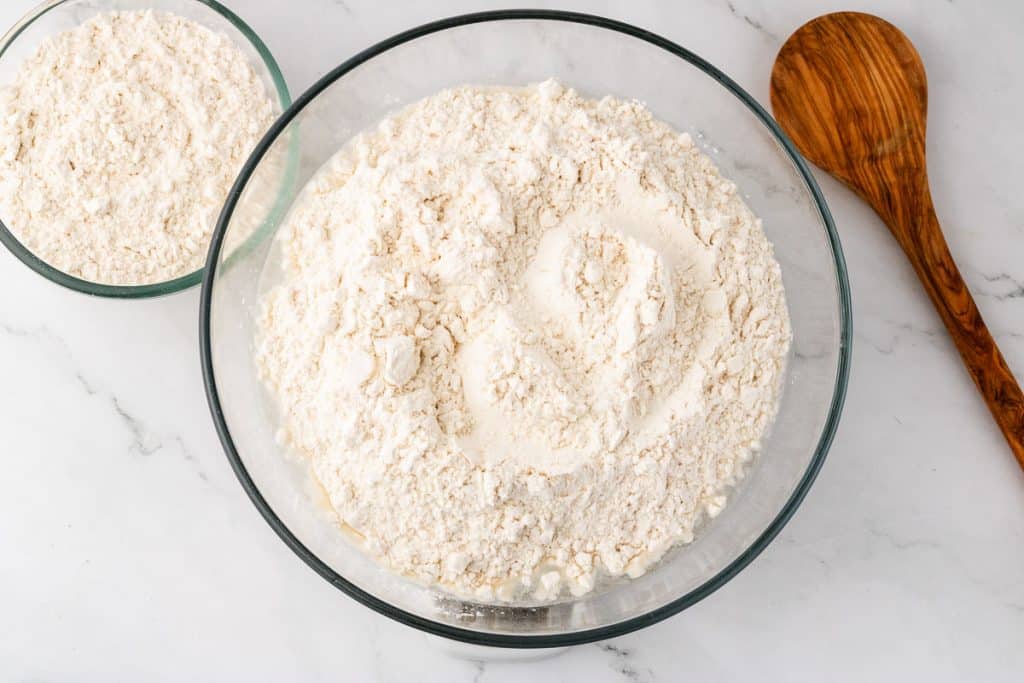
3. Autolyse the Dough (Saturday morning, around 6:30 a.m., 30 minutes before levain is ready)
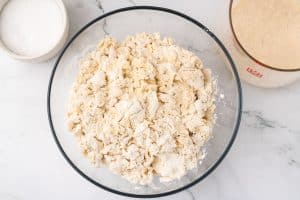
- Combine 500g white flour and 300g water in a large mixing bowl.
- Mix until just combined; the dough will be rough and shaggy.
- Cover and let it rest for 30 minutes to allow the flour to hydrate.

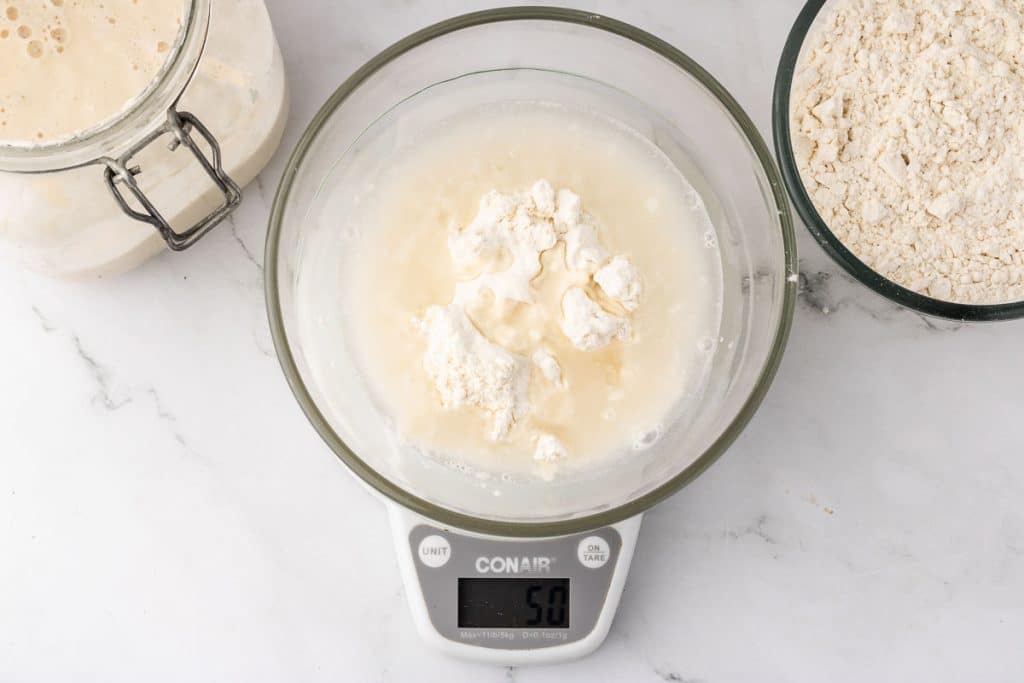
4. Mix the Dough (7 a.m. Saturday morning)
- Add 15g water, 10g salt, and the ripe levain to the autolyse.
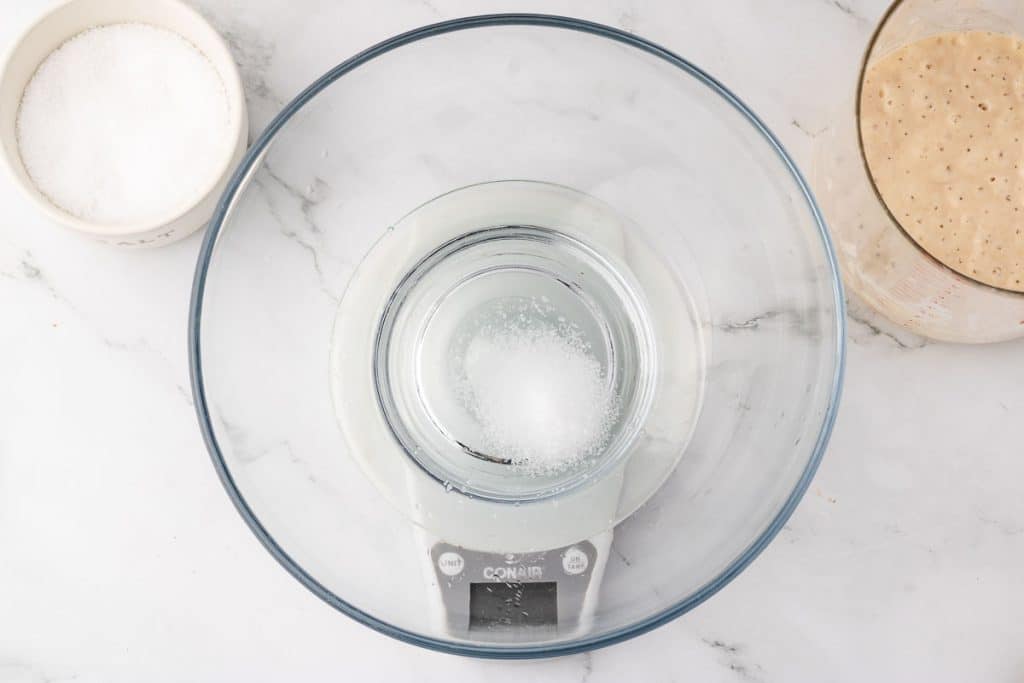
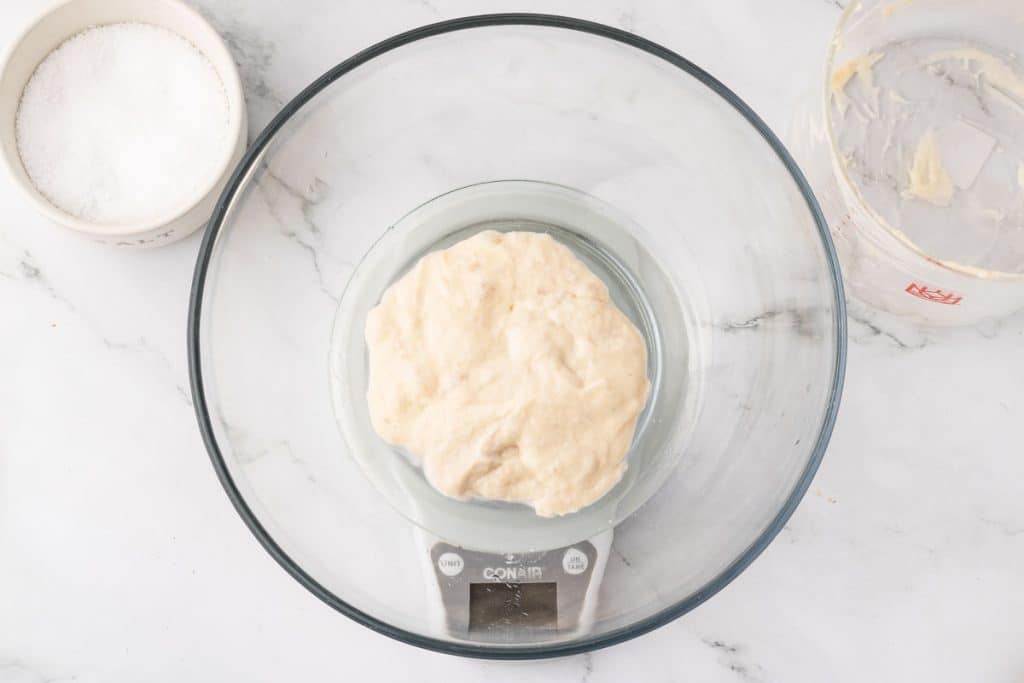
- Using wet hands, squeeze and mix until everything is evenly incorporated.
- Continue mixing until the dough forms a sticky but firm mass.
- If the dough feels too dry, add 15g of water and continue mixing.
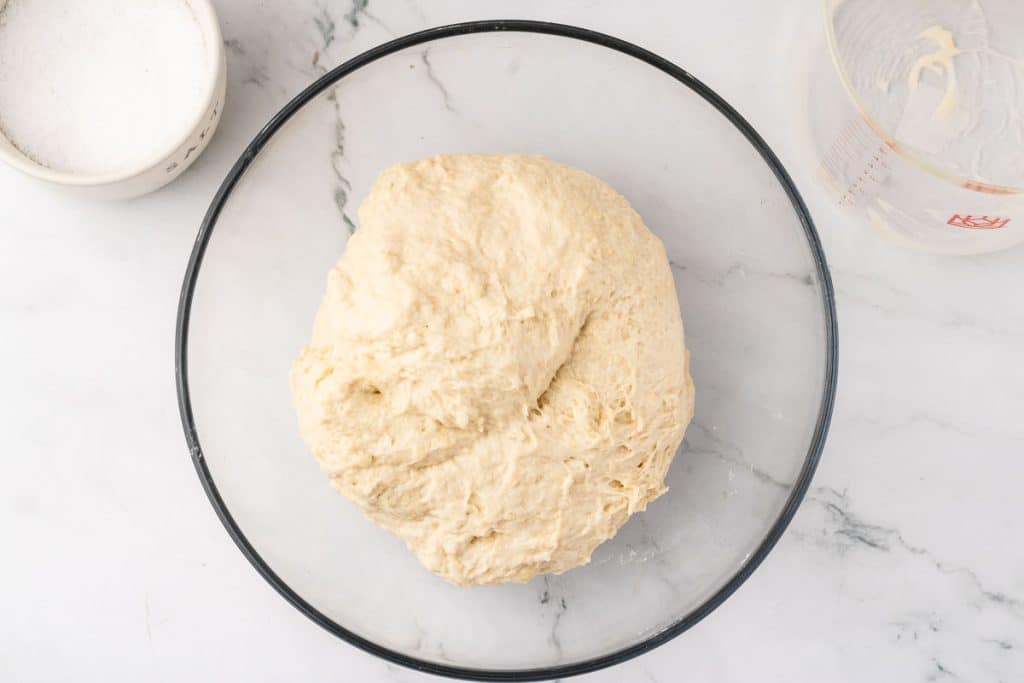
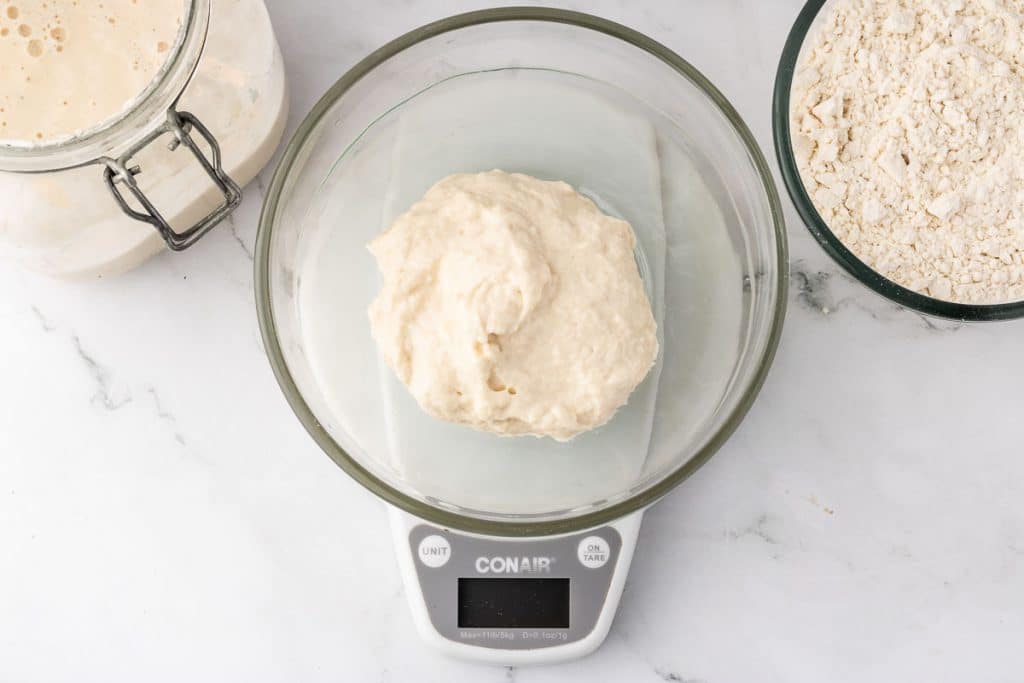
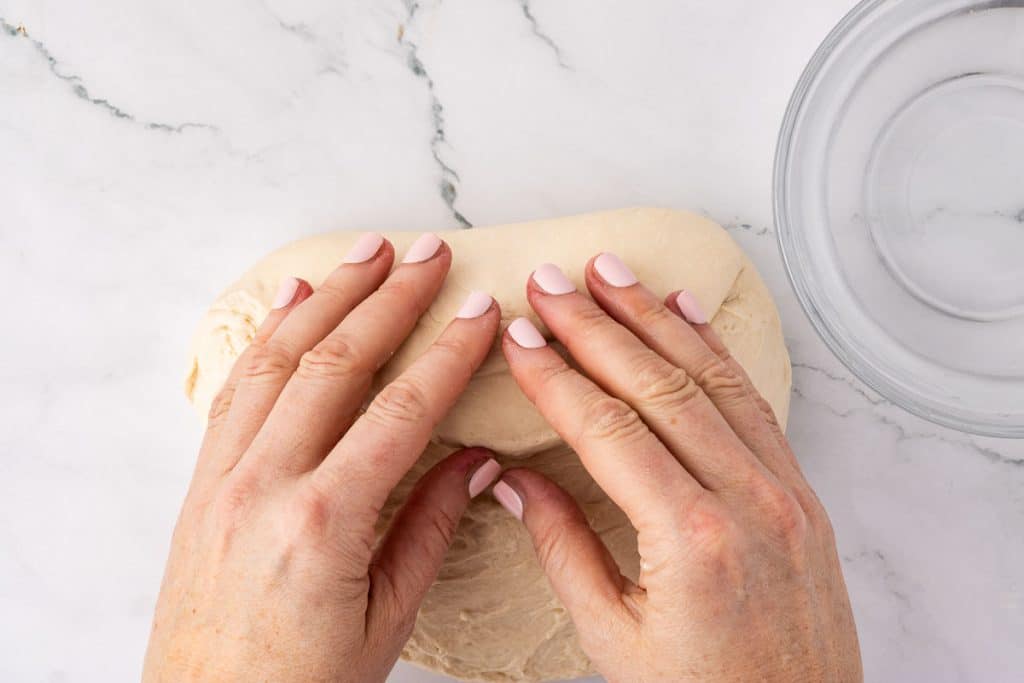
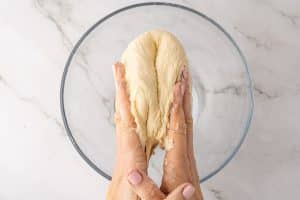
5. Stretch + Fold (4-6 minutes total)
- Perform a series of stretches and folds by taking the dough into your hands and folding it in half. Then rotate the dough 90 degrees, stretch it, and fold it half again.
- Continue rotating, stretching, and folding the dough for 4-6 minutes until it strengthens. In the beginning, the dough will feel slack and sticky. As you progress, it will offer more resistance when you stretch it, meaning the gluten structure is developing.
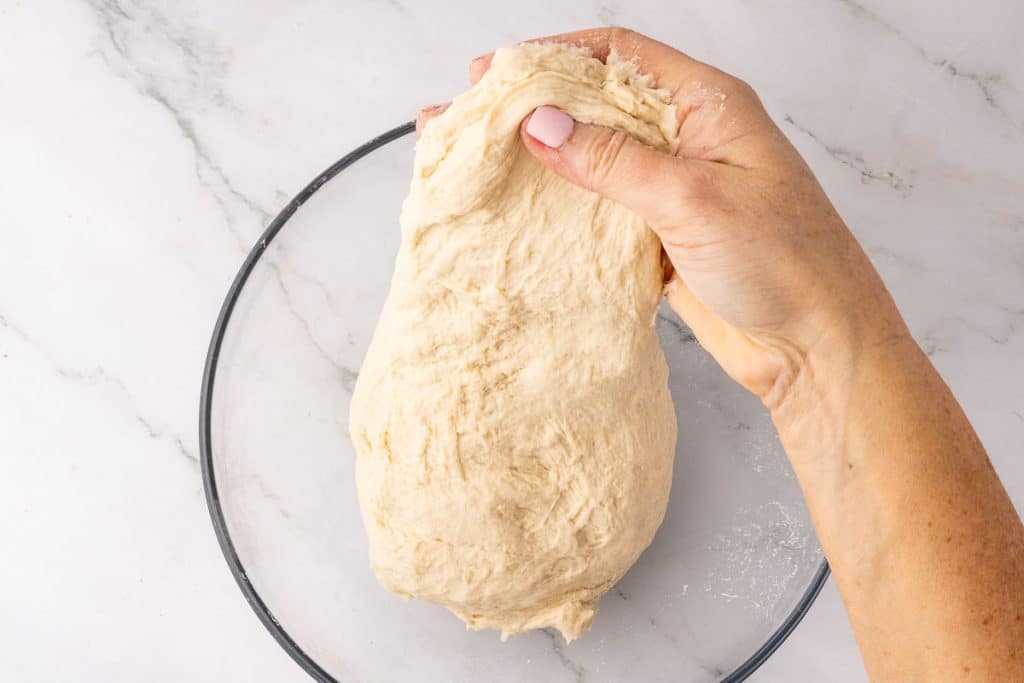
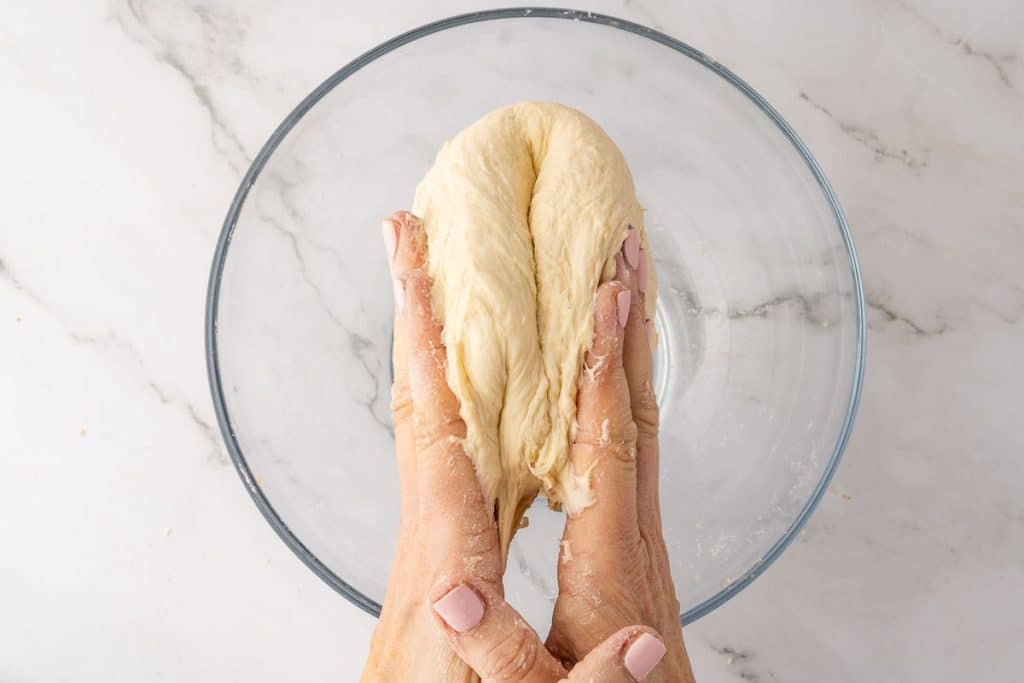
- Put the dough in a bowl, cover it, and let it sit on your counter for 30 minutes.
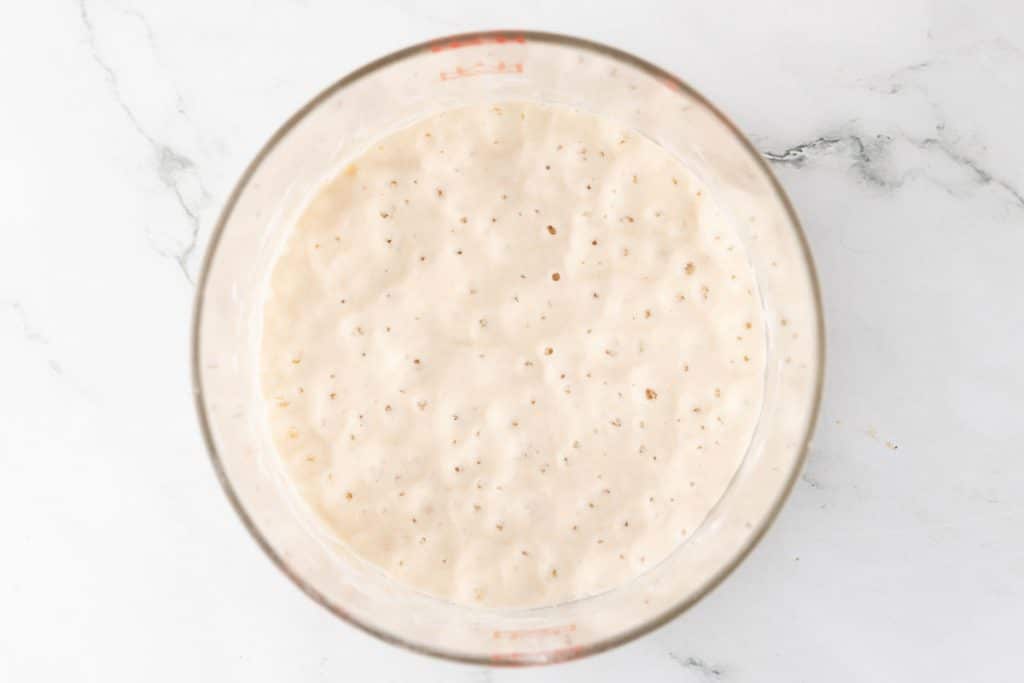
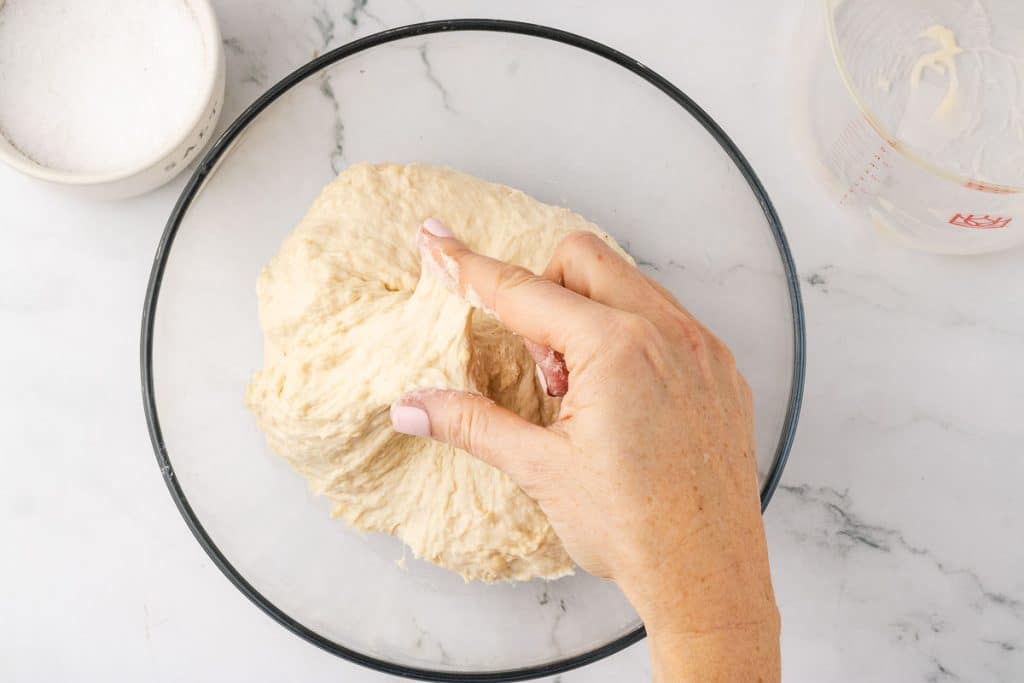
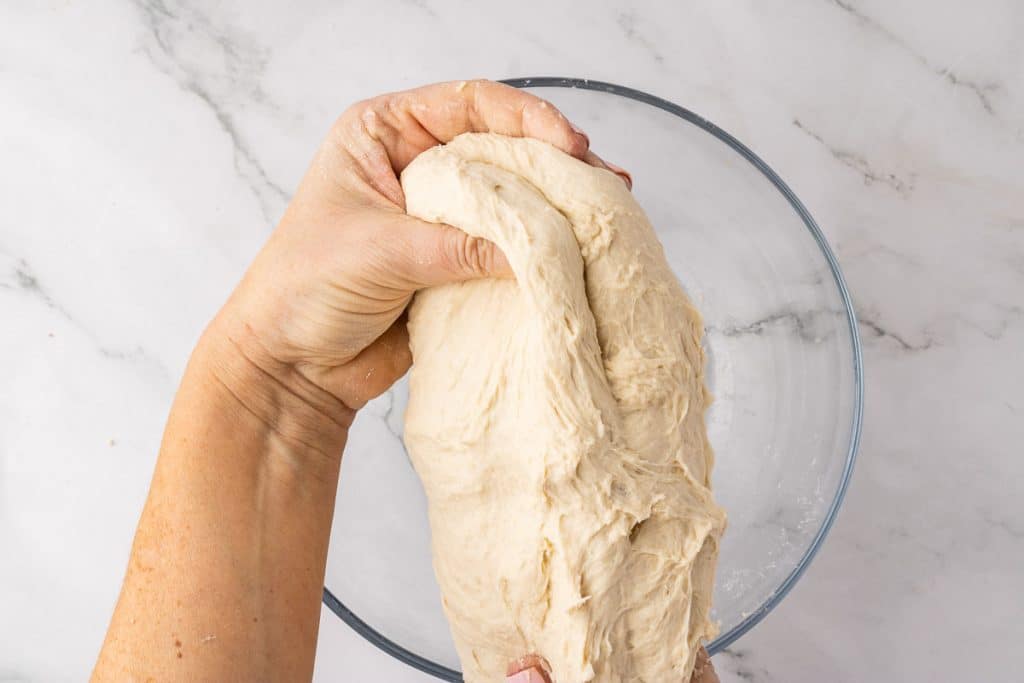
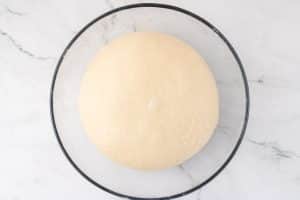
6. Bulk Fermentation and Stretch + Fold (4 hours total, from 9 a.m. until 1:30-ish p.m.)
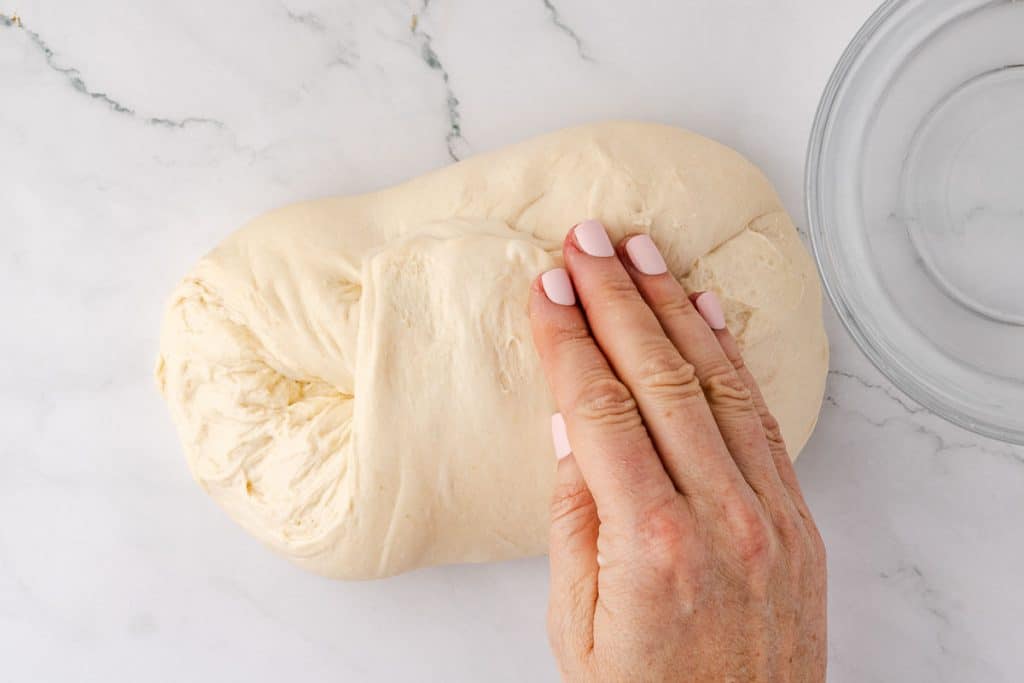
- After 30 minutes, do another set of stretches and folds, but once on each 90° rotation, not for 4-6 minutes as you did in the previous step. Repeat these stretches and folds two to three more times, with 30 minutes between each. After the third Stretch and Fold, you can stop if the dough has more of a domed appearance and is harder to stretch. If it is still a little slack, wait 30 minutes and do one more set of stretches and folds.
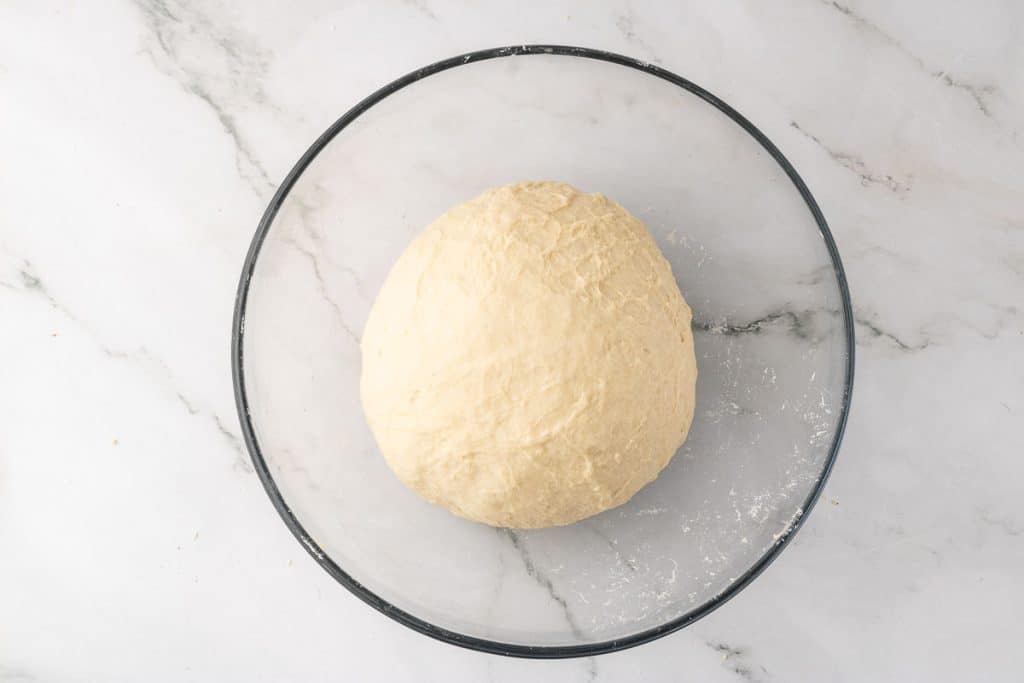
After the first set of stretches and folds for 4-6 minutes. (above)
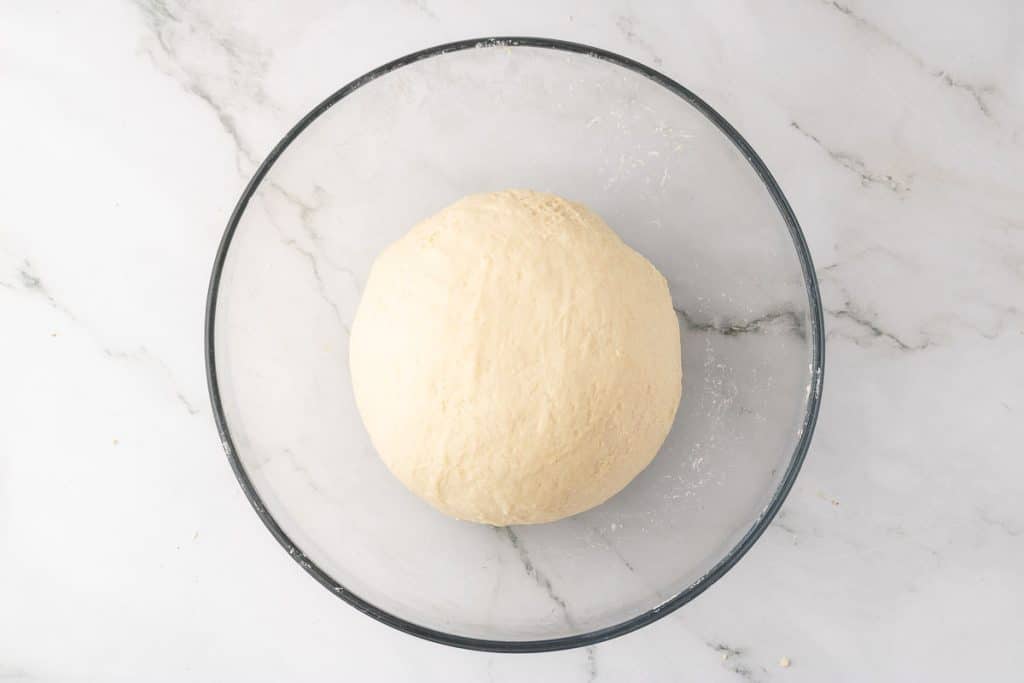
After the second set of stretches and folds, 30 minutes after the first set. Notice the dough is becoming smoother and less shaggy.
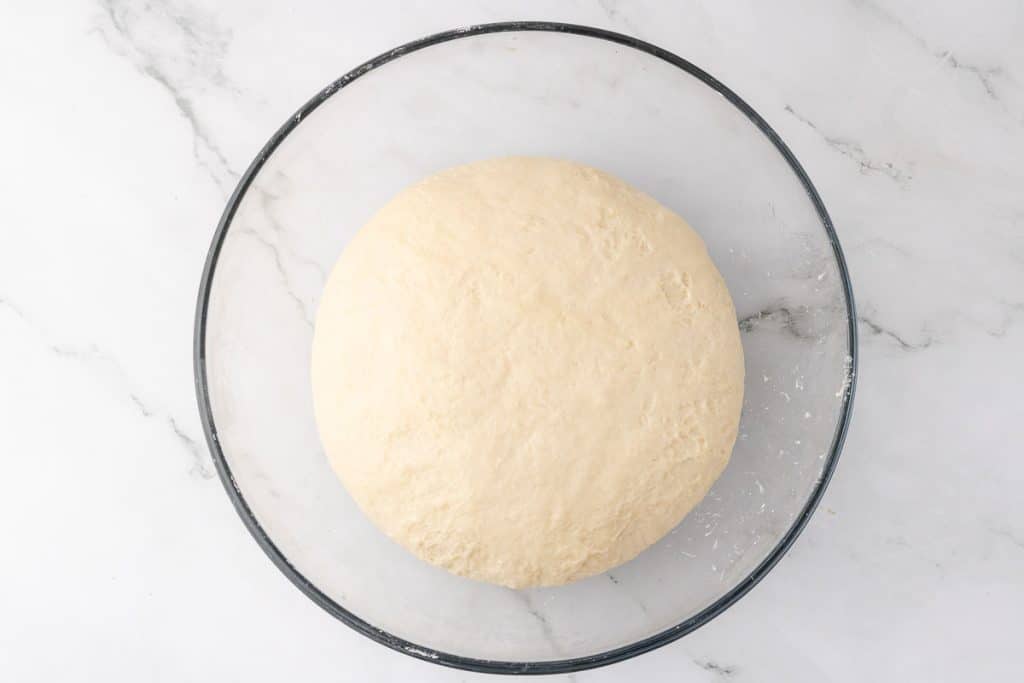
Right before the third set of stretches and folds, after sitting for 30 minutes. After the third set of stretches and folds, you’ll notice that the dough becomes harder to stretch and fold as the dough strengthens.
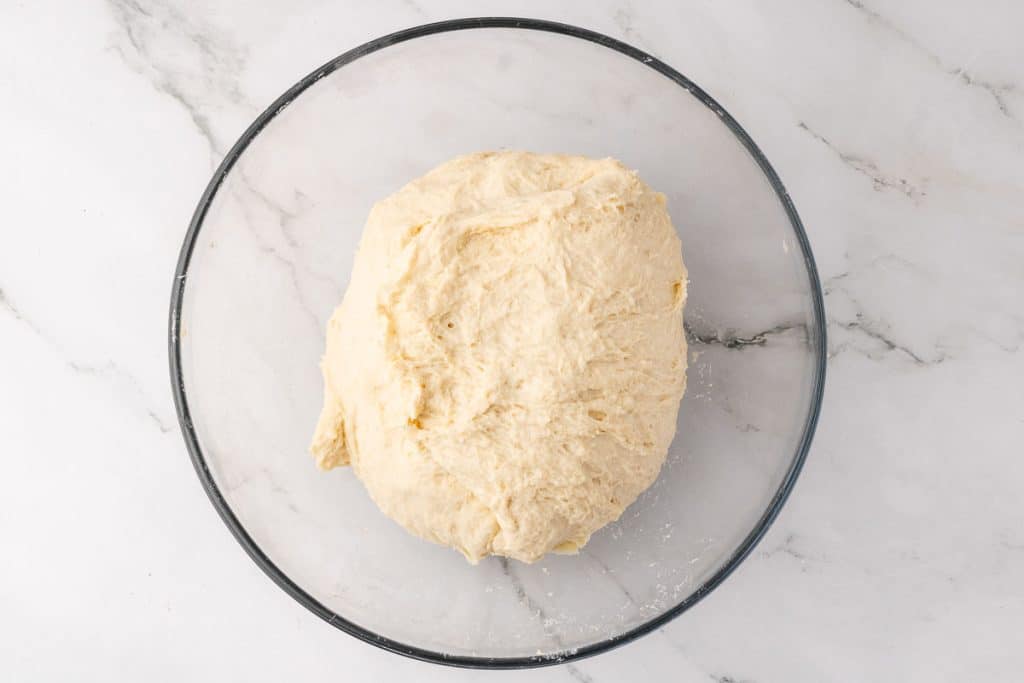
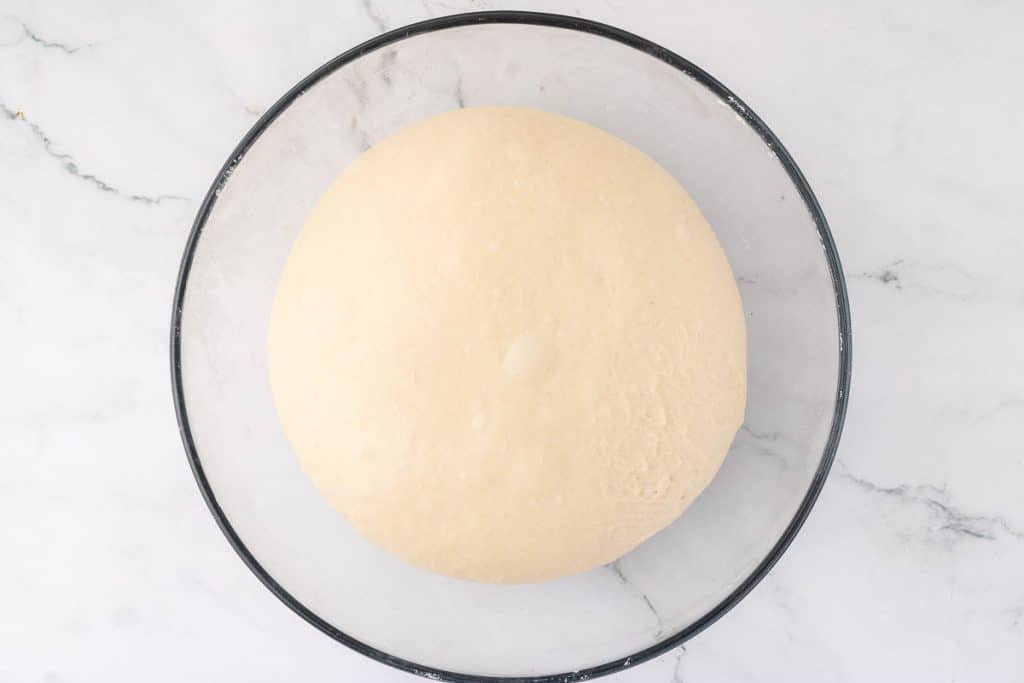
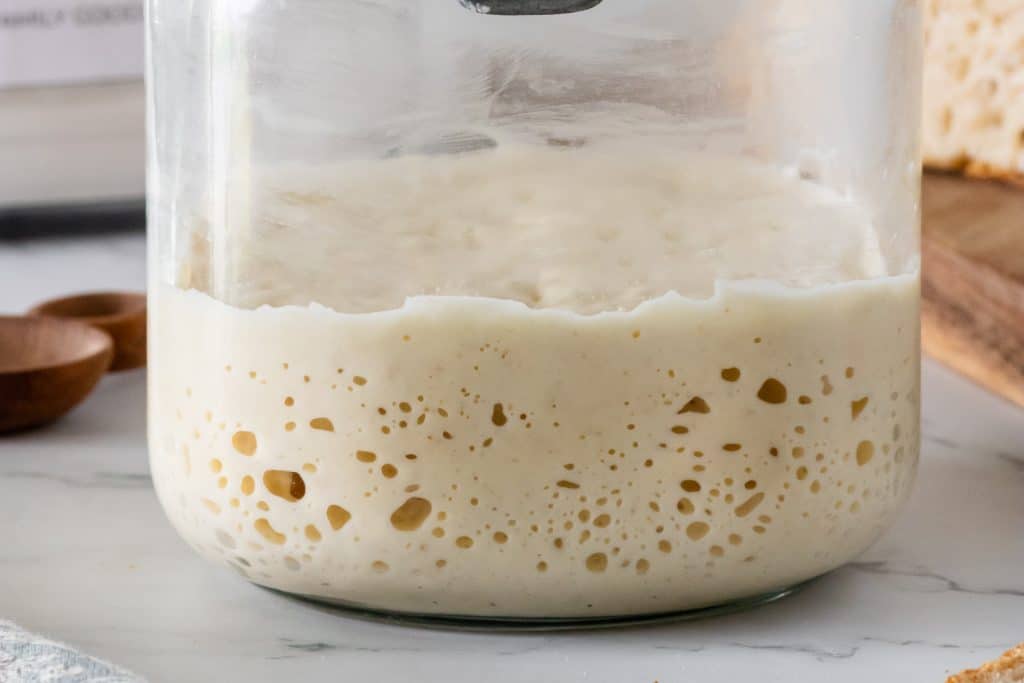
- Let the dough rest, covered and undisturbed, for the remaining 2 hours and 30 minutes at room temperature without disturbing it. You will know your dough has finished its bulk fermenting if it has risen approximately 30%. You may see bubbles on the top and sides. Here are the indicators that your dough has finished bulk fermentation:
- The dough should rise noticeably, increasing in volume by about 30% to 50%. It won’t always double like yeasted dough.
- You should see bubbles forming under the surface, and the dough should look slightly domed rather than flat.
- When gently shaking the bowl, the dough should jiggle slightly, showing that gas has developed inside.
- Do the “Poke Test”—Lightly wet your finger and poke the dough about ½ inches deep. If the indentation slowly springs back but leaves a slight mark, it’s ready. If it springs back quickly, it needs more time. If it deflates completely, it may be over-proofed.
At room temperature (~70°F/21°C), bulk fermentation typically takes 4-6 hours but can vary based on temperature and starter activity. If in doubt, it’s better to underproof slightly than overproof—underproofed dough can still rise in the oven, but overproofed dough may collapse.
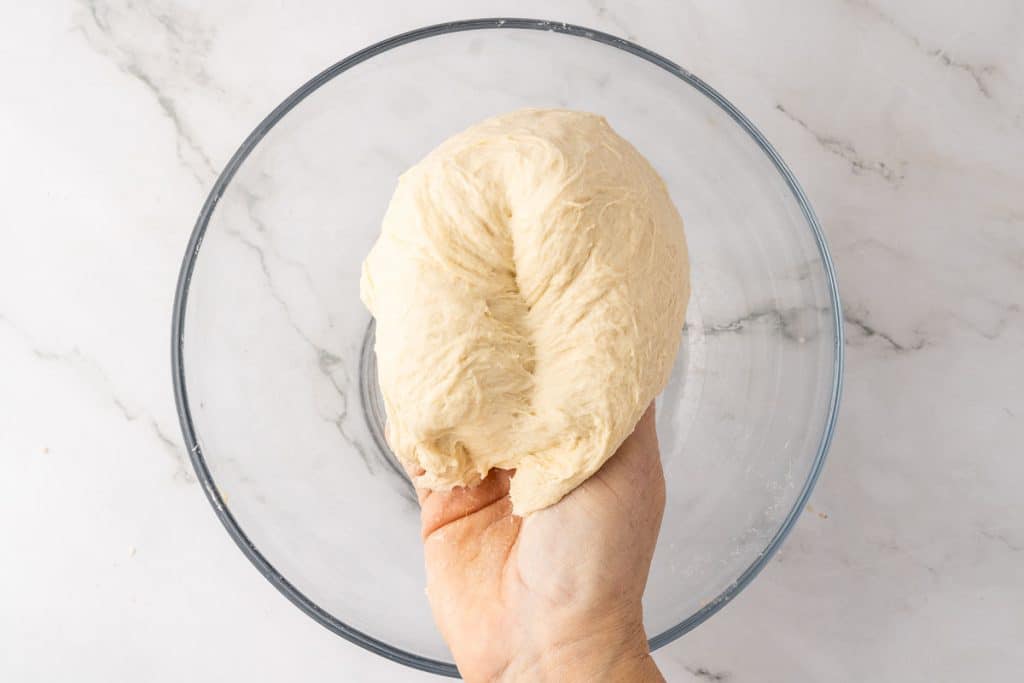
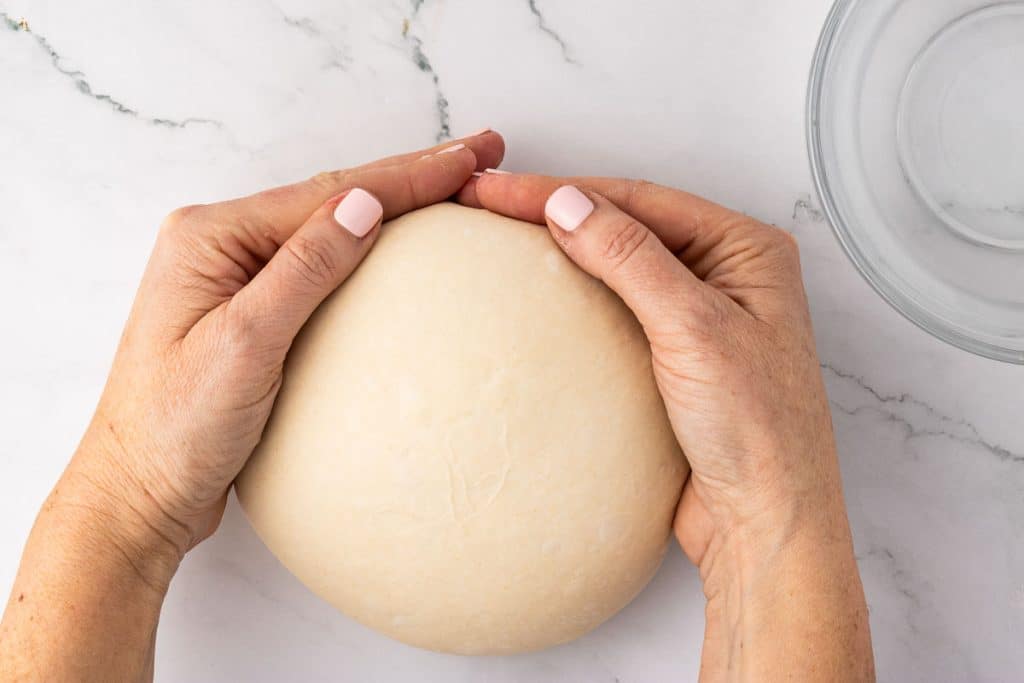
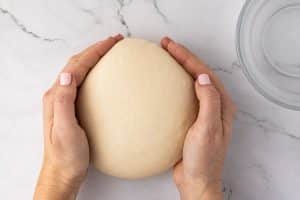
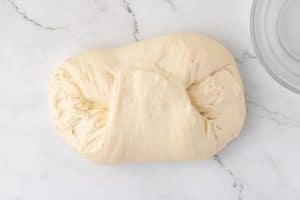
7. Preshaping the Dough (1:30 p.m., Saturday afternoon)
- Place the dough on the counter.
- Use a bench knife, bowl scraper, or your hands to push the dough against the counter’s surface. Use your free hand to guide the dough and help shape it into a boule (round). Moving it against the counter creates tension in the dough, helping it keep its shape.
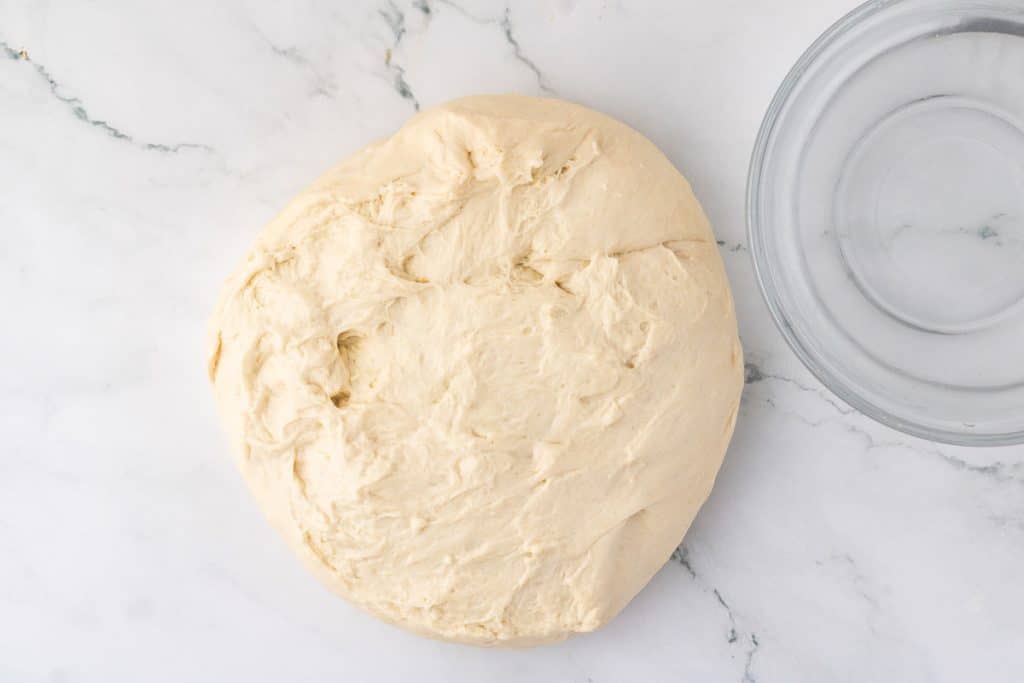
- Bench-Rest – Let it rest uncovered for 30 minutes to relax the gluten.
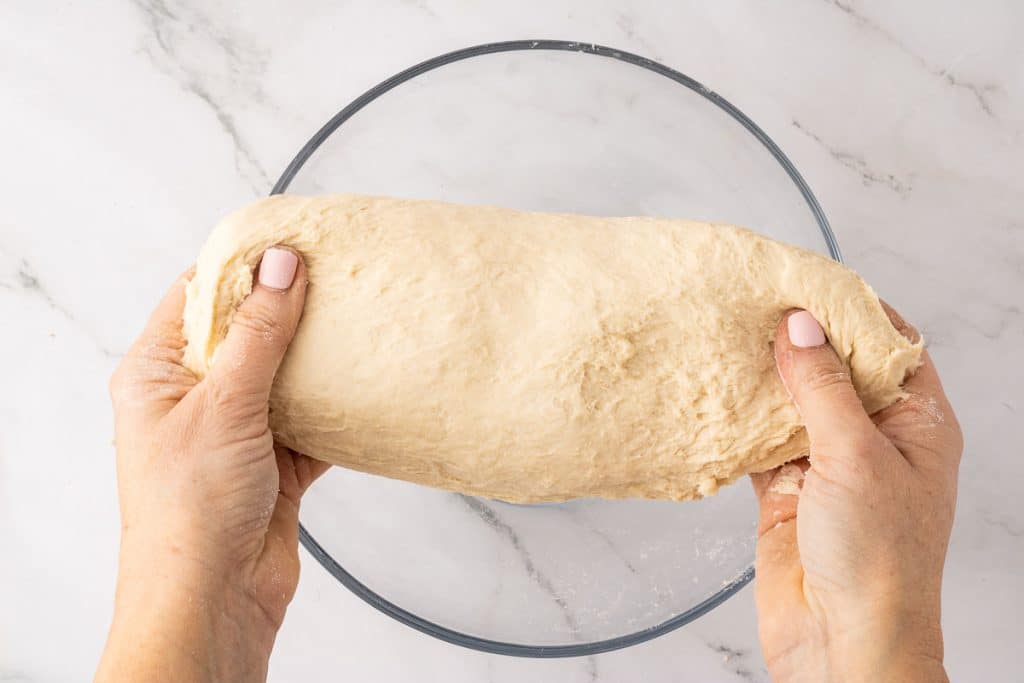
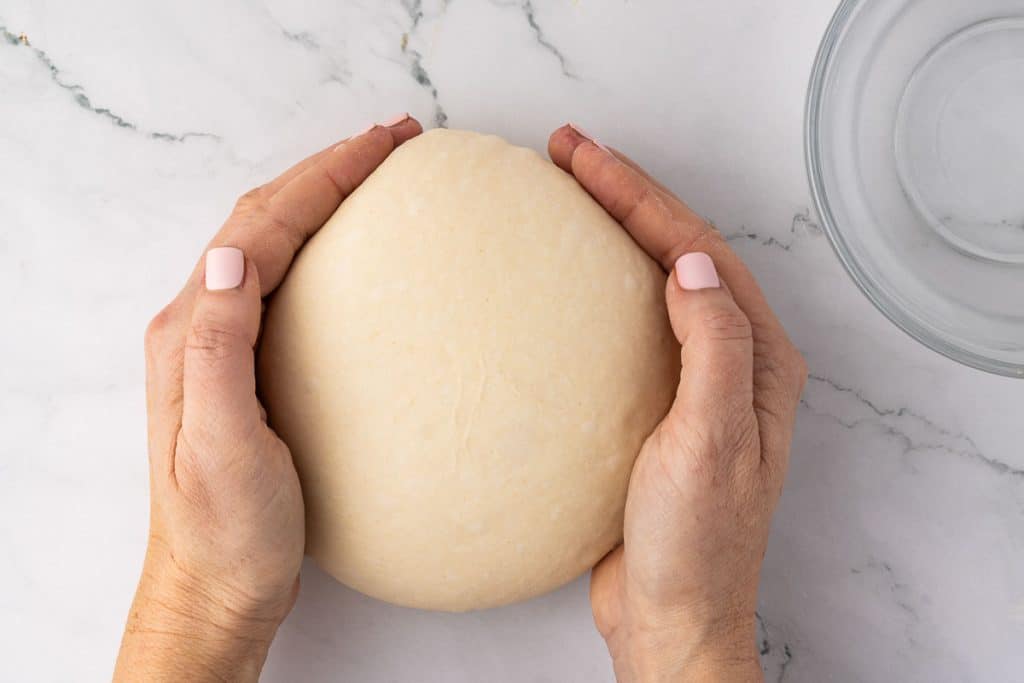
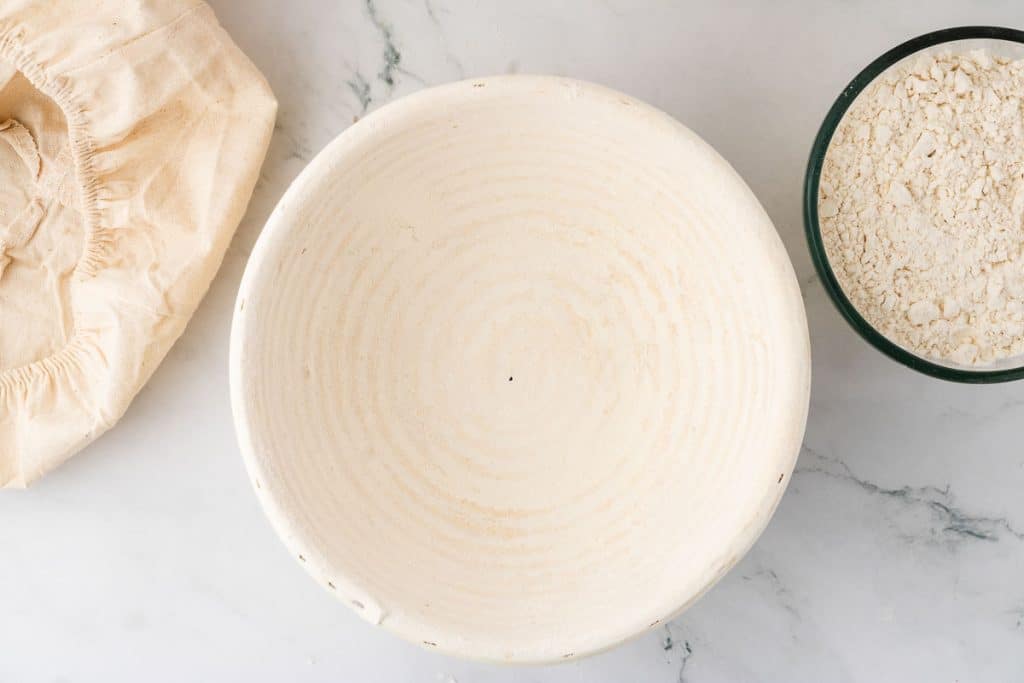
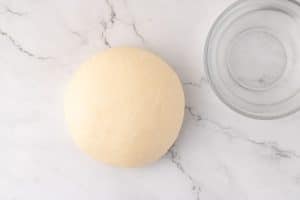
8. Final Shaping & Cold-Proofing (2 p.m. Saturday)
- Prepare a banneton by dusting it with rice flour. You can choose to use a linen liner in the banneton; it’s up to you. Without the liner, you will get the pattern of rings of the banneton on your bread.
- Now, it’s time to shape the dough into a tight boule.
- Turn it over on a lightly floured counter.
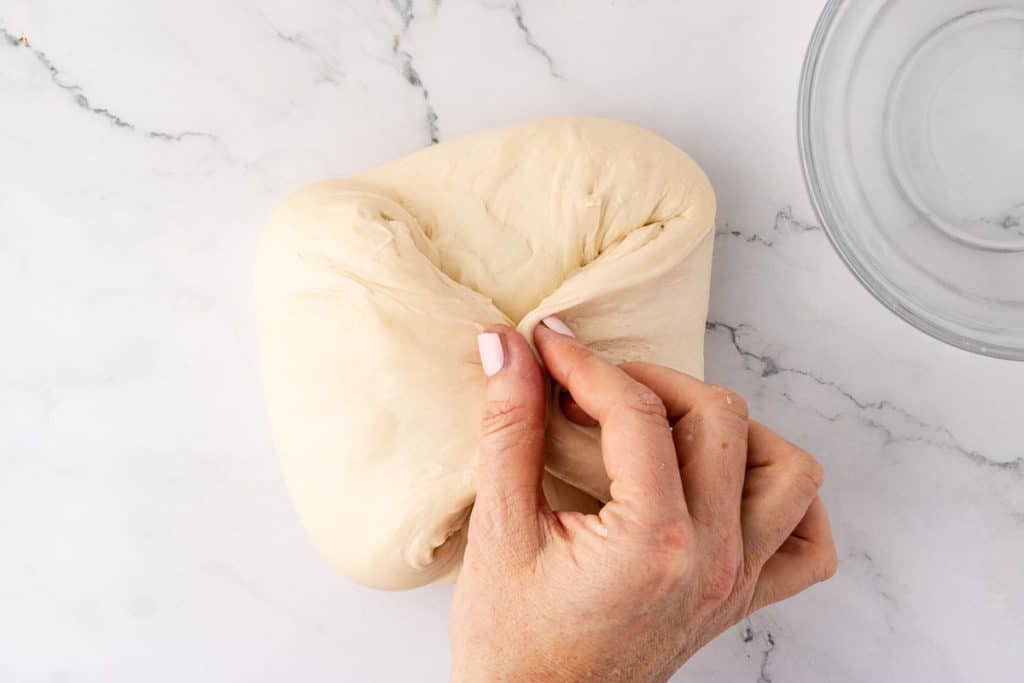
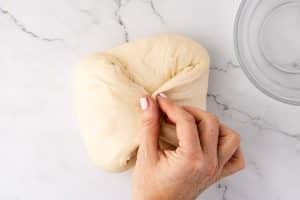
- Use both hands to gently flatten it slightly to form a disk or a loose 4-sided star.
- Turn down the top half of the dough to the middle.
- Pull the bottom half to the middle and push to adhere.
- Fold both sides in and pinch the dough to adhere it.
- Turn the dough back over so that the seam is on the counter.
- You can shape the boule using a bowl scraper or your hands. Here’s a video showing the process of using a bowl scraper.
- If you would rather use your hands, lightly flour your work surface and your hands. Be careful not to use too much flour, as you still want some friction to build tension in the dough.
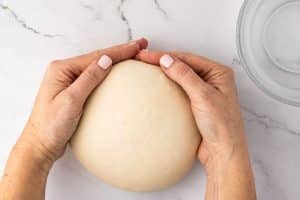
- Next, begin tightening the shape by cupping your hands around the dough.
- Gently pull the dough toward you while rotating slightly, using the pinky sides of your hands to create tension on the surface.
- Continue this pulling and rotating motion until the dough forms a smooth, round shape with a taut surface. If the dough sticks to the counter, lightly dust your hands with flour, but avoid flouring the bottom of the dough too much, as friction helps create the tension needed for a good rise.
- Repeat this process of rotating the dough and dragging it toward you until it holds itself in a nice round boule.

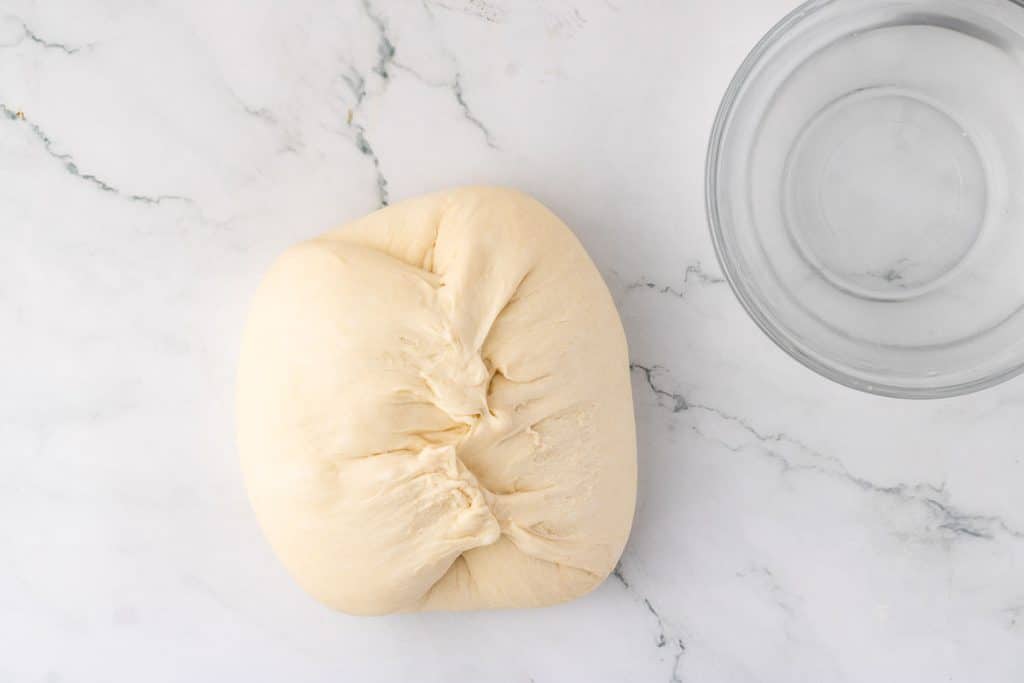
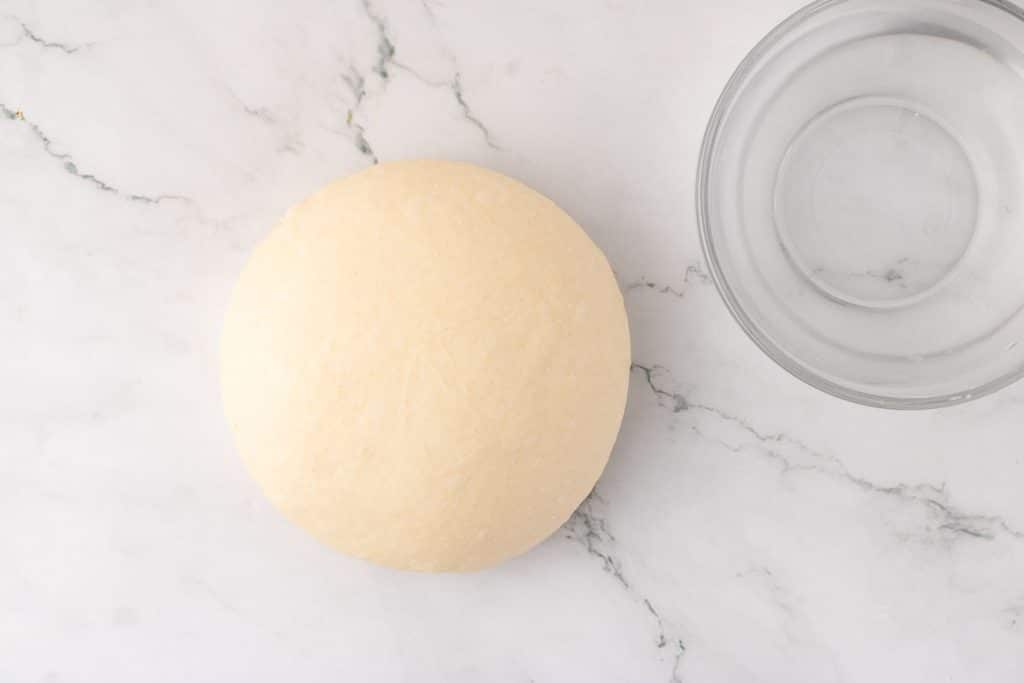
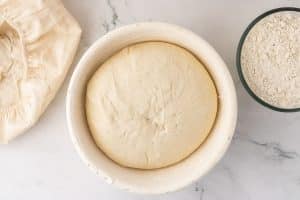
- Place the ball of dough into the banneton, seam side up.
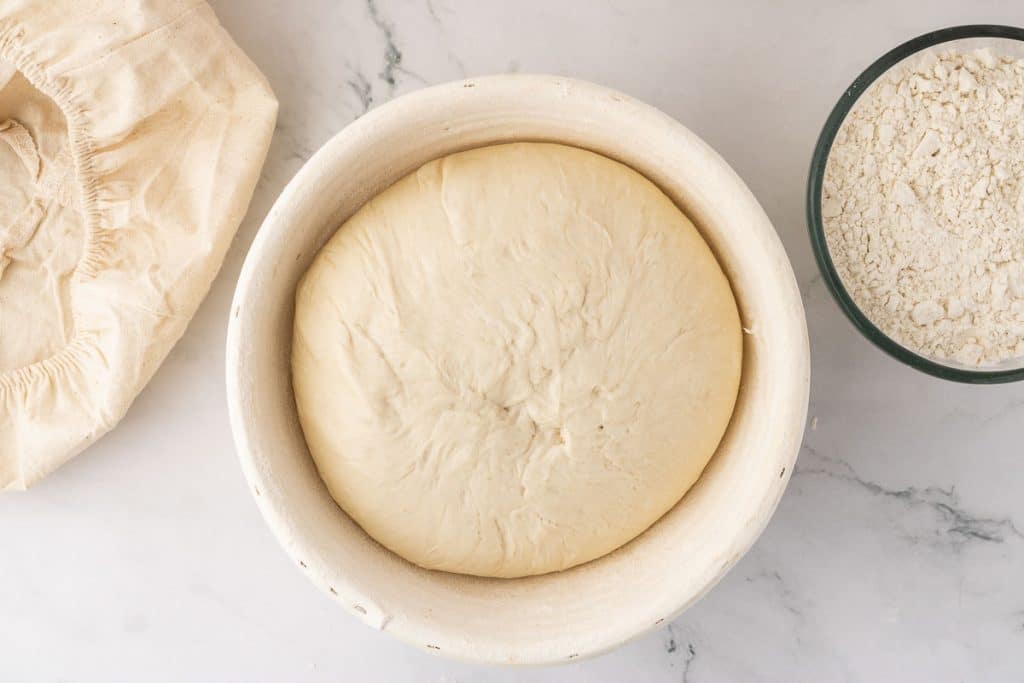
- Cover the banneton with plastic wrap or a reusable silicon cover, or put it in a zip-lock bag and refrigerate for 18 hours for slow fermentation and flavor development. You can refrigerate the dough for up to 48 hours. The longer you leave it proofing, the more sour the bread will be.
I store my bannetons in large, two-gallon ziplock bags when not using them. Then, I put my loaves in the same bags when I put them in the fridge. There will be condensation when you pull them out, so I hang them up to dry and then store the bannetons back in them. I’ve been reusing these two bags for at least a year now. Before I started storing them in plastic bags, I got little bugs in my bannetons.
9. Preheating & Baking
- Thirty minutes before baking, preheat your oven to 450°F (232°C) with a Dutch oven inside. Make sure your Dutch Oven is good at that temperature. While I have LeCreuset Dutch Ovens, I prefer to use my Lodge Cast Iron Dutch Ovens. I’m just hesitant to submit the knob of my good Dutch Oven to repeated heat like that.
- Carefully remove the dough from the refrigerator and place it on a parchment-lined surface or silicon bread sling. I’ve recently switched to the bread sling, and it really makes the process much easier.
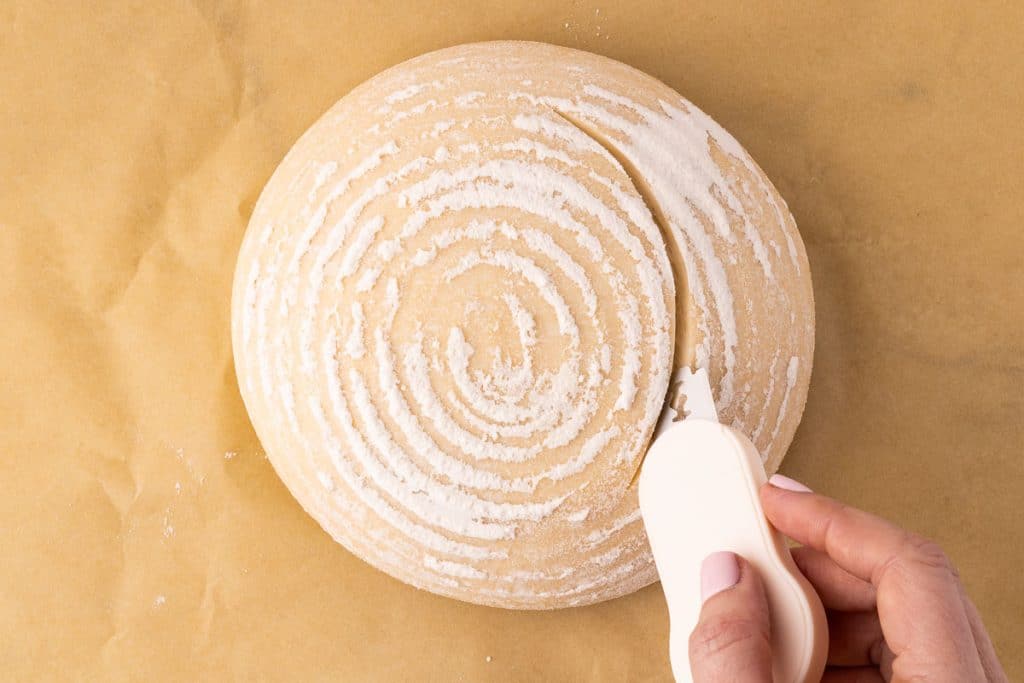
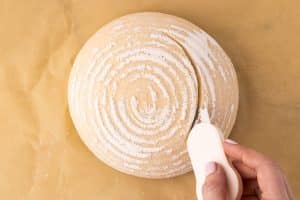
- Score the dough with a lame or razor blade to allow expansion. Hold your lame/razor to the counter at a 30-45° angle. Start at the top of the boule and pull your razor through the dough. Your main cut(s) should be ¼ to ½ inch (6-12mm) deep. You can also make decorative cuts at a shallower ⅛ inch (3mm) deep or shallower. You can do one slice or two, crisscross them, or add ‘leaves’ along the sides of one of the slices. Be creative, but don’t skip this step. This cut creates an escape for the gasses created when the bread is baking. If you don’t make that escape route, the gasses will still need to be released, causing the surface to erupt somewhere.


- Transfer the dough to the hot Dutch oven and put the lid on.
- Bake covered for 20 minutes, then uncover and bake for another 15-25 minutes until golden brown. Every oven is different, which is why there is a 10-minute variation in the final baking time. The bread is done when it reaches an internal temperature of 200-210°F (93-99°C).
- Let your bread cool before slicing, even though I know you’ll be tempted. Trying to cut before it is cool will cause to smush down.
Frequently Asked Questions about this Easy Sourdough Bread Recipe
Your starter might not be active enough, the dough could be under-proofed, or your fermentation environment might be too cold. Ensure your starter is bubbly and passes the float test before using it.
Yes, but whole wheat absorbs more water and makes a denser loaf. Start by substituting 25-30% of the flour with whole wheat and increase hydration slightly.
If the dough has over-proofed (too slack, lost volume), you can reshape it gently and bake it immediately, though it may not have as much oven spring.
If the crust is too thick or hard, try reducing the baking time slightly or baking at a slightly lower temperature. You can also wrap the bread in a towel while it cools to soften the crust.
First of all, I’d suggest you take the time to get comfortable with the Easy Sourdough Bread Recipe before you start finagling with it. That said, there are some ways to speed up the bulk fermentation process. Start by increasing the dough’s temperature, as fermentation happens faster at 75-80°F (24-27°C). You can place the bowl in the oven with the light on, on top of a warm appliance like the fridge, or wrap it in a warm towel. A proofing box or warm water bath (not too hot) can also help maintain an ideal environment. Keeping the dough in a covered, insulated container like a glass or plastic bowl with a lid traps warmth and humidity, creating a stable fermentation environment.
Using more starter or levain—about 25-30% of the total flour weight instead of the standard 15-20%—can also shorten fermentation time, though too much can lead to overproofing, so tread carefully. Another simple trick is to use warm water when mixing the dough, around 85-90°F (29-32°C), as this kickstarts yeast activity.
Increasing hydration (by 2-5%) can also help yeast move more freely and ferment faster. To give your dough a head start, ensure your starter is at peak activity before mixing, especially if it was refrigerated—feeding it twice before baking ensures it’s strong enough.
If you’re really in a pinch, reducing the salt by 5-10% can help, as salt slows fermentation, though removing too much affects dough strength and flavor.
Using these adjustments, you can significantly cut down bulk fermentation time while still producing a well-developed loaf.
The Dutch oven might be too hot, or your oven’s heat source is too strong. Try placing a baking sheet under the Dutch oven.
Ensure your dough is well-hydrated and proofed correctly and that you handle it gently during shaping.
Easy Sourdough Bread Recipe
Equipment
- Silicone Sling
Ingredients
Levain:
- 50 g White flour 11.5%
- 50 g Water
- 10 g Sourdough Starter 100% hydration (which means you fed it equal parts of flour and water)
Autolyse:
- 500 g White Flour
- 300 g Water
Prior to Baking:
- Rice Flour
Instructions
Prepare the Levain (12 hours before baking)
- In a small bowl, mix 50g white flour, 50g water, and 10g active sourdough starter.
- Stir well until fully combined.
- Cover loosely and let it sit at room temperature for 12 hours, until bubbly and active.

Autolyse the Dough (30 minutes before levain is ready)
- In a large mixing bowl, combine 500g white flour and 300g water.
- Mix until just combined; the dough will be rough and shaggy.
- Cover and let it rest for 30 minutes to allow the flour to hydrate.
Mix the Dough
- To the autolysed dough, add 15g water, 10g salt, and the ripe levain.
- Using wet hands, squeeze and mix until everything is evenly incorporated.
- Continue mixing until the dough forms a sticky but firm mass.
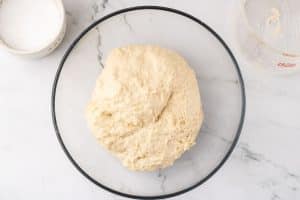
- If the dough feels too dry, add an additional 15g water and continue mixing.
Stretch and Fold (4-6 minutes total)
- Perform a series of stretches and folds by taking the dough into your hands and folding it in half. Then rotate the dough 90 degrees, stretch it, and fold it half again.
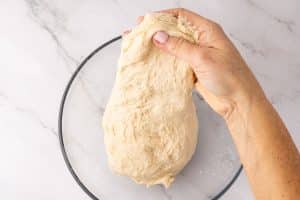
- Continue this process for 4-6 minutes until the dough becomes stronger.
- Set a timer for 30 minutes.
Bulk Fermentation (4 hours total)
- After 30 minutes, do another set of stretches and folds, but once on each 90° rotation, not for 4-6 minutes as you previously did. Repeat these stretches and folds two to three more times, with 30 minutes between each. After the third stretch and fold, you can stop if the dough has more of a domed appearance, is harder to stretch, and feels thicker. If it is still a little slack, wait 30 minutes and do one more set of stretches and folds.
- When done with the 2-3 stretches and folds, let the dough rest for the remaining 2 hours 30 minutes without disturbing it.
- You will know your dough has finished its bulk fermenting if it has risen approximately 30%. You may see bubbles on the top and sides.
- At room temperature (~70°F/21°C), bulk fermentation typically takes 4-6 hours but can vary based on temperature and starter activity. If in doubt, it’s better to underproof slightly than overproof—underproofed dough can still rise in the oven, but overproofed dough may collapse.
Preshaping the Dough
- Lightly flour your work surface.
- Using your hands, shape the dough into a rough boule (round shape).
- Let it rest uncovered for 30 minutes to relax the gluten.
Final Shaping & Proofing (Overnight in the Refrigerator)
- Prepare a proofing basket (or a bowl lined with a floured towel) by sprinkling rice flour in the bowl.
- Turn it over on a lightly floured counter.
- Use both hands to gently flatten it slightly to form a disk or a loose 4-sided star.
- Turn down the top half of the dough to the middle.

- Pull the bottom half to the middle and push to adhere.
- Fold both sides in and pinch the dough to adhere it.
- Turn the dough back over so that the seam is on the counter.
- You can shape the boule using a bowl scraper or your hands. You can see a video showing the process of using a bowl scraper by following the QR code in the notes below.
- If you would rather use your hands, lightly flour your work surface and your hands. Be careful not to use too much flour, as you still want some friction to build tension in the dough.
- Next, begin tightening the shape by cupping your hands around the dough.
- Gently pull the dough toward you while rotating slightly, using the pinky sides of your hands to create tension on the surface.
- Continue this pulling and rotating motion until the dough forms a smooth, round shape with a taut surface. If the dough sticks to the counter, lightly dust your hands with flour, but avoid flouring the bottom of the dough too much, as friction helps create the tension needed for a good rise.
- Repeat this process of rotating the dough and dragging it toward you until it holds itself in a nice round boule.
- Once formed into a tight boule, place it into the proofing basket, seam side up.
- Cover the banneton with plastic wrap or a reusable silicon cover, or put it in a zip-lock bag and refrigerate for 18 hours for slow fermentation and flavor development. You can refrigerate the dough for up to 48 hours. The longer you leave it proofing, the more sour the bread will be.
Preheating & Baking
- Preheat your oven to 450°F (232°C) with a Dutch oven inside. Once it reaches 450°F (232°C), set your timer for 30 minutes.
- Carefully remove the dough from the refrigerator and place it on a long sheet of parchment paper or a bread sling. I prefer a bread sling.
- Score the dough with a lame, sharp knife,, or razor blade to allow expansion.
- Once the 30 minutes timer goes off, transfer the dough into the hot Dutch oven.
- Bake covered for 20 minutes, then uncover and bake for another 15-35 minutes until golden brown. Every oven is different, which is why there is a 10-minute variation in the final baking time. The bread is done when it reaches an internal temperature of 200-210°F (93-99°C).
Notes

Nutrition
I know that seems like a LOT. But, like anything, the more you do it, the easier it becomes. With a healthy starter, accurate ingredient measurements, and a little patience, you’ll have success with your sourdough. And don’t hesitate to reach out with questions!
Other Sourdough Recipes
Our sourdough recipes are divided between sourdough discard recipes and active starter sourdough recipes. We also have a recipe and tutorial for making your sourdough starter.
Sourdough Discard Recipes
Sourdough discard is the portion of sourdough starter removed during feeding to maintain a healthy and active culture. When you feed a sourdough starter, you typically add fresh flour and water, but before doing so, a portion of the existing starter is discarded to prevent it from growing too large and to maintain the right balance of yeast and bacteria.


- Sourdough Discard Pizza Dough
- Sourdough Discard Cheese Crackers
- Sourdough Discard Tortillas
- Fluffy Sourdough Discard Pancakes
- Sourdough Discard Banana Muffins
- Sourdough Discard Waffles
Sourdough Recipes


Bookmark this page or pin the following image to refer back to this Easy Sourdough Bread Recipe in the future.


Thank you, Lynn, for cutting the recipe in half. I’ve not made it yet because I don’t have enough equipment for two loaves and I wasn’t sure what to do about halving the levain. That’s certainly not a lot of starter to make it! I’ve had some success with another recipe that calls for 100g of starter and no levain. I’m understanding it all a lot better thanks to you and get very excited when I have success!
Seemed hard at first but I made a beautiful tasting loaf.
Thank you for the step by step approach