
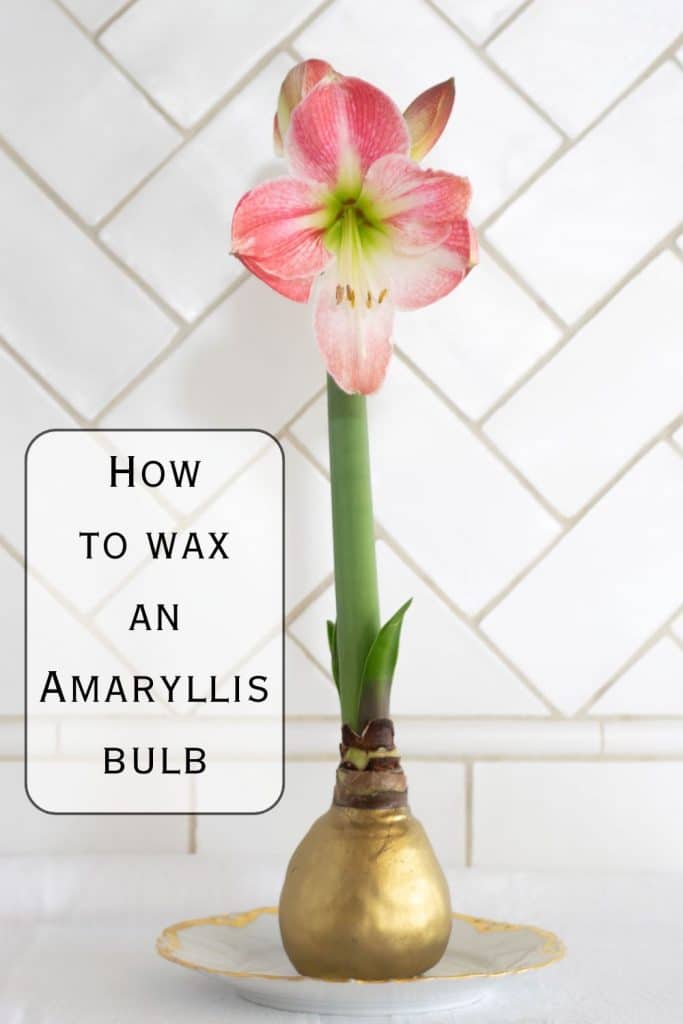
How to Wax an Amaryllis Bulb


After receiving a waxed Amaryllis bulb at Christmas, I was instantly hooked! Over the holidays, it blossomed into a gorgeous focal point on my coffee table. As is my want, I wondered if this was a project I could make at home. Not only do I love having them in my house, but they make fantastic gifts. So, I did some research, jumped in feet first, and am now sharing how to wax an Amaryllis Bulb with you!
Waxing amaryllis bulbs is a great way to create a mess-free, self-sustaining bloom that doesn’t require soil or water. It’s also a fun DIY project that adds a decorative touch to your home decor. While it may seem complicated, it’s quite simple with the right tools and techniques. In this guide, I’ll walk you through everything you need to know to successfully wax amaryllis bulbs, from selecting the right bulbs to properly melting and applying the wax.
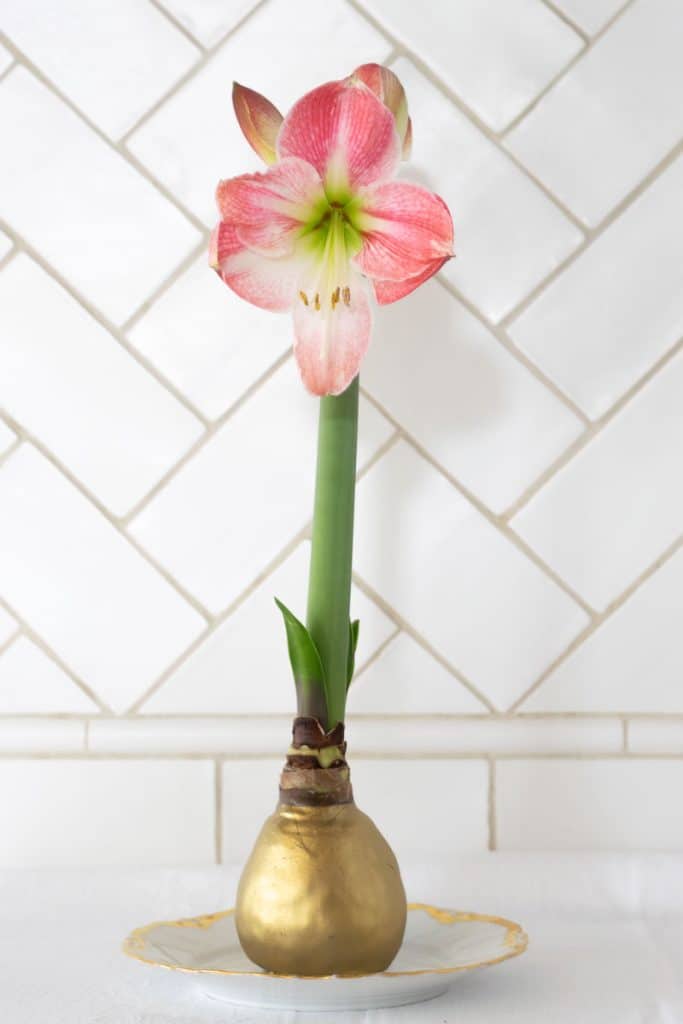
Table of Contents
Buy vs. Make?
If you’d like to have a waxed amaryllis bulb or give one, you definitely want to learn how to do it yourself! Have you priced those lately? When purchased in a store, waxed amaryllis bulbs typically range from $20 to $30 a bulb.
If you do a little searching, you can buy unwaxed bulbs much cheaper than that. I spent $49 for six bulbs, an average of $8 per bulb. At around $10, one pound of wax is enough to dip six bulbs. So, my cost to purchase all the materials was $59, an average of $10 per waxed Amaryllis bulb. That’s quite a savings in my book.
In terms of labor, it truly is an easy process: soak the bulbs, cut the roots off, melt wax, dip bulbs in wax, and paint! You could start and finish in a day and have a plethora of pretty waxed Amaryllis bulbs for your home or to give as gifts; I did a little of both!
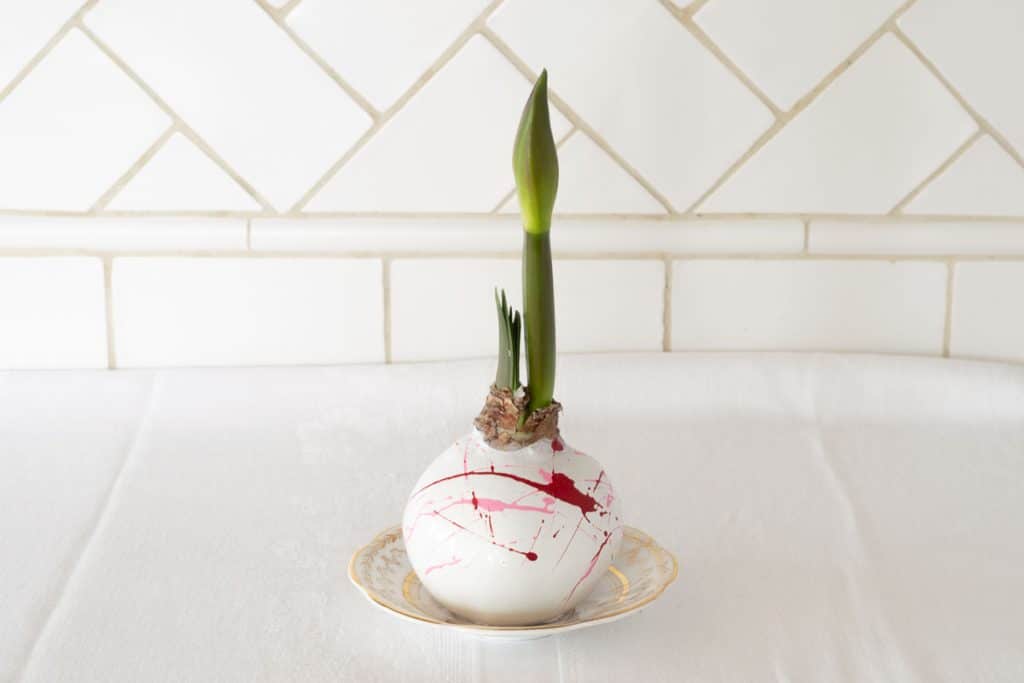
You can choose how you want to paint them. I painted several with gold bases for my home. But I wanted to give some as Galentine’s Day gifts, so I painted those white with dark and light pink splatters. You can get as creative as you like!
Something To Be Aware Of
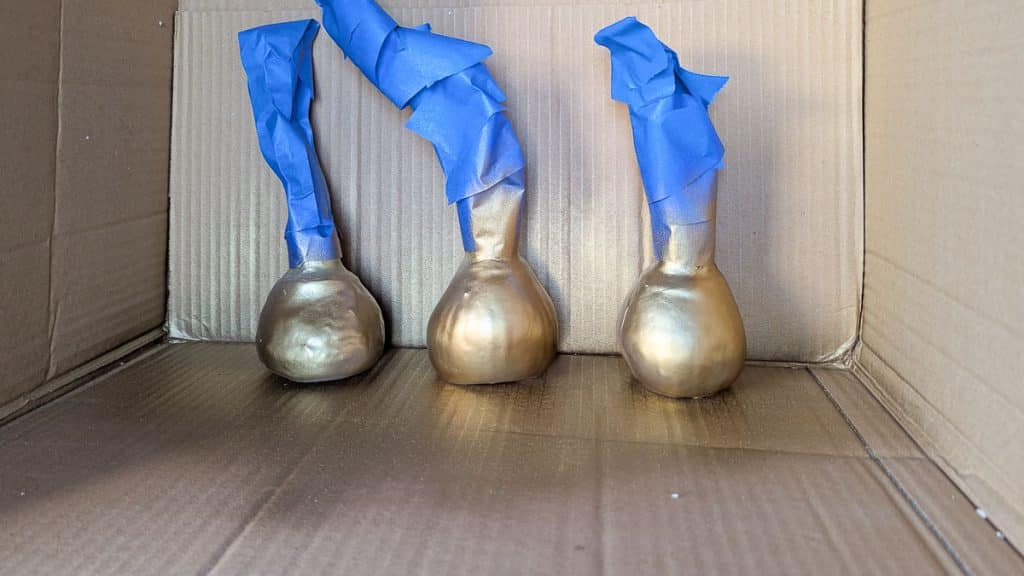
The last three bulbs I ordered online arrived while we were out of town. They were put inside the house and were kind of lost in the shuffle of us returning home, unpacking, etc., to the point that when I finally opened the box, those poor bulbs had sprouted and were searching for light. Their search resulted in stems that were not straight; no matter my efforts to straighten them in the sunshine, I could never. So, the story’s moral is to get your bulbs out of shipping boxes ASAP!
Still pretty, in a wonky sort of way!

How Does Waxing Amaryllis Bulbs Work?
Waxing an amaryllis bulb creates a sealed barrier that locks in the moisture and nutrients stored inside, allowing it to bloom without additional watering. Since amaryllis bulbs naturally contain enough water and energy to support an entire bloom cycle, they can sustain themselves without an external water source. Typically, bulbs lose water through evaporation, but the wax coating prevents this by trapping moisture inside.
The wax also helps prevent rot and mold by eliminating exposure to soil and moisture, reducing the risk of fungal growth. Additionally, the wax barrier prevents the bulb from receiving external signals that typically trigger root growth, keeping its energy focused on flowering instead.
Once the bulb has finished blooming, it will eventually use up its stored energy and enter dormancy.
Can You Replant an Amaryllis Bulb That Has Been Waxed?
You can theoretically remove the wax and plant a waxed amaryllis bulb. However, its success will depend on its condition after being sealed in wax. Since the wax prevents the bulb from growing roots and absorbing water, it will have used up most of its stored energy to bloom. Reviving it for future growth with proper care may be possible, but it isn’t as reliable as planting one that still has its roots.
While some waxed bulbs can recover and regrow, others may not have enough stored energy to thrive. If you plan to reuse amaryllis bulbs year after year, it’s better to grow them in soil rather than waxing them.
To attempt to save a waxed amaryllis bulb for replanting:
- Gently Remove the Wax: Peel or carefully crack the wax away from the bulb, careful not to damage the outer layers.
- Inspect the Bulb: Check for signs of rot, dehydration, or damage. If the bulb is too shriveled, it may not recover.
- Soak the Bulb: Let the bulb sit in lukewarm water for a few hours to help rehydrate it.
- Plant in Soil: Choose a well-draining potting mix and plant the bulb about one-third above the soil.
- Water and Care: Water the bulb lightly and place it in a warm, bright location. Avoid overwatering to prevent rot.
- Be Patient: Since the bulb has been without roots, it may take longer than usual to establish itself and may not bloom in the first growing season.
What You Need To Wax Amaryllis Bulbs
- A bowl to soak Amaryllis bulbs
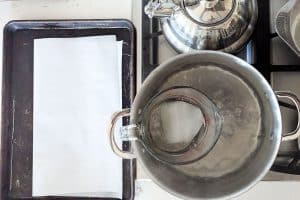
- Double Burner or something similar. You need some sort of double burner to melt the paraffin wax. A double boiler consists of a heatproof container or pot placed over a larger saucepan filled with simmering water, which provides gentle, indirect heat to melt the wax gradually. Paraffin wax is highly flammable and has a flash point of approximately 390°F (199°C). Direct heat from a stovetop burner can cause it to overheat quickly, potentially igniting. I used a four-cup glass measuring cup in a pot of boiling water. The second time, I also put a rubber trivet at the bottom of the pot. If you have an empty aluminum or tin can, that’d be a great option, as you could dispose of it afterward.
- Parchment paper
- Aluminum foil is recommended but not required
- Amaryllis bulbs
- Paraffin wax – 1 lb will coat 6 bulbs
- Acrylic Spray Paint
- Painter’s Tape
- Thermometer
What are the best Amaryllis Bulbs to Wax?
Look for bulbs that are relatively shorter (12″-18″, but no higher than 24″) and have smaller blooms. A long-stemmed, large-blossomed flour will be more likely to tip over with that small bulb base. Luckily for us, plenty of Amaryllis bulbs fit that bill. I did some internet sleuthing and came up with a list of possibilities. As organic things, I can’t ‘guarantee’ their exact height. But generally, these amaryllises tend to stay a medium height.
In terms of what you pay, I went to sites and filtered by low to high price. By doing that, I found the ones that were on sale.
Some of these links may be Amazon affiliate links and I may earn a small commission from the sale of these products to help defray the costs of operating this site, but the price you are charged is not affected. You can see my full disclosure policy here.
- Trio of bulbs (at this writing, a great price for three bulbs)
- Tinkerbell * this is the pink flower in this post
- Red Lion (at this writing, a great price for three bulbs)
- Picotee
- Charisma
- Alfresco (at this writing, a great price for three bulbs)
- Minerva
- Pinkolo Dwarf
- Miniature Baby Star
- Ballerina Sonatini
- Fairy Tale
- Denver
- Evergreen
- Merry Christmas (at this writing, a great price for three bulbs)
- Fire Dancer
- Apple Blossom
- Cherry Blossom
Heating Paraffin Wax Safely
Melting paraffin wax on the stovetop requires caution, as it is highly flammable if overheated. If the wax reaches its flash point of approximately 390°F (199°C), it can ignite, creating a serious fire hazard. Additionally, hot wax can cause severe burns if spilled or splattered, and overheating it may produce smoke and fumes that can be harmful when inhaled.
To minimize risks, always melt paraffin wax over low heat using a double boiler rather than placing it directly on a burner. This helps distribute heat evenly and prevents scorching. A candy or candle thermometer monitors the temperature.
Never leave melting wax unattended, as it can quickly overheat. Keep the wax away from gas burners, open flames, and high heat sources, and use an old or dedicated pot rather than good cookware, as wax can be difficult to clean.
Never use water in the case of a wax fire, as it can cause the flames to spread. Instead, smother the fire with baking soda or a metal lid. A fire extinguisher is always a good idea when working with flammable materials.
How to Wax Amaryllis Bulbs
- Soak the amaryllis bulbs for 6 hours. Don’t oversoak the bulbs, or they may rot.
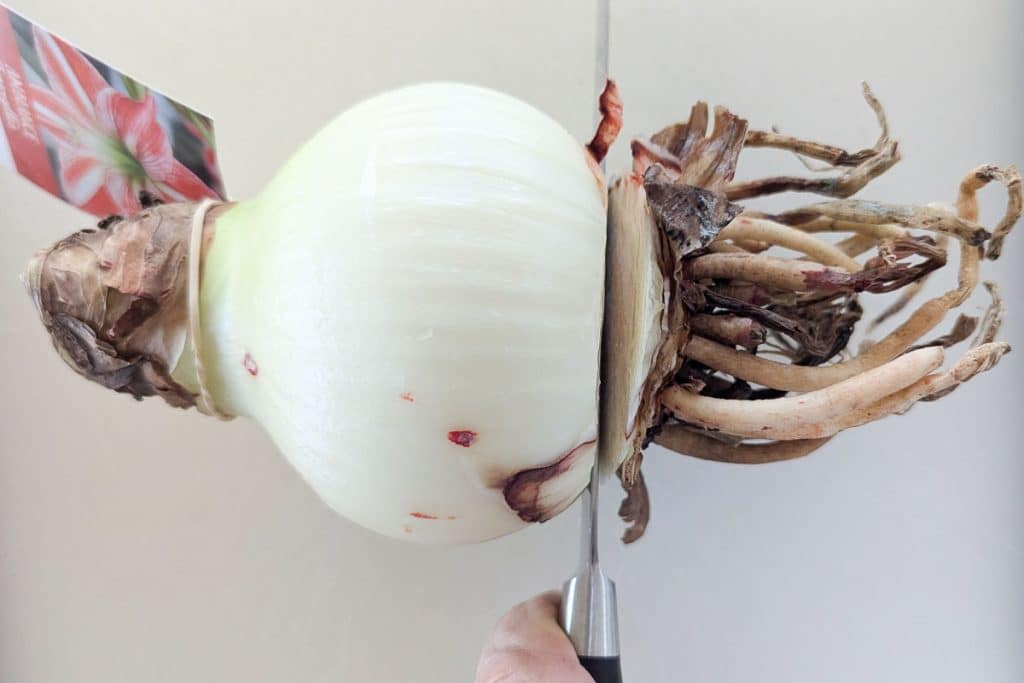
- After 6 hours, dry the bulbs and trim off the roots just where they meet the bulb. You’ll want a flat surface on the bottom of the bulb, so stand it up to make sure it stands straight. Remove as little of the actual bulb as possible.
- Chop the paraffin wax into small pieces to help it melt quickly.
- Melt the paraffin wax in a double boiler or something similar over low heat. Remember, it is essential to use a double boiler so the paraffin wax doesn’t overheat and catch fire. It is easier to thoroughly coat the bulbs if the container holding the wax is narrow rather than wide, which forces the wax to be deeper. I used a 4-cup glass measuring cup; it made the wax deeper than my double boiler.

- While the wax is melting, use aluminum foil and/or baking sheets to cover as much of your stove and counter as possible. You will be extra thankful you did this after you are done! I learned the hard way how messy it is to clean up lots of little drops of wax.
- Line a cookie sheet with parchment paper. If you have a variety of bulbs, try to keep the tags attached to the green or place them on the parchment paper so you can keep track of which bulb is which.
- While you want the wax to melt, you also want to keep it from getting too hot. The ideal wax temperature for dipping the amaryllis bulbs is around 120℉ (48.9°C). I turned the stove off once the wax temperature reached 120℉ (48.9°C) and then turned it back on once the wax seemed less smooth.
- Hold the amaryllis bulbs by their neck or any green leaves and dip them in the wax. You want to walk a fine line between waxing it and overheating the bulb. I would quickly dip each bulb 10 times and then let it cool down before dipping it again. I dipped three each time, so I just rotated among the three. Place the bulb cut side down on a piece of parchment paper between each set of 10 dippings. All told, I dipped each bulb approximately 70 times.

- Once your bulbs are fully coated, set them aside to cool
- You can add color to the waxed bulbs once they are cool with spray paint!
- Tape any green leaves/stems with painter’s tape to shield them from the paint. Use several light coats of paint so you don’t get drips.
How to Wax Amaryllis Bulbs
Equipment
- A bowl to soak Amaryllis bulbs
- Double Burner or something similar, see note 1
- Aluminum foil recommended,, but not required
Ingredients
- Amaryllis bulbs see note 2
- Paraffin wax 1 lb will coat 6 bulbs
- Acrylic Spray Paint
- Painter's Tape
- Thermometer
Instructions
- Soak the Amaryllis for 6 hours. Don't oversoak the bulbs, or they may rot.
- After 6 hours, dry the bulbs and trim off the roots just where they meet the bulb. You'll want a flat surface on the bottom of the bulb, so stand it up to make sure it stands straight. Take off as little of the actual bulb as possible.

- Chop the paraffin wax into small pieces, which helps it melt quickly.
- Melt the paraffin wax in a double boiler or something similar over low heat. It is easier to fully coat the bulbs if the container holding the wax is narrow rather than wide, which forces the wax to be deeper. See the warning about paraffin wax in the notes.
- While the wax is melting, use aluminum foil and/or baking sheets to cover as much of your stove and counter as possible. You will be extra thankful you did this after you are done! I learned the hard way how messy it is to clean many little wax drops.
- Line a cookie sheet with parchment paper. If you have a variety of bulbs, try to keep the tags attached to the green or place them on the parchment paper so you can keep track of which bulb is which.
- While you want the wax to melt, you want to keep it from getting too hot. The ideal wax temperature for dipping the amaryllis bulbs is around 120℉ (48.9°C). I turned the stove off once the wax temperature reached 120℉ (48.9°C) and then would turn it back on once the wax seemed less smooth.
- Hold the amaryllis bulbs by their neck or any green leaves and dip them in the wax. You want to walk a fine line between waxing it and overheating the bulb. I would quickly dip each bulb about 10 times and then let it cool down before dipping it again. Place the bulb cut side down on a piece of parchment paper between each set of 10 dippings. All told, I dipped each bulb approximately 70 times.
- Once your bulbs are fully coated, set them aside to cool
- You can add color to the waxed bulbs once they are cool with spray paint!
- Tape any green leaves/stems with painter's tape to shield them from the paint. Use several light coats of paint so you don't get drips.


Notes
Note 1
You need some sort of double burner to melt the paraffin wax. A double boiler consists of a heatproof container or pot placed over a larger saucepan filled with simmering water, which provides gentle, indirect heat to melt the wax gradually. Paraffin wax is highly flammable and has a flash point of approximately 390°F (199°C). Direct heat from a stovetop burner can cause it to overheat quickly, potentially igniting. I used a four-cup glass measuring cup in a pot of boiling water. The second time, I also put a rubber trivet at the bottom of the pot. If you have an empty aluminum or tin can, that’d be a great option, as you could just dispose of it afterward.Note 2
Look for Amaryllis bulbs that don’t grow too tall. I have listed quite a few in the article. With just the bulb as the base, Amaryllises that grow too tall are likely to tip over.Risks Of Melting Paraffin Wax and Steps to Reduce Risk
Melting paraffin wax on the stovetop requires caution, as it is highly flammable if overheated. If the wax reaches its flash point of approximately 390°F (199°C), it can ignite, creating a serious fire hazard. Additionally, hot wax can cause severe burns if spilled or splattered, and overheating it may produce smoke and fumes that can be harmful when inhaled. Always melt paraffin wax over low heat using a double boiler rather than placing it directly on a burner to minimize risks. This helps distribute heat evenly and prevents scorching. Use a candy or candle thermometer to monitor the temperature. Never leave melting wax unattended, as it can quickly overheat. Keep the wax away from gas burners, open flames, and high heat sources, and use an old or dedicated pot rather than good cookware, as wax can be difficult to clean. Never use water in the case of a wax fire, as it can cause the flames to spread. Instead, smother the fire with baking soda or a metal lid. Having a fire extinguisher nearby when working with flammable materials is always a good idea.Bookmark this page or pin the following image to refer back to this post on How to Wax an Amaryllis Bulb.
Thanks so much for spending a few minutes of your busy day with me!
To ensure you don’t miss future content, pop your email in the pale green box on the right or click here. I usually send one email weekly, so I won’t inundate your inbox. I’m sensitive to an overflowing email inbox!
We will only use your email address to send you emails, no more than 1-2 weekly. In addition, you will have access to my growing library of knit & crochet patterns and other printables. Check back often as this library will continue to grow. You can unsubscribe anytime by emailing me or clicking on the “unsubscribe” link at the bottom of all emails.
And you can access many of the products I refer to on my Nourish and Nestle Amazon Page. You can access it here.
So, if you’d like to participate in the ‘subscriber benefit’ action, simply subscribe to Nourish and Nestle here or use the form on the right sidebar. It’s slightly towards the top.
I have sent all my subscribers the link to the Subscriber Benefits Library. If you missed it or misplaced it, let me know.
Until next time…


I received two waxed bulbs, and I wanted to find out how to do it myself so that I could have more. Thank you!
One note: the stem likely leaned because it was searching for room to grow. You said that it never straightened. This is my first experience with having amaryllis. I’m just learning. One of the things I learned was that when they have too much light, they lean to get away from it. By turning it around, it will stand up straight, again! Before it starts leaning too far the other way, just keep rotating them every few days, and the stem stays straight up and down. You helped me. I hope this helps you! Blessings!
I’m wondering how this works in dry climate such as the US southwest? I can understand that the bulb needs to be moist but not too wet. How does this translate into my region?
HI Anne-Marie,
It shouldn’t matter. You will soak your bulb well before you coat it. The wax keeps the moisture in the bulb so it has everything it needs.