
Homemade Buttermilk Biscuits from Scratch — Tall, Flaky, and Buttery
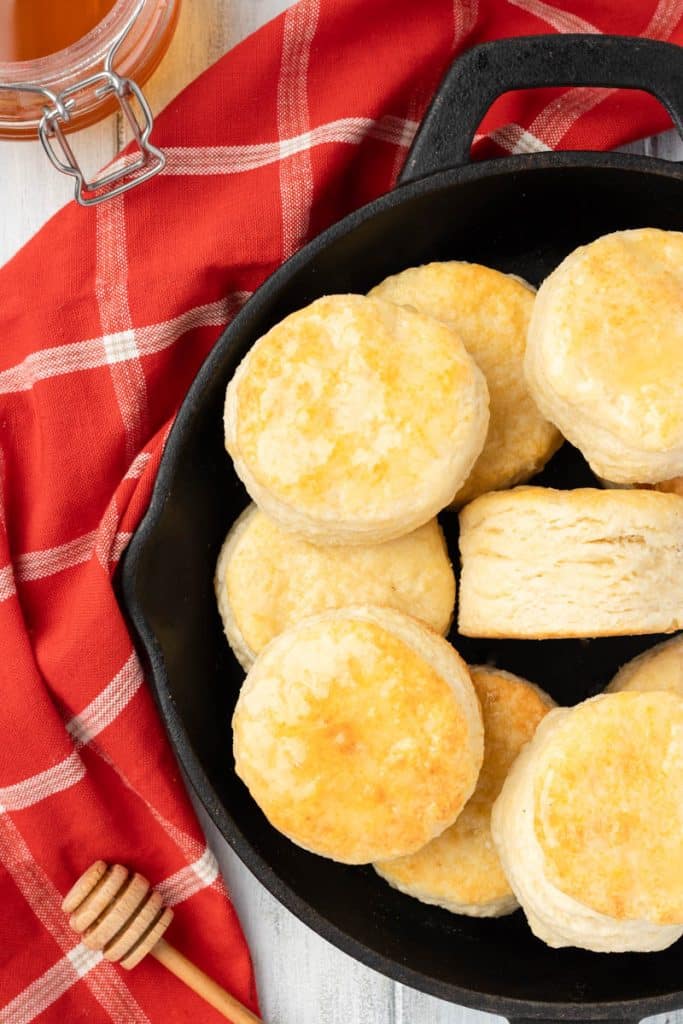
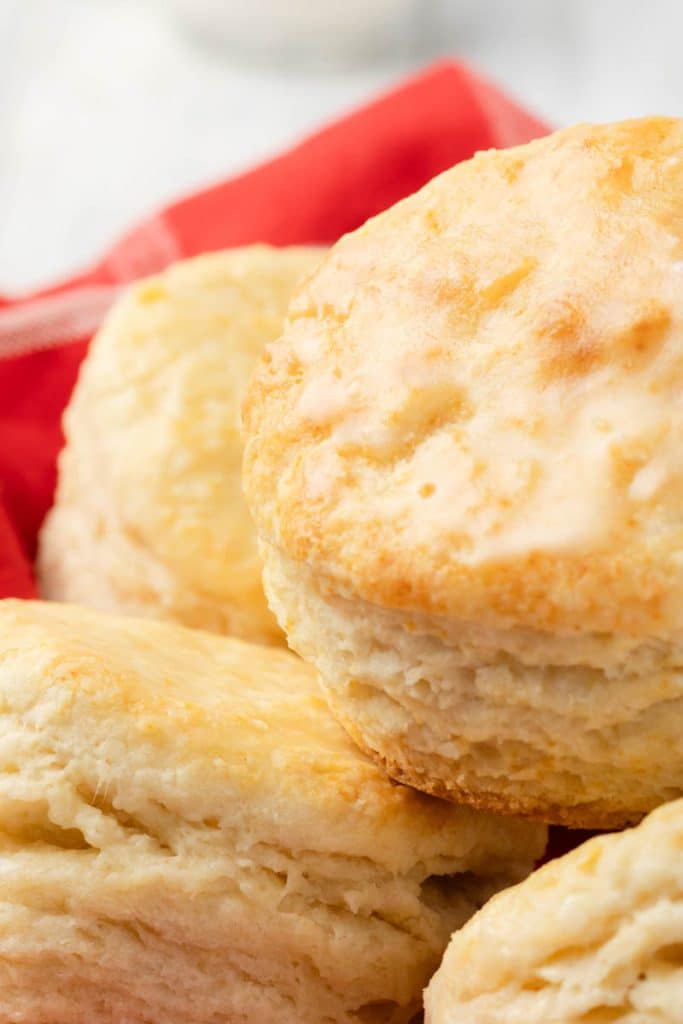
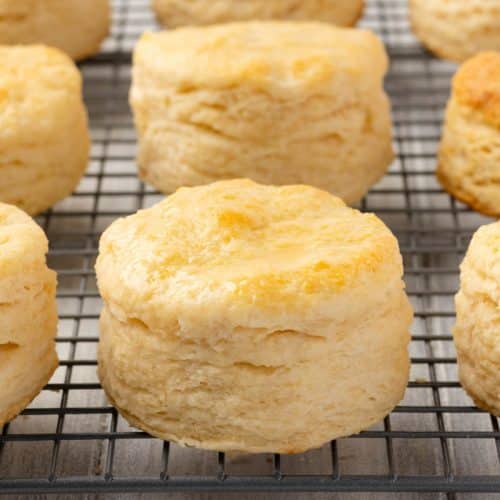
I have eaten a lot of biscuits in my life. Flat ones, dense ones, perfectly respectable ones that got the job done without doing anything memorable. These are not those biscuits. These Homemade Buttermilk Biscuits are the ones with the crisp bottom, the buttery layers you can actually see when you pull them apart, and enough height to make you feel like you really accomplished something in the kitchen today. Tall, flaky, and rich with that slight buttermilk tang — they deliver on every word in the title.
This recipe is a hybrid, and that’s intentional. It borrows the grated frozen butter technique from bakery-style biscuits, which gives you those distinct flaky layers without overworking the dough. It uses buttermilk and a splash of heavy cream for the richness and slight tang that defines a classic Southern biscuit. And it uses a simple folding method to build layers without turning the whole thing into a production. The result sits right in the middle of both worlds, and it’s better for it.
If you’ve had bad luck with biscuits before, I’d be willing to bet it came down to one of two things: the butter wasn’t cold enough, or the dough got overworked. Both are easy fixes once you know to watch for them. Keep everything cold, stir just until the dough comes together — shaggy and rough is exactly right — and let the oven do the heavy lifting. That’s really the whole game.
Start to finish, you’re looking at about 45 minutes, including a short chill in the freezer that I’ll talk about in the tips section and that you really don’t want to skip. The recipe makes 7 to 8 biscuits, and they work just as well alongside sausage gravy at breakfast as they do next to a bowl of chili at dinner. Scroll down for the full Homemade Buttermilk Biscuit recipe, but I recommend reading through the tips before you start — a few small details make a real difference here.

Table of Contents
Ingredients for these Homemade Buttermilk Biscuits
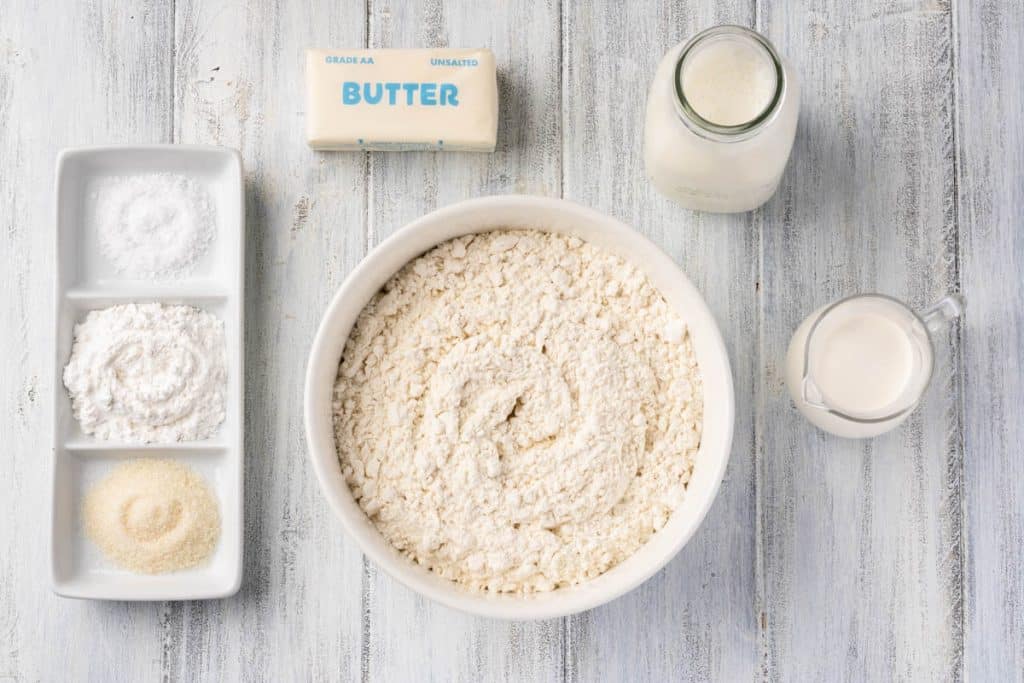
Flour: All-purpose flour is what you want here. It has enough structure to hold the layers together without making the biscuit tough, the way bread flour would. The recipe calls for sifting, and it’s worth doing — sifted flour incorporates more evenly and keeps the dough lighter. Measure by spooning the flour into your measuring cup and leveling it off, rather than scooping directly from the bag, which packs it down and can yield significantly more flour than the recipe intends.
Baking Powder: Two tablespoons sounds like a lot, and it is on the generous side, but that’s what gives these biscuits their height. Make sure yours is fresh — baking powder loses its punch over time, and old baking powder is one of the most common reasons biscuits come out flat. To test it, drop a teaspoon into hot water. If it bubbles actively, you’re good. If it just sits there, buy a new can. Read more about baking powder below.
Sugar: Two teaspoons is a small amount, just enough to round out the flavor without making these taste sweet. It also encourages a little browning on top. You can substitute honey if you prefer — just add it to the wet ingredients so it incorporates evenly. Either way, don’t skip it entirely. It does more than you’d expect for such a small quantity.
Salt: The recipe uses kosher salt, which has a cleaner, less sharp flavor than table salt and dissolves well into the dough. If you only have table salt, use about half the amount called for, since table salt is finer and more concentrated by volume.
Butter: This is the most important ingredient in this flaky biscuits recipe, and the temperature matters more here than anywhere else in your baking. The butter needs to be very cold — frozen is even better. Grating frozen butter on a box grater is the technique this recipe uses, and it’s genuinely worth the extra step. You get small, evenly distributed pieces of fat throughout the dough without any warmth from your hands working against you. Those cold butter pieces create steam in the oven, and steam creates flaky layers.
Use unsalted butter so you can control the salt level yourself. If salted butter is all you have, reduce the kosher salt by about half.
If you don’t want to grate the butter, you can cut it into small, cold cubes and work it into the flour with a pastry cutter, or quickly pinch the pieces into the flour with your fingertips. Just work fast and get it into the oven while everything is still cold.
Buttermilk: Cold buttermilk is non-negotiable for both flavor and chemistry. The acidity reacts with the baking powder to help the biscuits rise and gives them that classic, slightly tangy flavor that makes a buttermilk biscuit taste like a buttermilk biscuit. Full-fat buttermilk produces the best result.
If you don’t have buttermilk on hand, you can make a quick substitute by adding one tablespoon of white vinegar or lemon juice to a cup of whole milk, stirring, and letting it sit for about five minutes until it curdles slightly. It works, and in a pinch, it’s perfectly fine, but real buttermilk does produce a noticeably better biscuit. It’s worth keeping a carton in the freezer if you bake regularly. See the notes below.
Heavy Cream: The heavy cream is listed as optional, but it adds a richness and tenderness to the crumb that’s hard to replicate any other way. If you’re already making biscuits from scratch, it’s worth the small addition. Whole milk works as a substitute if that’s what you have, though the result will be slightly less rich.
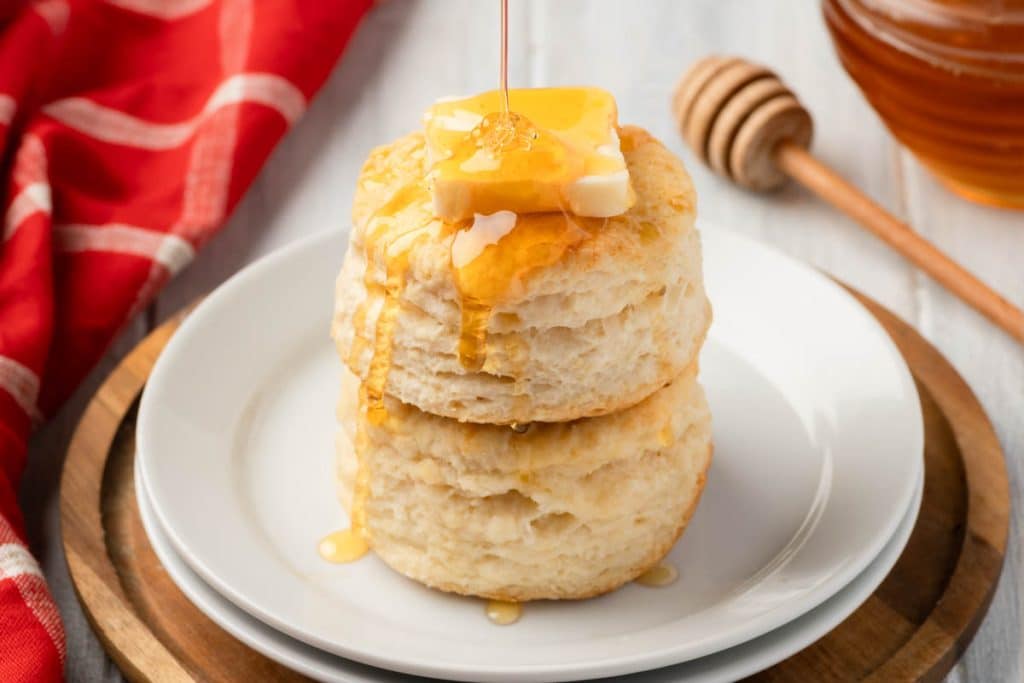
Melted Butter for the Tops: Don’t skip brushing them. It gives the biscuits that glossy, golden finish and adds another layer of butter flavor right at the end. Brush them as soon as they come out of the oven while the tops are still hot.
Can You Freeze Buttermilk?
Yes, and it’s one of those small kitchen habits that saves a surprising amount of money over time. Buttermilk is one of those ingredients you rarely need a full quart of at once, and it has a relatively short refrigerator life once opened.
Pour leftover buttermilk into an ice cube tray and freeze until solid, then transfer the cubes to a freezer bag. Standard ice cube trays hold about two tablespoons per cube, so you can pull out exactly what you need for a recipe without thawing a whole container. It keeps well in the freezer for up to three months.
When you’re ready to use it, thaw the cubes in the refrigerator or set them in a small bowl at room temperature for about 30 minutes. Frozen and thawed buttermilk can separate and look a little curdled, which is normal. Give it a good stir or a quick whisk, and it will come back together. The flavor and acidity are fully intact, and it performs exactly the same way in baking as fresh buttermilk.
If you bake regularly, it’s also worth knowing that buttermilk freezes well in half-cup or one-cup portions in small zip bags or a muffin tin. Freeze until solid, pop them out, and store them in a labeled freezer bag. Pull one out the night before you plan to bake and let it thaw in the refrigerator overnight.
Baking Powder v Baking Soda
These two ingredients look similar and are often confused, but they work differently and are not interchangeable in most recipes without some adjustment.
Baking soda is a base. On its own, it does nothing. It needs an acidic ingredient in the recipe — buttermilk, yogurt, lemon juice, vinegar, brown sugar, or honey — to activate and produce the carbon dioxide bubbles that make baked goods rise. When it works, it works fast, which is why recipes that use baking soda usually go straight into the oven without any resting time.
Baking powder already contains both the base and the acid, so it doesn’t need anything else in the recipe to activate. Most modern baking powder is double-acting, meaning it releases gas twice: once when it gets wet and again when it hits the heat of the oven. That second rise in the oven is what gives biscuits and cakes their final lift.
This recipe uses only baking powder because of the buttermilk. Buttermilk is acidic, which means the recipe already has the right chemistry for baking powder to work well. Adding baking soda on top of that without carefully recalculating the balance could cause the biscuits to over-rise and collapse, or leave a slightly metallic or soapy aftertaste if the soda doesn’t fully neutralize.
Some biscuit recipes do use a small amount of both — typically a larger amount of baking powder for lift, with just a pinch of baking soda to help neutralize the buttermilk’s acidity and encourage browning. This recipe keeps it simple and sticks with baking powder alone, which is part of why it’s reliable and consistent without a lot of fuss.
The most important thing to know about either leavener is that freshness matters enormously. Both lose their potency over time, especially once the container has been opened and exposed to humidity. If your biscuits aren’t rising the way they should, check the dates on both before assuming you did something wrong. Read how to test the viability of your baking soda and baking powder here.
Homemade Buttermilk Biscuit Variations
One of the best things about this homemade buttermilk biscuits recipe is how easily it takes to add-ins. The base dough is lightly sweetened and neutral enough to go savory or sweet without any adjustments to the core recipe. Just fold your additions in gently after the dough comes together, before you start folding.
Cheddar and Chives: This is the crowd-pleaser. Use sharp cheddar for the best flavor — about half a cup, shredded — and two to three tablespoons of fresh chives. These are excellent alongside eggs in the morning or split and used as the base for a breakfast sandwich.
Rosemary and Black Pepper: A more sophisticated option that pairs beautifully with dinner. Use about a tablespoon of finely chopped fresh rosemary and a generous amount of cracked black pepper. These are particularly good next to roast chicken or a bowl of tomato soup.
Parmesan and Garlic: Use finely grated, fresh Parmesan rather than shredded — it distributes more evenly through the dough. Add half a teaspoon of garlic powder or one small, very finely minced clove of fresh garlic. These lean more toward the savory side and hold up well next to beef stew or chili.
Jalapeno Cheddar: Use sharp cheddar and one to two jalapenos, seeded and finely diced. If you want more heat, leave some of the seeds in. These work as well with BBQ and pulled pork as they do with a plate of scrambled eggs.
Honey Butter Glaze: Instead of plain melted butter on top, mix equal parts softened butter and good honey and brush it on the moment the biscuits come out of the oven. The glaze soaks in slightly as they cool, making them appropriate for a bread basket at a dinner party or a weekend breakfast that feels a little more special than usual.
A note on sweet variations: because the base dough is only lightly sweetened, these buttermilk biscuits can also go in a fully sweet direction. Split them warm and top with macerated strawberries and whipped cream for a simple strawberry shortcake, or serve them with peaches and cream in the summer. They don’t need any modifications to the dough for either application.
Biscuit Cutter Alternatives
Some of these links may be Amazon affiliate links and I may earn a small commission from the sale of these products to help defray the costs of operating this site, but the price you are charged is not affected. You can see my full disclosure policy here.
A 3-inch biscuit cutter is what this buttermilk biscuits recipe calls for, and if you bake biscuits with any regularity, it’s worth having one. They’re inexpensive, and they cut cleanly, which matters for a good rise. That said, you don’t need to make a special trip to the store for this recipe to work.
A Sharp-Edged Drinking Glass: The most common substitute and one that works well. Choose a glass with a thin, sharp rim (like a wine goblet) rather than a thick, rounded one, and dust the rim with flour before each cut, just as you would with a biscuit cutter. Press straight down and lift straight up — the same rule applies here. Don’t twist.
A Bench Scraper or Sharp Knife: If you want to skip the round cutter altogether, cut the dough into squares instead. Press the dough into a rectangle, then use a bench scraper or a sharp knife to cut it into even squares or rectangles. This method has a practical advantage: there are no scraps. Every piece of dough becomes a biscuit with the first cut, which means no re-rolling and more consistent results throughout the batch. Square biscuits rise just as well as round ones.
A Word About Re-Rolling Scraps
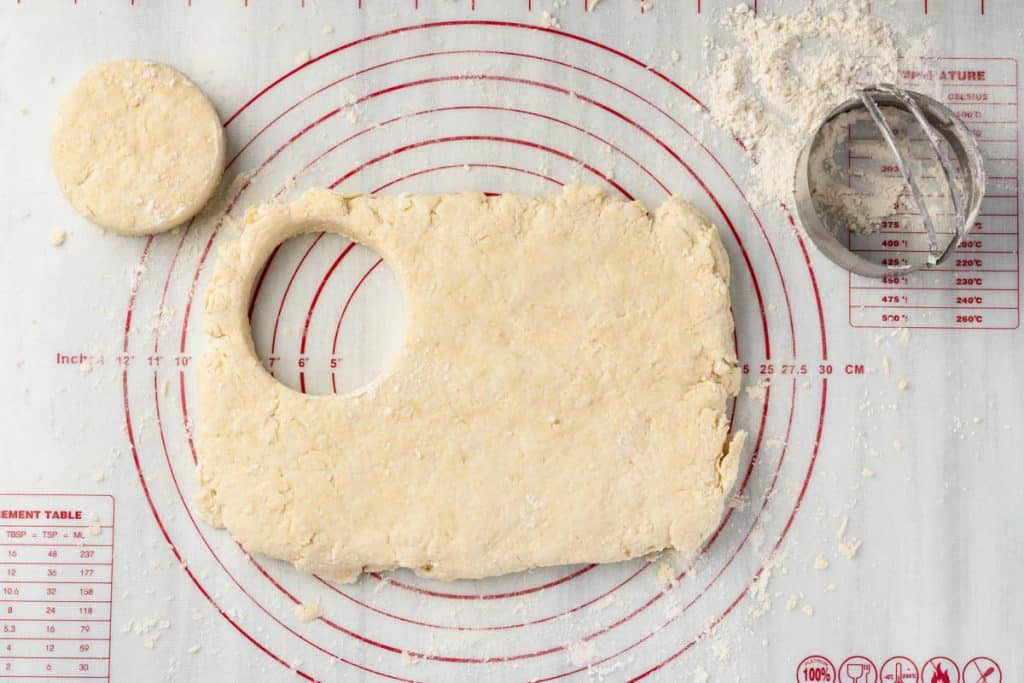
If you do use a round cutter, you’ll have some dough left after the first pass. Press those scraps together gently — don’t knead them — and cut again. The second-cut biscuits will be slightly less tall and a little less tender than the first batch because the dough has been handled more, but they’ll still taste great. Just accept that they’re the cook’s biscuits and eat them first. 😉
Make Ahead Instructions
These Homemade Buttermilk Biscuits are one of the more freezer-friendly things you can bake, and building a little make-ahead strategy into your routine means you’re never more than 20 minutes away from a fresh, hot biscuit.
Refrigerating the Dough Overnight
If you want to get a head start the night before, you can cut the biscuits, place them on a parchment-lined baking sheet, cover loosely with plastic wrap, and refrigerate overnight. Pull them straight from the refrigerator and into the preheated oven the next morning. No thawing needed. The cold rest actually works in your favor here — the butter firms back up overnight, and the biscuits go into the oven in perfect condition.
If you bake regularly, it’s worth doubling the recipe specifically to stock the freezer with unbaked biscuits. The active time is almost identical, and you end up with a ready supply that works for breakfast, dinner, or any time someone shows up at the door, and you want to put something warm on the table without any real effort.
Freezing Unbaked Buttermilk Biscuits
This is the method I’d recommend if you want biscuits on demand without having to start from scratch every time. Cut the biscuits as directed, arrange them on a parchment-lined baking sheet, spaced apart, and freeze until completely solid — about an hour. Then, transfer the frozen biscuits to a labeled freezer bag and store for up to three months.
When you’re ready to bake, pull out however many you need and bake straight from frozen at 425°F (218°C). Add three to five minutes to the baking time and keep an eye on the tops. No thawing required. This method preserves the layers and the rise beautifully because the butter goes into the oven cold and firm, exactly the way it should.
Freezing Baked Biscuits
Already-baked buttermilk biscuits freeze well, too. Let them cool completely first — putting warm biscuits in a bag traps steam and makes them gummy. Freeze on a tray until solid, then transfer to a freezer bag or airtight container. They keep for two to three months.
To reheat, the oven is your best option. Set the oven to 350°F (177°C) and warm the refrigerated or frozen biscuits for 10 to 15 minutes, loosely wrapped in foil if you want softer tops.
The air fryer works well at 320° to 330°F (160° to 166 °C) for three to five minutes if you want the edges to crisp back up. The microwave is the fastest option but the least forgiving — wrap the biscuit in a damp paper towel and heat in 15-second increments. They can get chewy quickly if you overdo it.
Tips for Homemade Buttermilk Biscuit Success
Cold ingredients are everything. The butter needs to be very cold, the buttermilk needs to be cold, and the kitchen shouldn’t be hot if you can help it. The whole point of the technique is to keep the butter in small solid pieces so it steams in the oven and creates layers. Warm butter just disappears into the dough.
Grate the butter. This is the single most useful technique tip in the whole recipe. Grating frozen butter gives you even, fine pieces distributed throughout the dough without any dough-warming hand contact. Don’t skip this.
Shaggy is good. First-time biscuit makers panic when the dough looks rough and messy. That’s correct. You are not looking for a smooth, cohesive dough when you add the buttermilk. The folding process will bring it together.
Don’t twist the cutter. Press straight down and lift straight up. Twisting seals the edges and prevents the biscuit from rising fully. This is a small thing that makes a real difference.
Freeze before baking for maximum height and flakiness. Ten minutes in the freezer lets the butter firm back up after all that handling. Your oven does the rest.
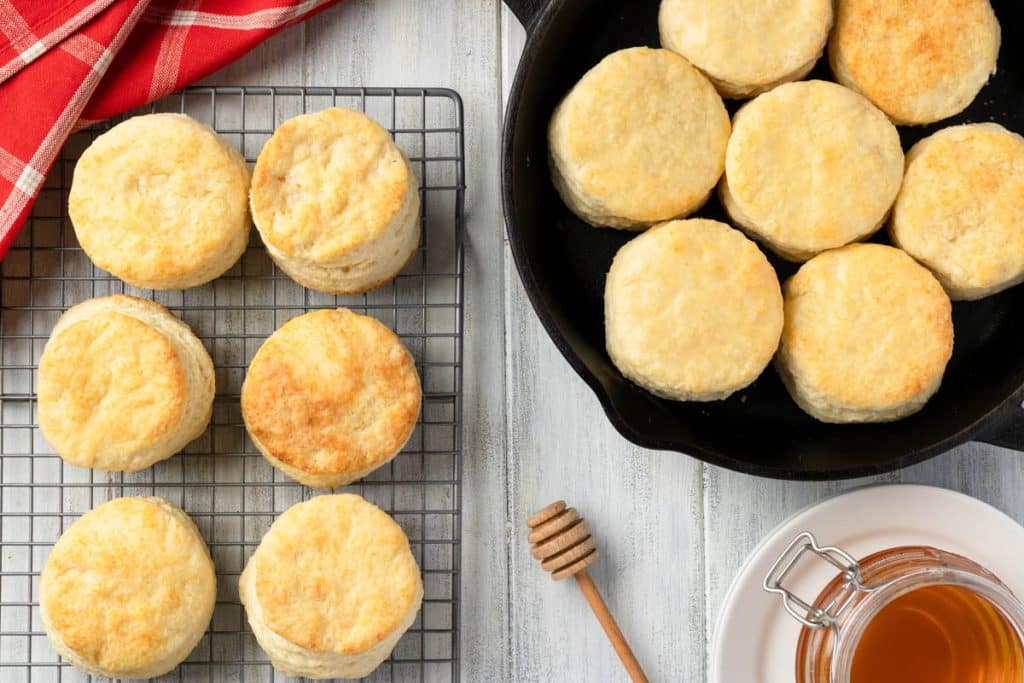
Use a heavy pan. A cast-iron skillet holds heat evenly and gives you a better bottom crust than a thin baking sheet.
Troubleshooting Homemade Buttermilk Biscuits
Biscuits didn’t rise: Almost always a cold butter issue, an overworked dough, or expired baking powder. Check the date on your baking powder — this is the most overlooked culprit.
Biscuits spread instead of rising: The butter got too warm during mixing. Next time, work faster and freeze the shaped biscuits before baking.
Biscuits are tough: You mixed too long or folded too many times. Once the dough comes together, stop.
Biscuits are dry inside: Either overbaked or the dough was too dry going in. When in doubt, err on the slightly wet/shaggy side with your dough.
Bottoms burned: Your pan is too thin, or your oven runs hot. Try a cast-iron skillet, or put a second baking sheet underneath to buffer the heat.
No distinct layers: The folding technique is what creates those layers. Make sure you’re doing at least 3 folds, pressing to a true rectangle each time, and that your butter is cold enough to stay in pieces rather than smearing.
Homemade Buttermilk Biscuits
Equipment
Ingredients
- 2 ½ cups all-purpose flour sifted
- 2 tbsp baking powder
- 2 tsp sugar
- 1 tsp kosher salt
- ½ cup very cold unsalted butter 1 stick
- 1 cup cold buttermilk
- 2 tbsp heavy cream optional for richness
- melted butter for brushing tops
Instructions
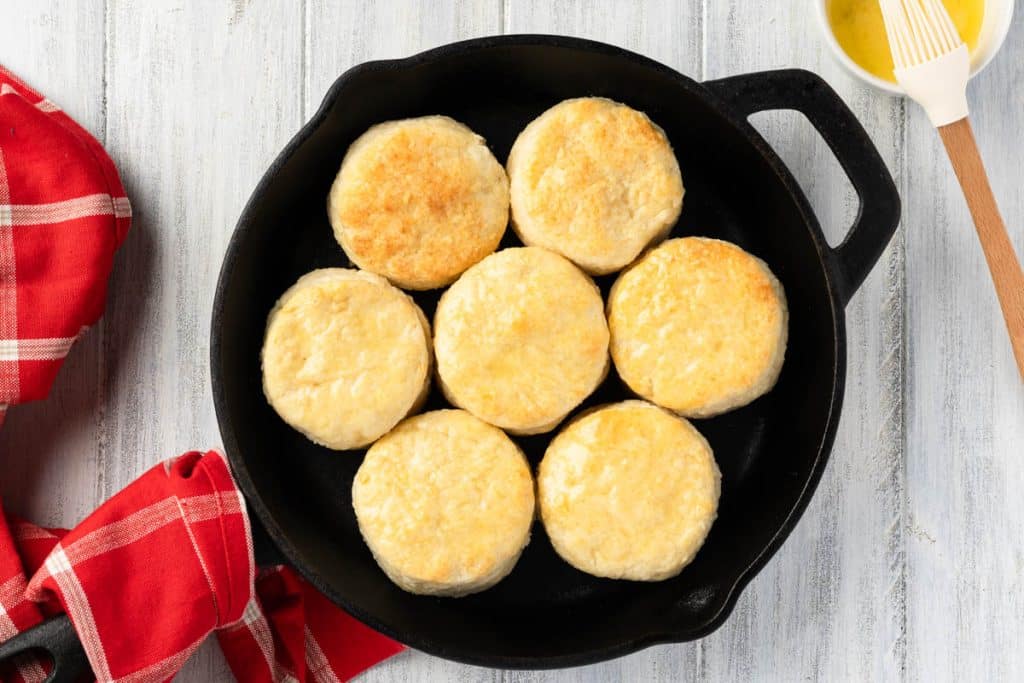
- Preheat the oven to 425℉ (218 ℃). Grease a cast-iron skillet or line a baking sheet.
- Place the butter in the freezer for 15-20 min if it's not already super cold.
- Measure the flour using the scoop-and-level method. (see note) Whisk flour, baking powder, sugar, and kosher salt together.
- Use a box grater to grate the butter into the flour mixture and gently toss with your hands or a fork until the butter is coated.
- Create a well in the flour mixture and add the buttermilk and the optional heavy cream. Stir gently just until the dough starts to come together. The dough should look shaggy and slightly messy. DO NOT overmix.
- To create layers, turn the dough onto a floured surface and use your hands to press the dough into a rectangle.
- Fold the dough in thirds. This is done by folding one side of the dough to the middle, and bringing the other side over that. Similar to folding a letter.
- Rotate the dough 90°, gently press the rectangle out with your hands until thin enough to fold, and repeat the folding process. Repeat the folding a total of 3- 4 times. The dough should feel smooth.
- For cutting, press the dough until it’s 1- ½ inches thick. Cut the dough with a 3 inch biscuit cutter dusted with flour. Press straight down, do not twist. (You can also use a 2 ½ inch biscuit cutter instead)
- Freeze shaped biscuits for 10-15 minutes before baking.
- Arrange the biscuits in the greased cast iron pan or on a baking sheet. Place them close together but not touching. If you prefer a softer edge, have the biscuits touching.
- Bake for 15-18 minutes at 425℉ (218 ℃) until the tops start to brown. Brush the tops with butter and serve warm.

Hi Lynn:
A note on correctly measuring flour:
Use a scale!
Kim
Hi Kim,
Agreed! I use a kitchen scale for much of my baking. But since not everyone has a kitchen scale, we wanted to offer a method that everyone could use.