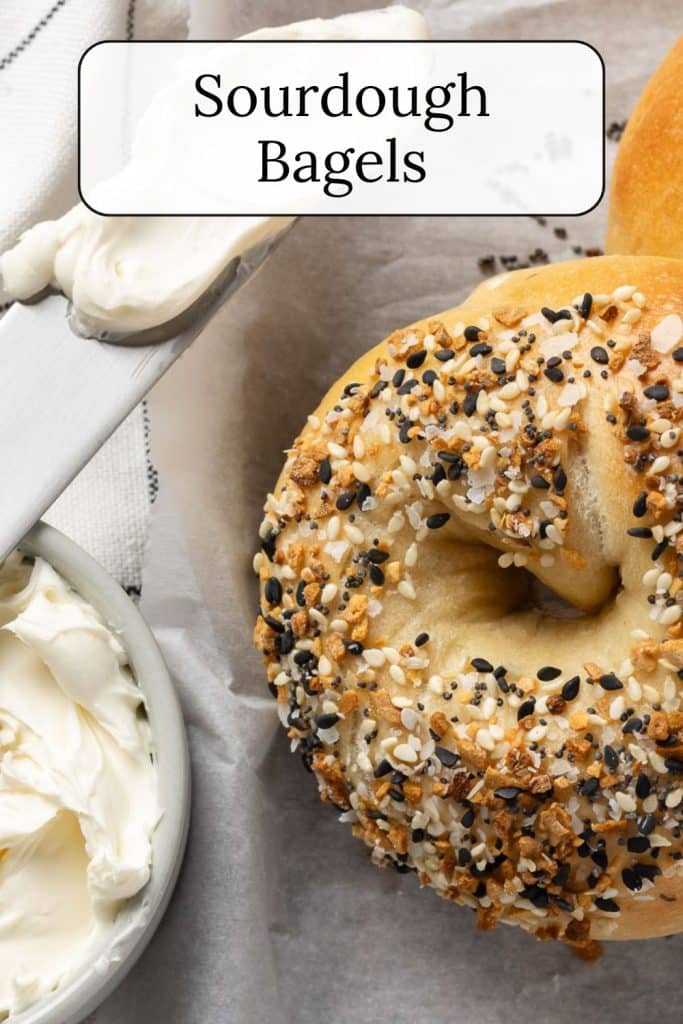
Sourdough Bagels Recipe


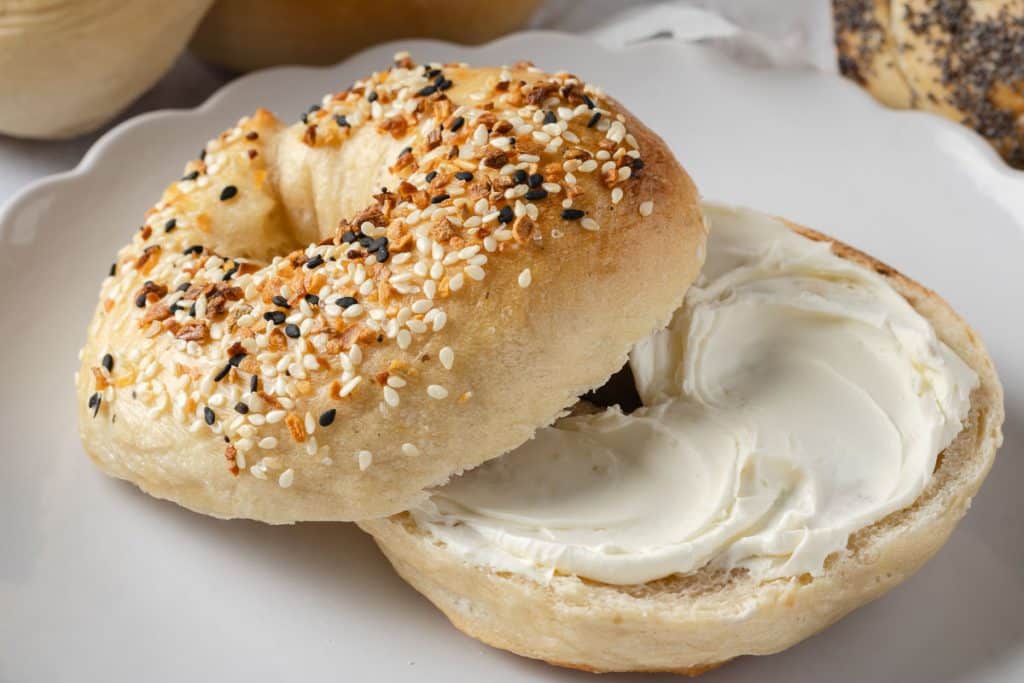
There’s nothing quite like biting into a freshly baked bagel, and these sourdough beauties deliver the perfect contrast: a burnished, chewy shell that yields to a pillow‑soft interior. Starting with a lively starter gives sourdough bagels the gentle tang and depth of flavor that commercial yeast can’t match. This post walks you through this relatively straightforward process, demystifying sourdough bagel making so you can make them at home!
The dough is intentionally stiff; lower hydration lets you shape tidy rings and sets you up for the signature tight crumb. An unrushed first rise (overnight in cooler weather, daytime when warm) develops flavor while fitting neatly around real‑life schedules. After shaping, every bagel takes a quick honey bath that locks in moisture, sets the crust, and preps the surface for baking to a golden hue.
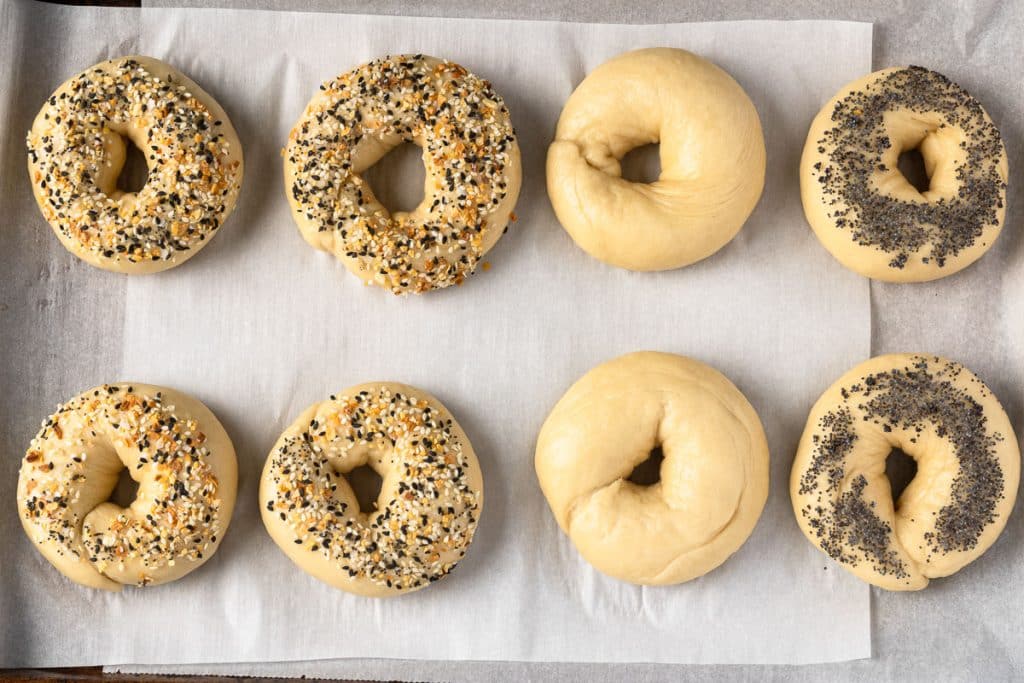
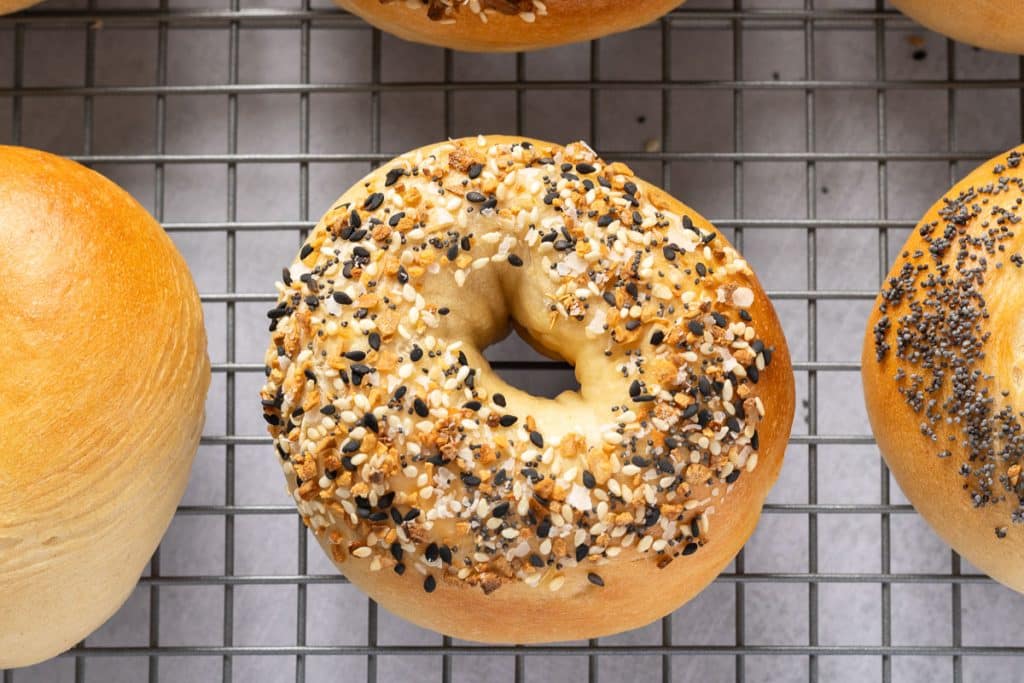
But, before their turn in the oven, you can roll still‑warm bagels in everything seasoning (my go-to) for a savory crunch or choose from various other topping options. However you top them, the result is a batch of bakery‑level bagels that freeze like a dream and stand ready for breakfasts, sandwiches, and snack attacks all week long.
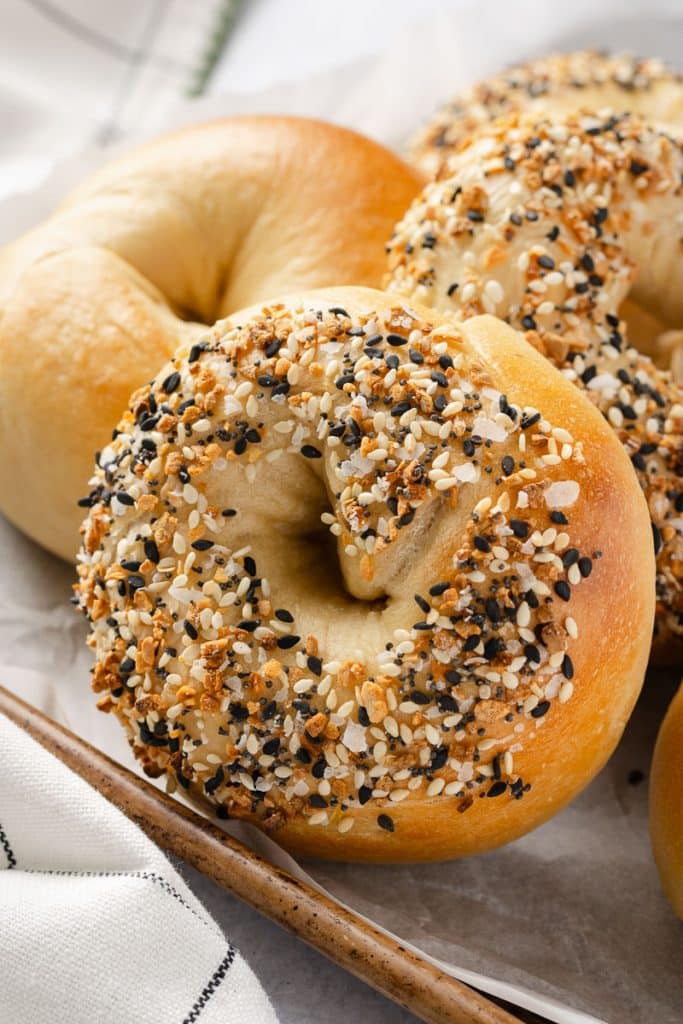
Table of Contents
Yeasted v. Sourdough Bagels – What Is The Difference?
If you are primarily familiar with yeast-leavened bagels, the first thing you notice when you bite into a sourdough-leavened bagel is its subtle tang. The mild tang comes from wild yeast and lactic‑acid bacteria in the starter. Their slow work adds a wheaty, slightly malty flavor that quick commercial yeast can’t match. A yeasted bagel, by contrast, tastes cleaner and a touch sweeter because its fermentation window is short; the flavors in the flour don’t have as much time to evolve, so the dough leans more toward straightforward breadiness.
Texture is another area where you will notice a difference. Sourdough doughs are typically mixed a little stiffer and allowed to ferment at a cooler pace, translating into a tighter, chewier crumb once they’re boiled and baked. The longer rise also leaves more naturally produced sugars on the surface, helping the crust brown deeper and form a heartier “shell.” Yeasted bagels still have that classic chew, but because the dough is often a bit softer and the rise is faster, the finished crumb feels slightly lighter and the crust can become thinner and less assertive.
The timelines themselves affect both workflow and flavor. A sourdough batch asks for patience—usually six to twelve hours for the first rise and another short proof after shaping. That extra time is worth it, but it means planning ahead and maintaining an active starter. A yeasted dough races from mix to bake in as little as two hours, making it the hero of last‑minute brunches, though you sacrifice some complexity in the finished bagel.
Because sourdough fermentation pre‑digests some starches and proteins, many bakers find sourdough bagels easier on the stomach, and the bagels stays soft a day or two longer at room temperature. Yeasted bagels stale faster and are best frozen within twenty‑four hours if you’re not eating them immediately. Ultimately, the choice comes down to schedule and taste: yeast offers speed and a familiar deli profile, while sourdough pays you back for the overnight wait with deeper flavor, a sturdier chew, and a bagel that toasts, freezes, and stands up to hefty sandwich fillings like a champ.
Tips for Sourdough Bagel Success
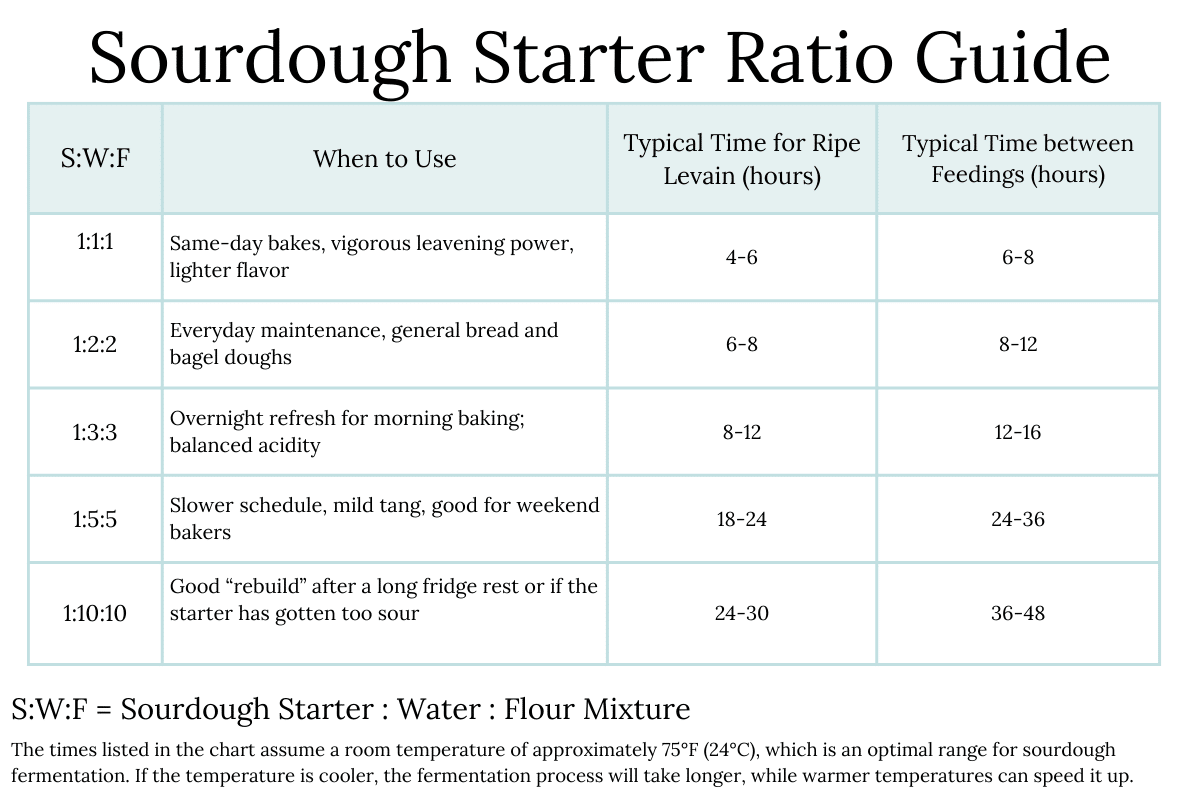
- Use your sourdough starter at its bubbly peak. If it is sluggish, give it an extra feeding and a warm spot to revive it. This post has some tips on boosting your starter. Here’s a chart that helps determine how to feed your starter to get it where you want it to be. This is just a guideline, as every starter’s environment (water, room temperature, flour, etc.) differs.

- Resist the urge to add water; a tacky‑firm dough is key to chew and shape.
- Keep the water bath at 180-190°F (82-88°C). A gentle simmer sets the crust without overcooking the center.
- If a test bagel won’t float after 10 seconds in the pot, lift it back onto a parchment‑lined tray so it doesn’t soak up extra water. Blot any surface moisture with a clean towel—excess water can make them stick later. Give all the bagels another 15‑20 minutes of proofing.
- Make sure the first rise truly doubles the dough to ensure that your bagels are ready to boil and float; rushing that stage leaves the gluten too tight. And if you’re cold‑proofing shaped bagels overnight, let them warm up 20–30 minutes on the counter before boiling.
- When shaping the bagels using either method shown, skip the extra flour on your hands or work surface—friction is what tightens the dough. If sticking becomes an issue, a quick mist of water adds glide without changing the texture. Shape each ring briskly, because over‑handling lets the gluten relax and the surface slacken. You’ll know you’ve built good tension when the shaped bagel springs back after a light poke.
- For extra shine, flip the bagels midway through baking so both sides face the hotter top of the oven.
Sample Baking Schedule
Once again, you know your starter better than anyone! Adjust this schedule to fit your starter’s regular activity.
Day Rise/Evening Bake
- 8 pm- Feed starter so that it will be bubbly and active the next day
- 8 am- Mix and knead dough, cover for the first rise, let it rest until it’s doubled.
- 6 pm- Line a tray with parchment paper. Divide and form the dough into eight equal balls. Shape using one of the two methods shown below.
- 6:45 pm- Preheat the oven to 425°F (218°C). Prep toppings. Place the pot of water and honey on the stove and boil.
- 7 pm- Boil bagel dough, top it with toppings, and bake it in the oven.
Night Rise/Morning Bake
- 8 am- Feed sourdough starter
- 8:30 pm- Mix and knead the dough. Cover and let the dough rise overnight.
- 7:30 am- Line a tray with parchment paper. Divide and form the dough into eight equal balls. Shape using one of the two methods shown below.
- 8:15 am—Preheat the oven to 425°F (218°C). Prepare the toppings. Place the pot of water and honey on the stove and boil.
- 8:30 am- Boil bagel dough, top with toppings, and bake in the oven.
In the warmer summer months, it’s recommended to skip the overnight rise and do a day rise instead to ensure the bagels do not overproof. If you do a day rise and don’t have time for the second rise, shaping, and baking, you can cover the dough in a bowl and place it in the fridge overnight. Use the cold dough in the morning to complete the rest of the steps.
How to Make Sourdough Bagels
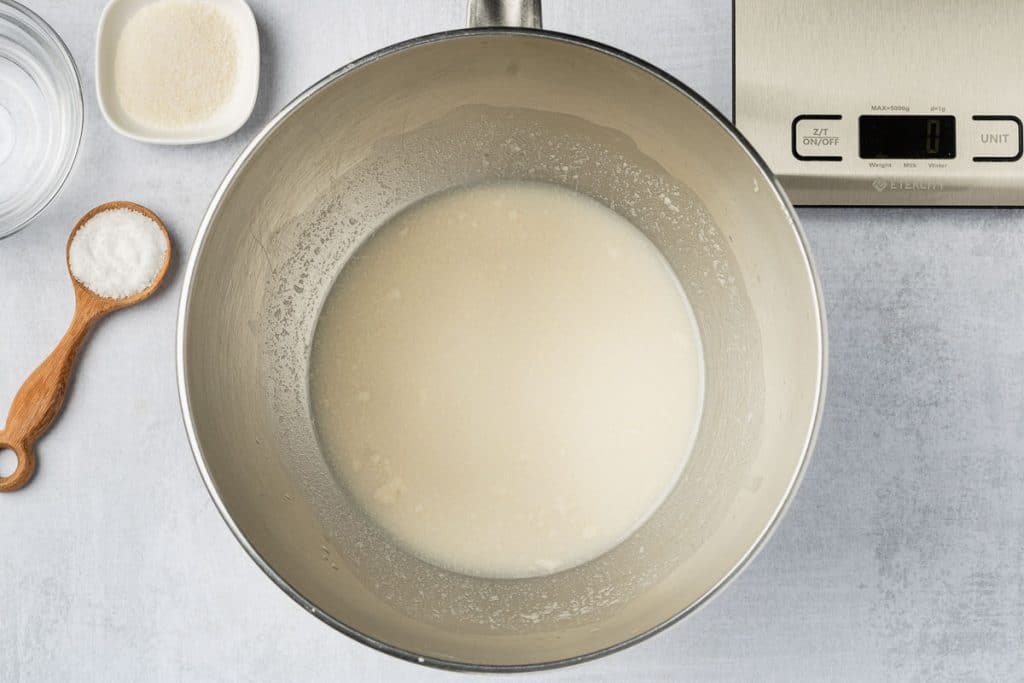
1. Combine sourdough starter, water, sugar, and salt in a mixing bowl.
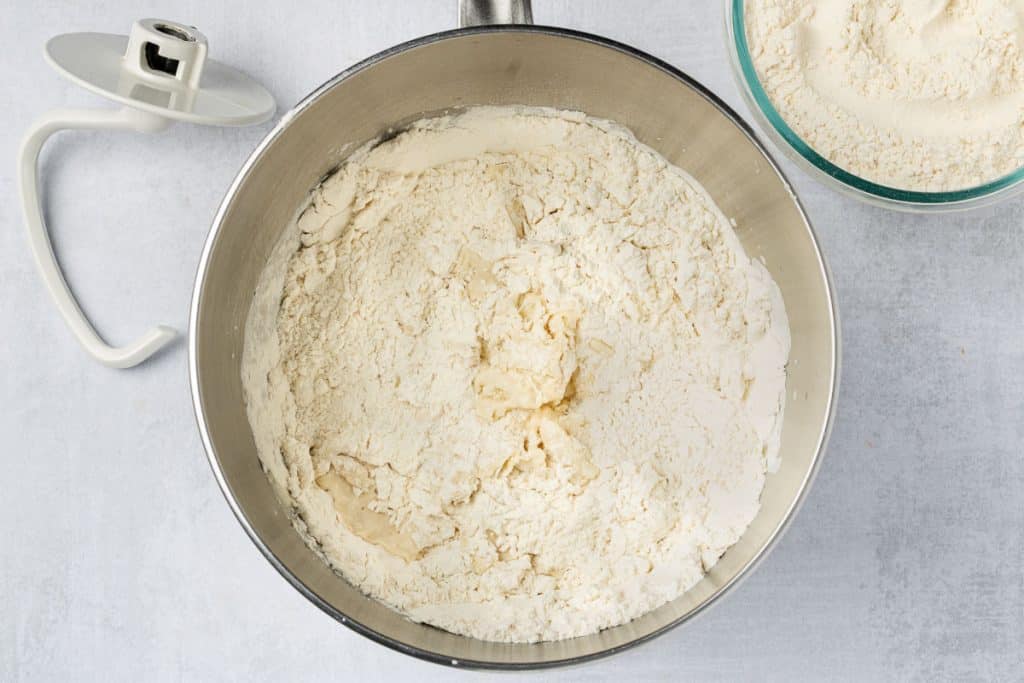
2. Using a dough hook, mix in bread flour. The dough will be stiff, but do not add more water. Mix on low, with the dough hook, for 6-7 minutes (or knead 10 minutes by hand).
 Starter
- Starter, water, sugar, and salt
- Add flour and use dough hook
- After 6-7 minutes of processing with dough hook

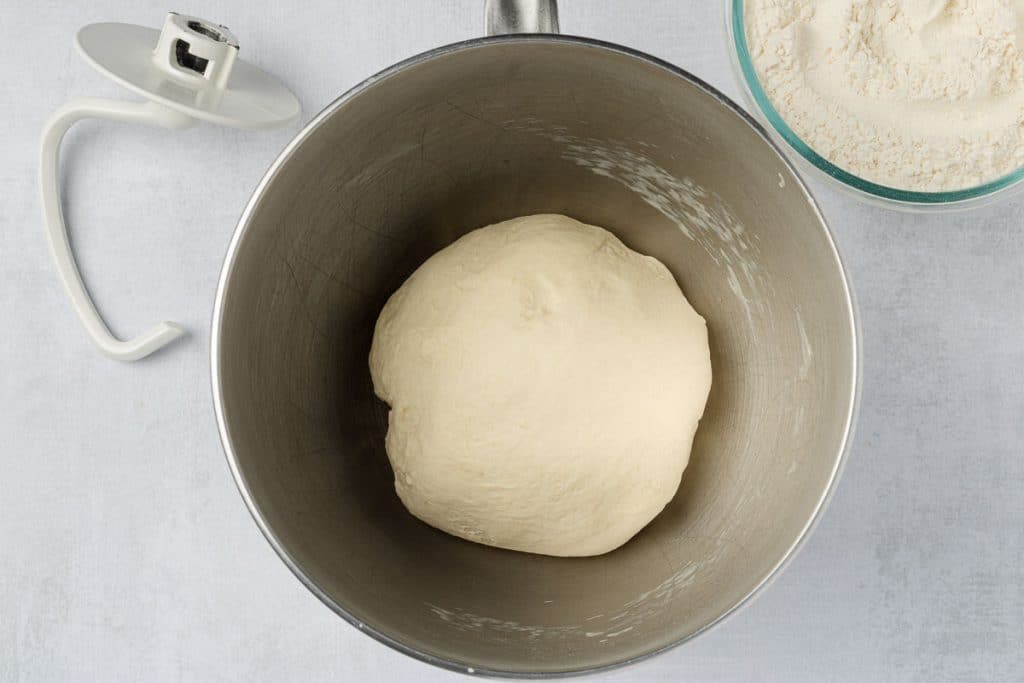
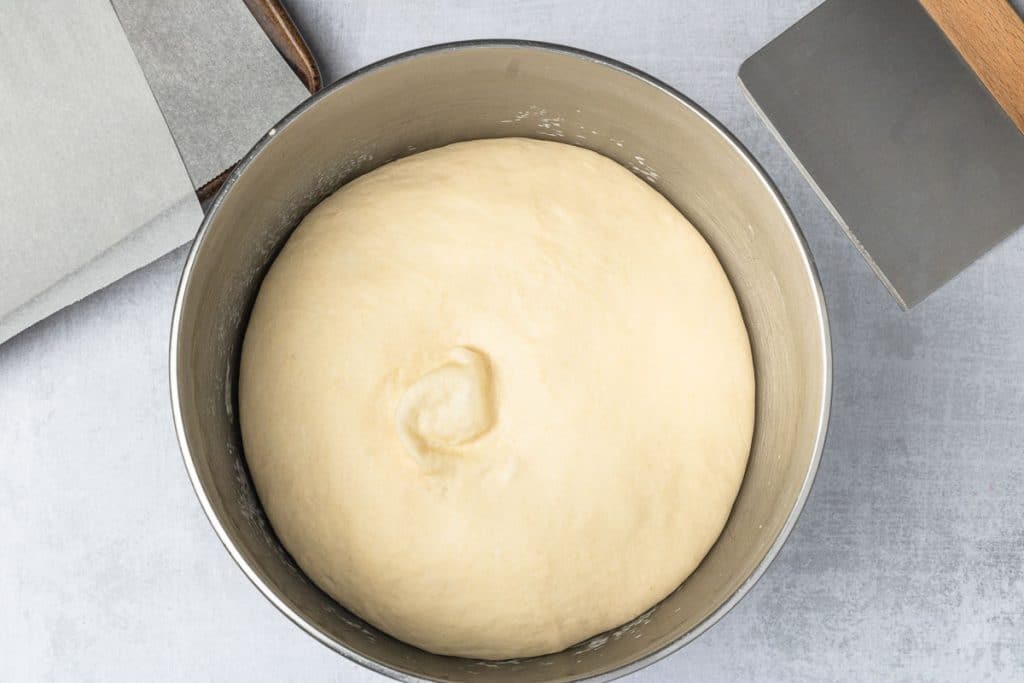
3. Cover the dough in the bowl and let it rest at room temperature until it doubles in size.
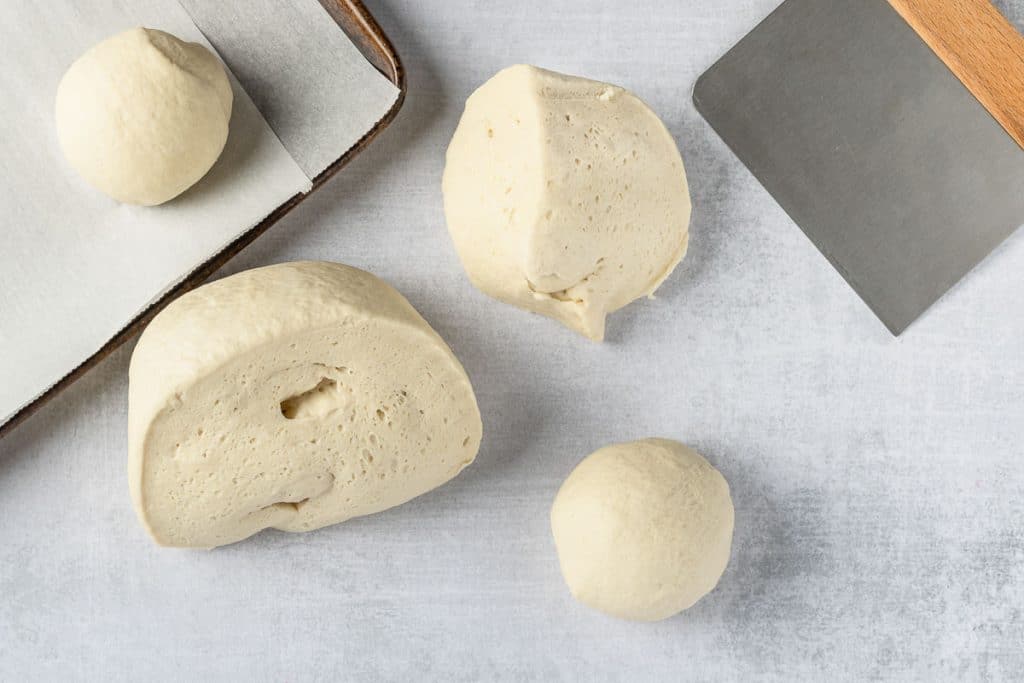
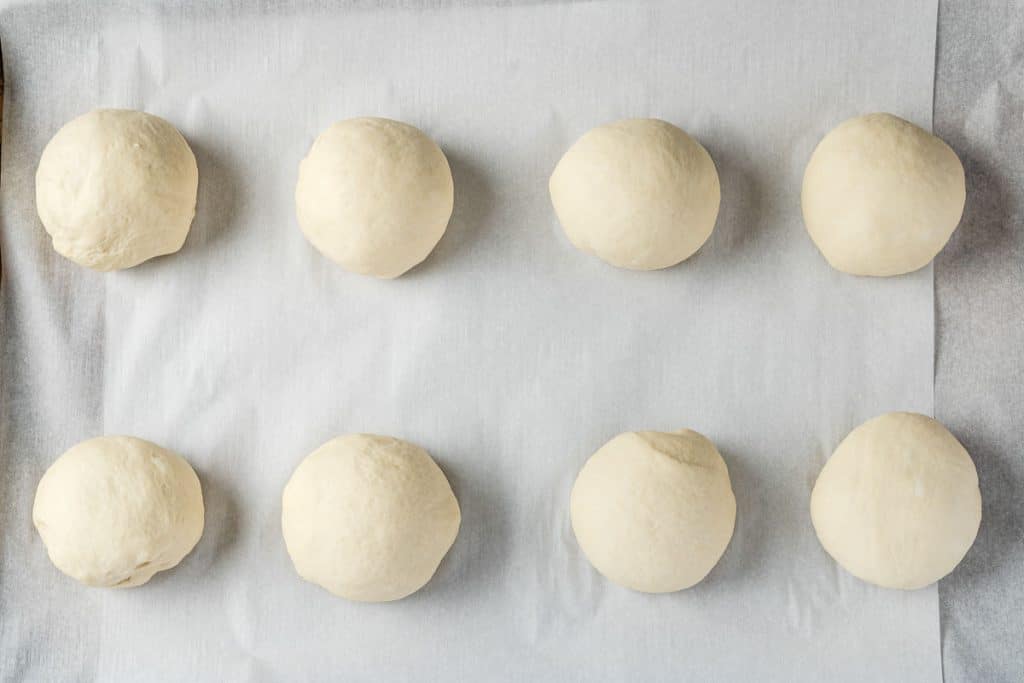
4. Line a baking sheet with parchment paper. Divide the dough into eight equal pieces and roll them into balls.
5. Choose a shaping method, either “Rope and Loop” or “Poke and Stretch.”
Rope and Loop
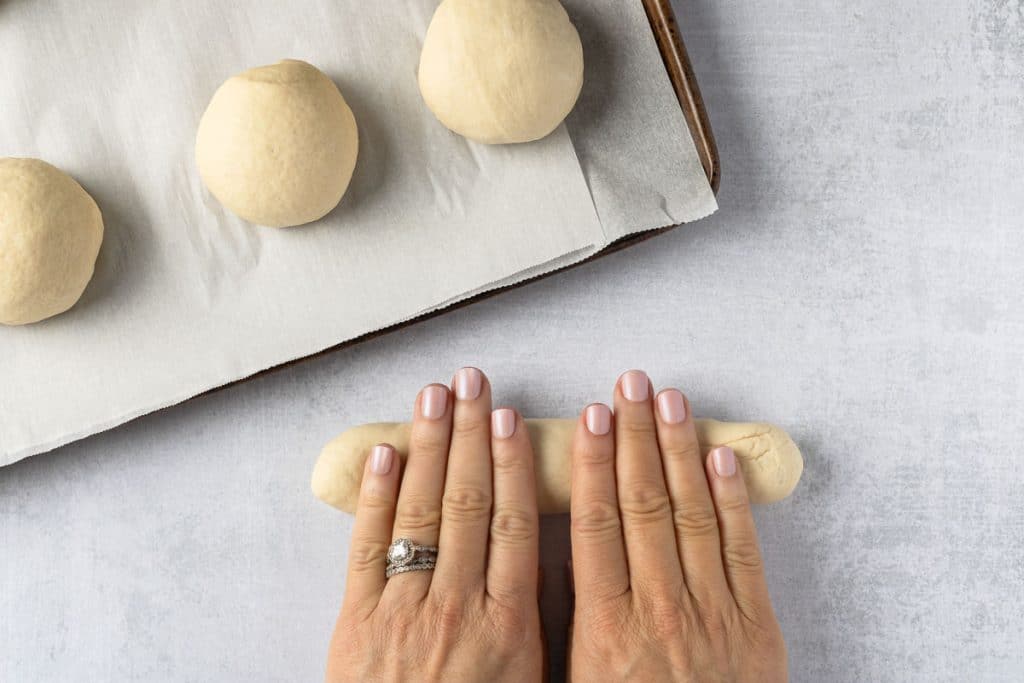
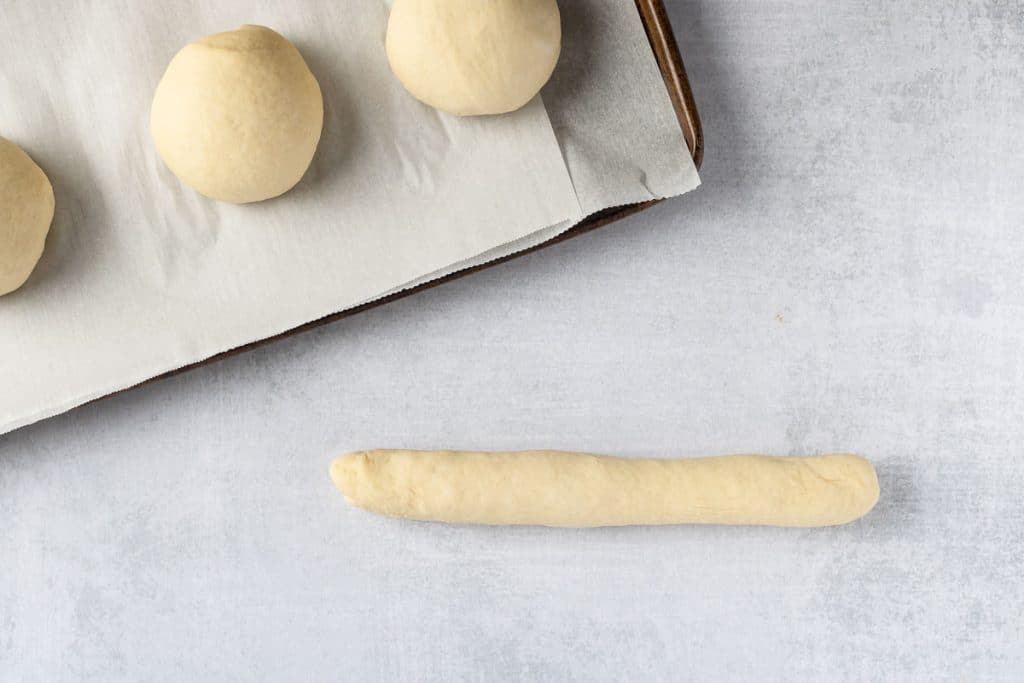
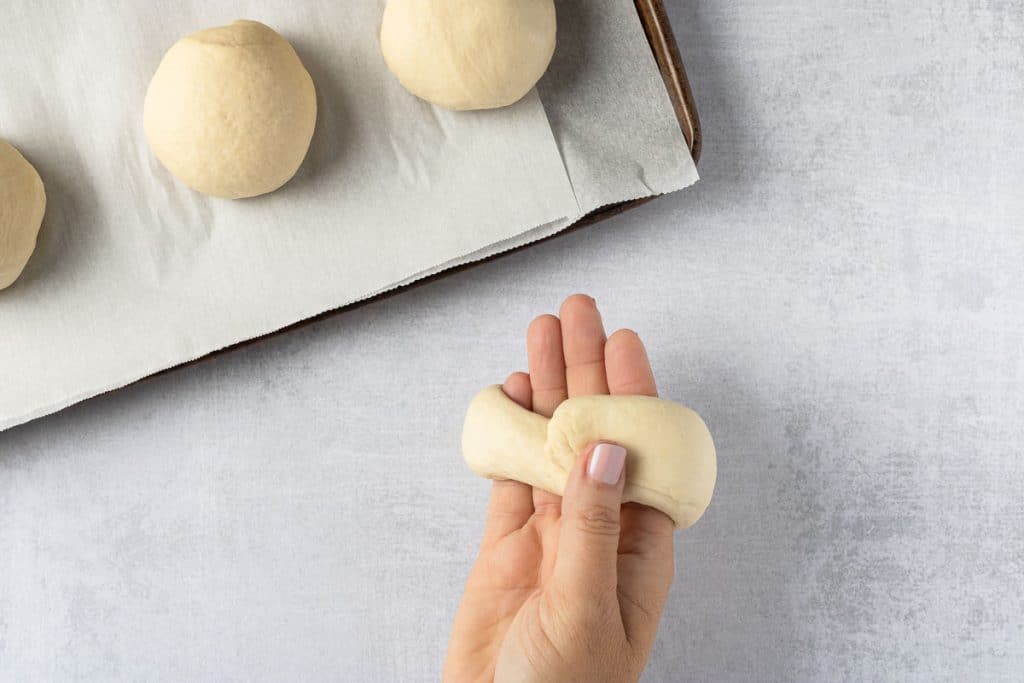
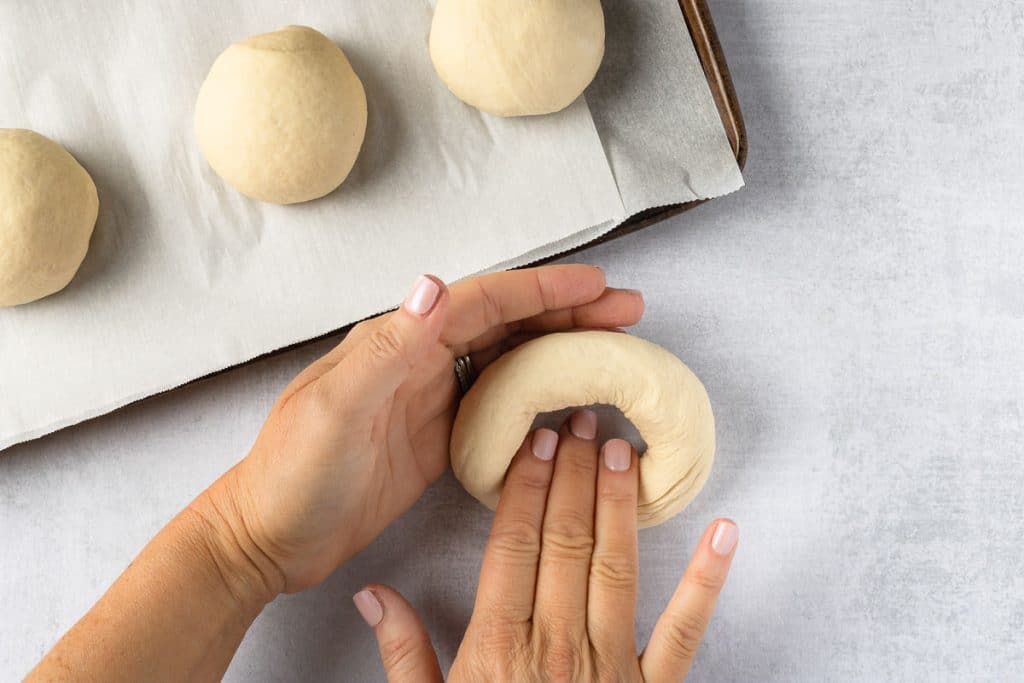
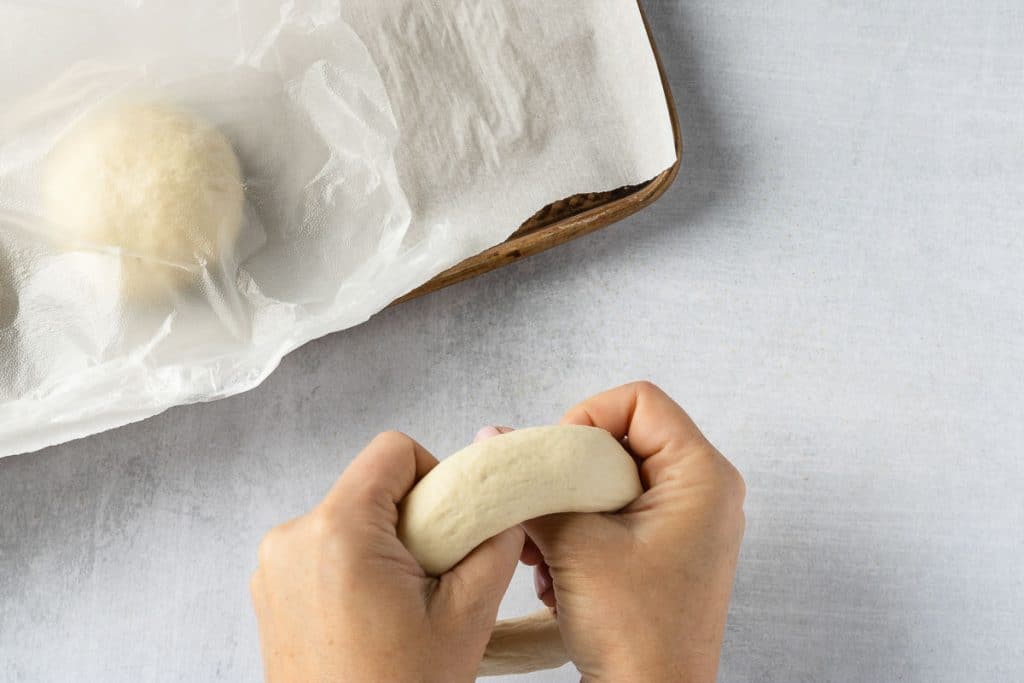
Roll each ball into a rope or log shape. To help develop tension in the dough, roll each piece into a short rope, holding one end in place and rolling the other end back and forth, slightly stretching the rope as you go. The gentle elongation tightens the outer layer. The dough must be long enough to wrap a circle around your fingers, plus an inch or so, so the two ends can overlap slightly.
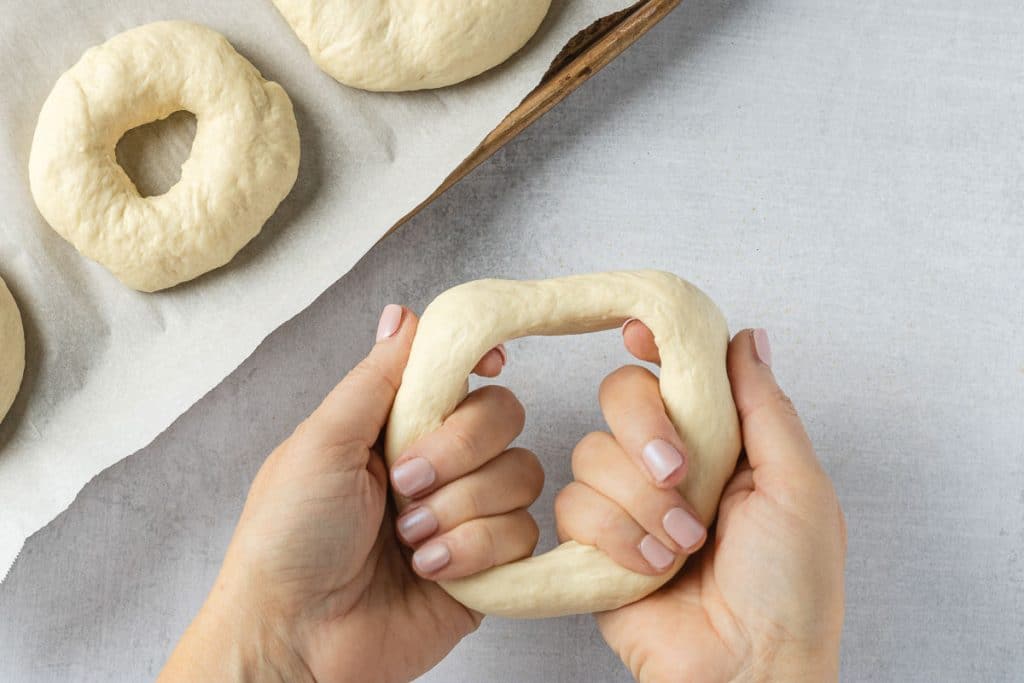
Adhere the overlapping ends together to create a complete circle (you can use water to stick the ends together if necessary).
Using a motion similar to rolling the dough into a rope, roll the two ends together, ensuring they adhere well. Place the circle of dough back onto the parchment for the second rise.
Cover and let them rise for 30- 60 minutes or until puffy.
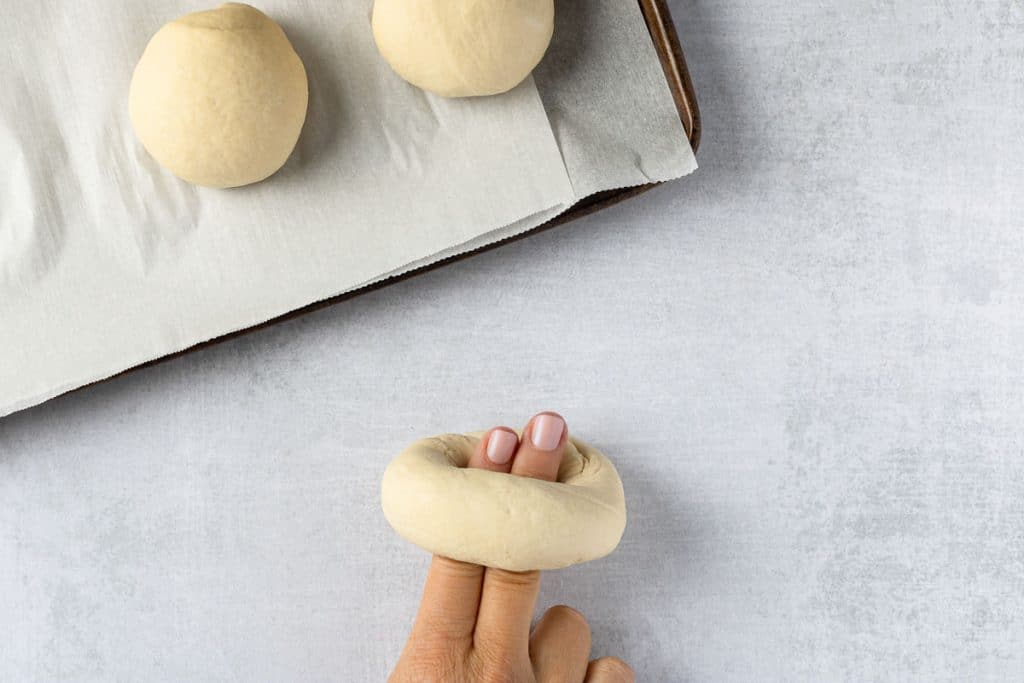
Poke and Stretch
Let the dough balls sit for 10-15 minutes to rest.
Work on an unfloured or barely misted counter so the dough can grip, then cup your hand loosely over a piece and move it in tight circles; the drag of your palm tucks the underside while stretching the top smooth. After six to eight passes the dough will feel firmer—once the bottom seam seals and the top looks satiny, you’ve built the surface tension that keeps the bagel’s shape.
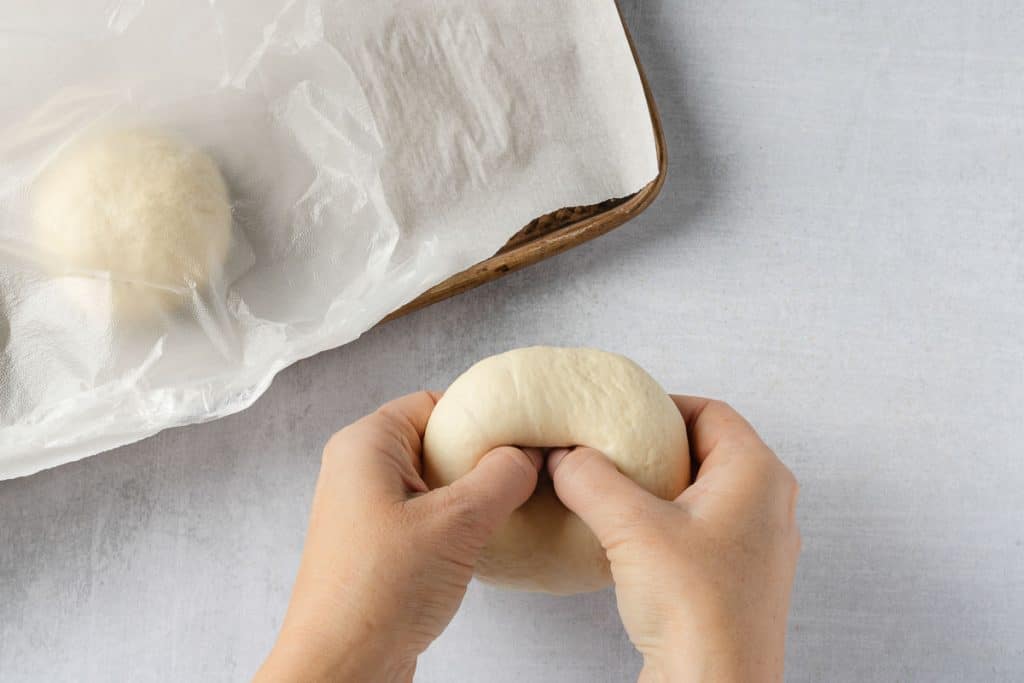
Using a thumb, swiftly press a hole through the center of a dough ball.
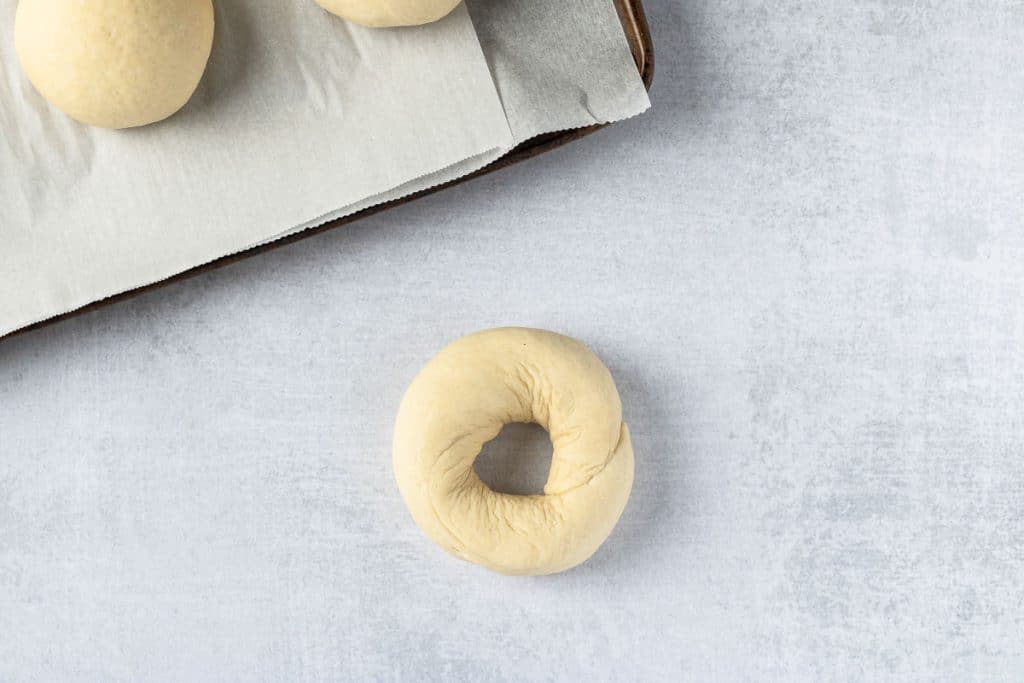
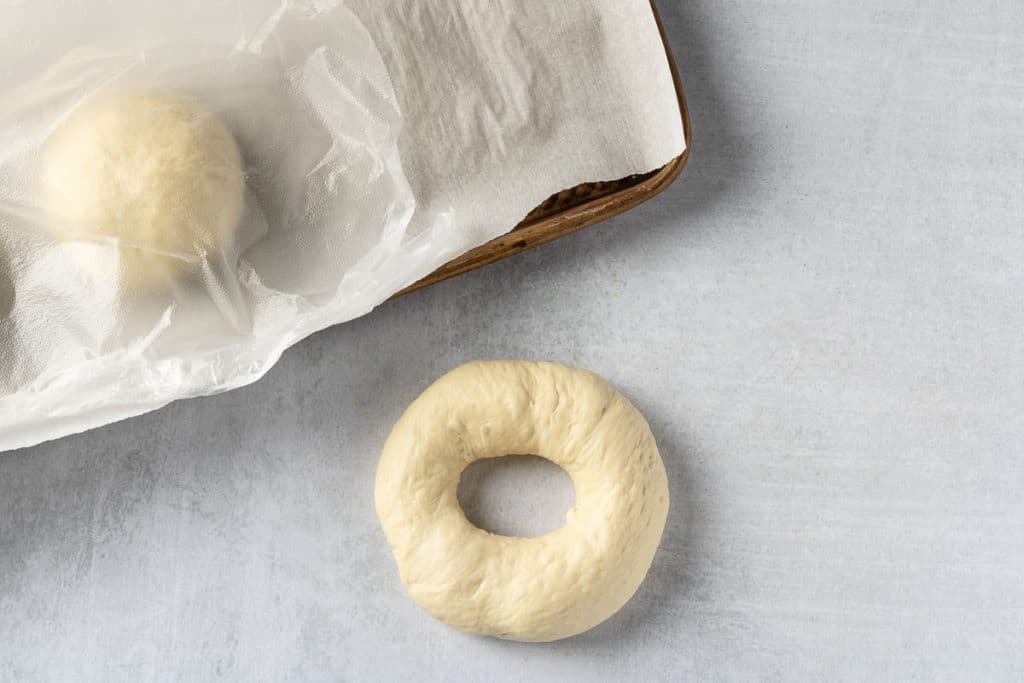
Gently stretch the dough to make a large ring. Work a little section at a time, around the ring, stretching the dough with both hands. Once pulled, the circle should fit around all the fingers on one hand. Remember that the hole in the center will shrink back down after resting and baking, so you don’t want it too small, or the hole will close when baking.
Place the dough circles back onto the parchment paper and cover for the second rise, which should take approximately 30- 45 minutes.

6. Preheat the oven to 425°F (218°C) and position the rack in the center.
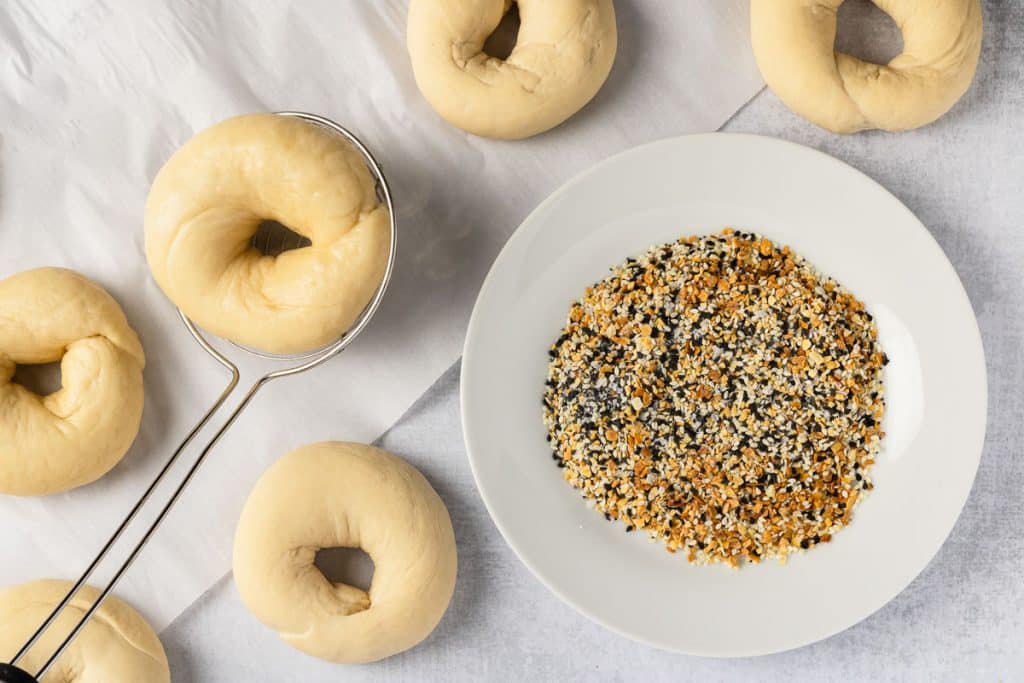
7. If using, prepare the toppings by placing them in a shallow container for dipping. Also, prepare a second sheet of parchment to place the bagels on after boiling.
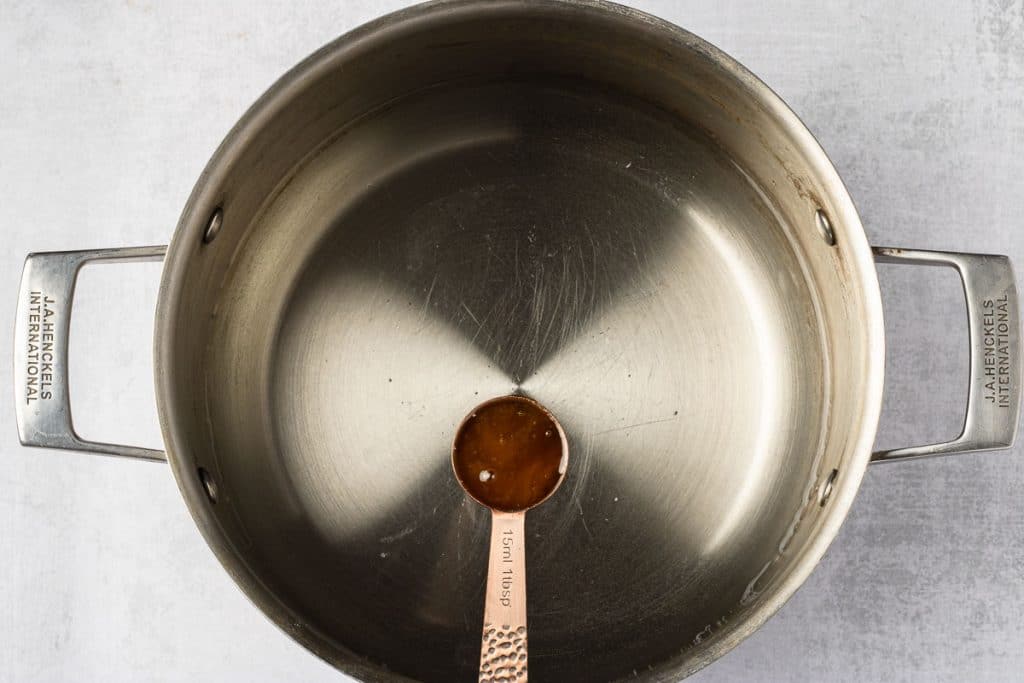
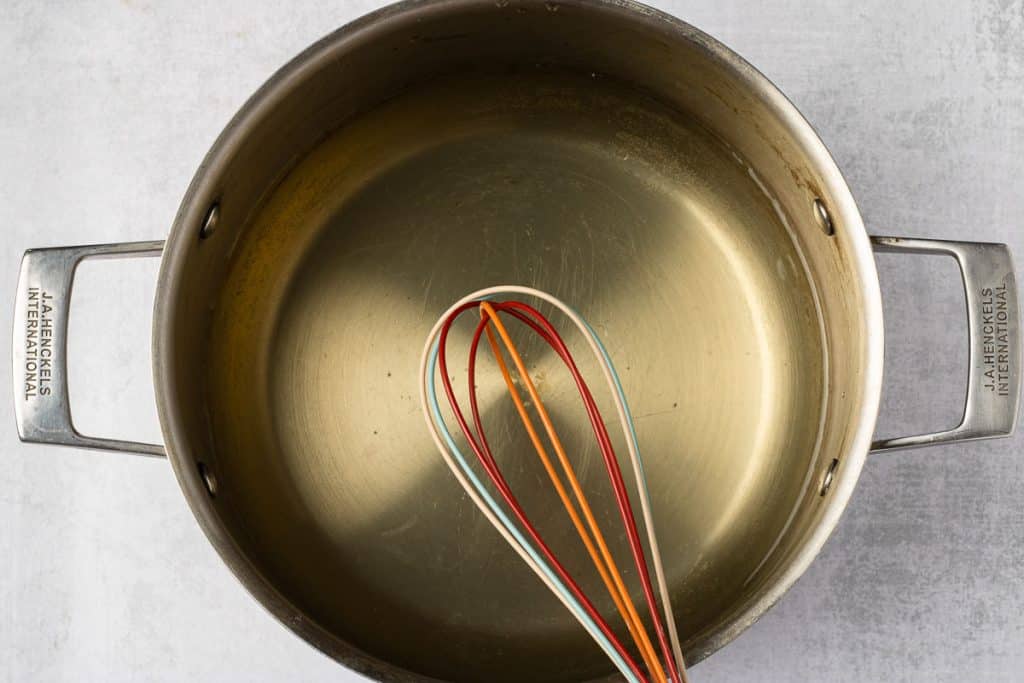
8. In a large pot, boil 6 cups of water with one tablespoon of honey and whisk well. The water bath temperature should be about 180-190°F (82-88°C)
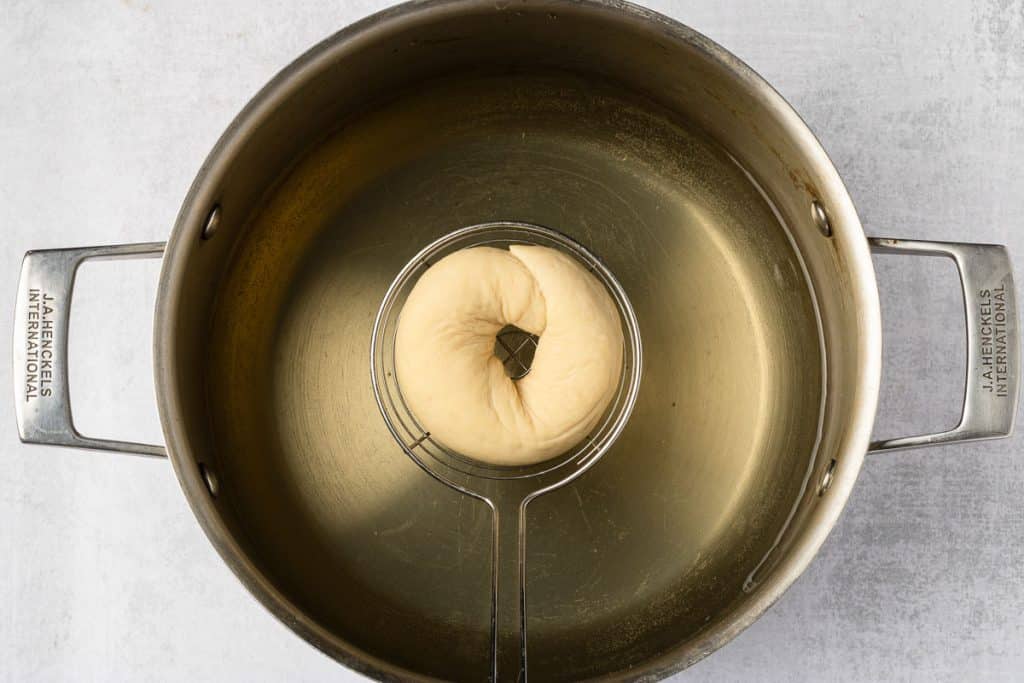
9. Place one test bagel in a spider strainer and gently add it to the water bath. If it floats within 10 seconds, you are good to continue. Boil the bagels for 60 seconds, 30 seconds on each side. It is easiest to boil no more than 2-3 at a time.
If a test bagel won’t float after 10 seconds in the pot, lift it back onto a parchment‑lined tray so it doesn’t soak up extra water. Blot any surface moisture with a clean towel—excess water can make the bagel stick later. Give all the bagels another 15‑20 minutes of proofing before repeating step 9.
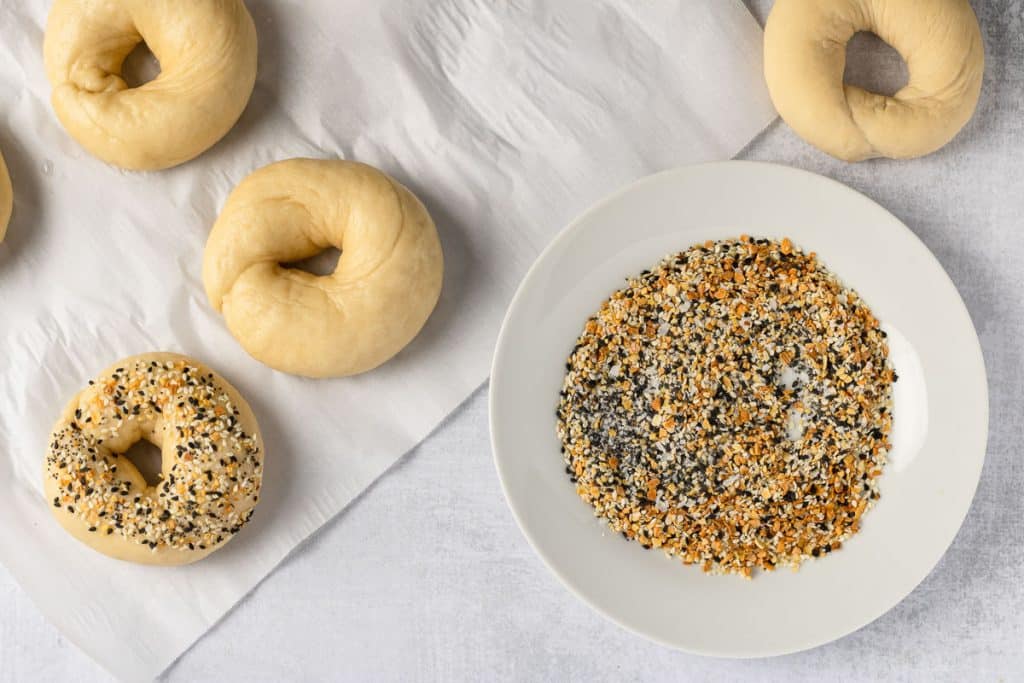
10. Remove the bagels from the water with the strainer and set the bagels back onto the original parchment.
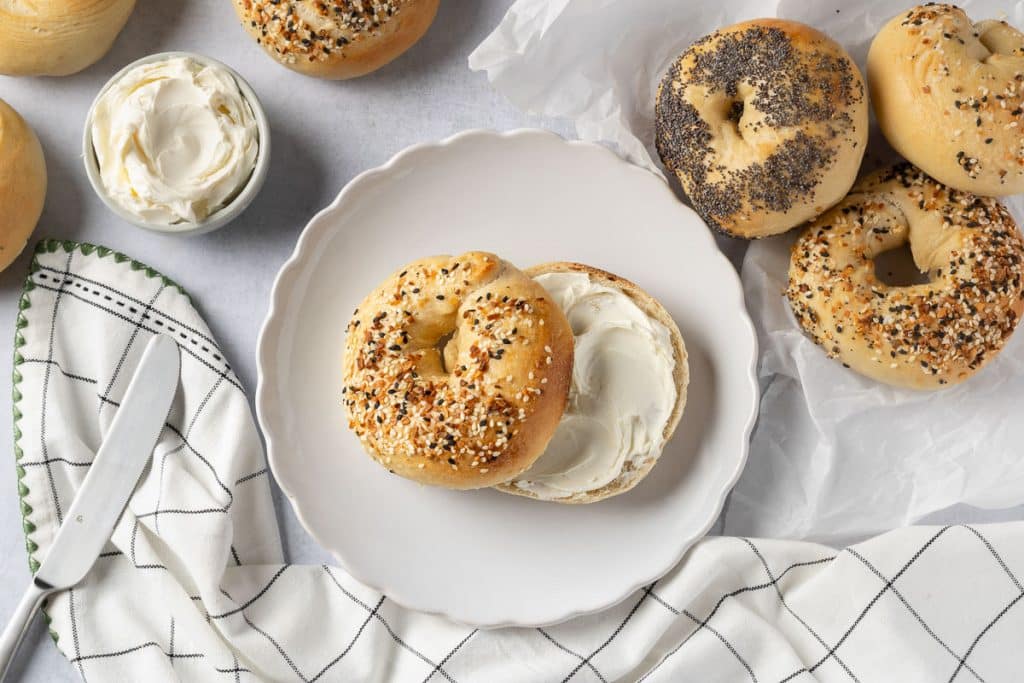
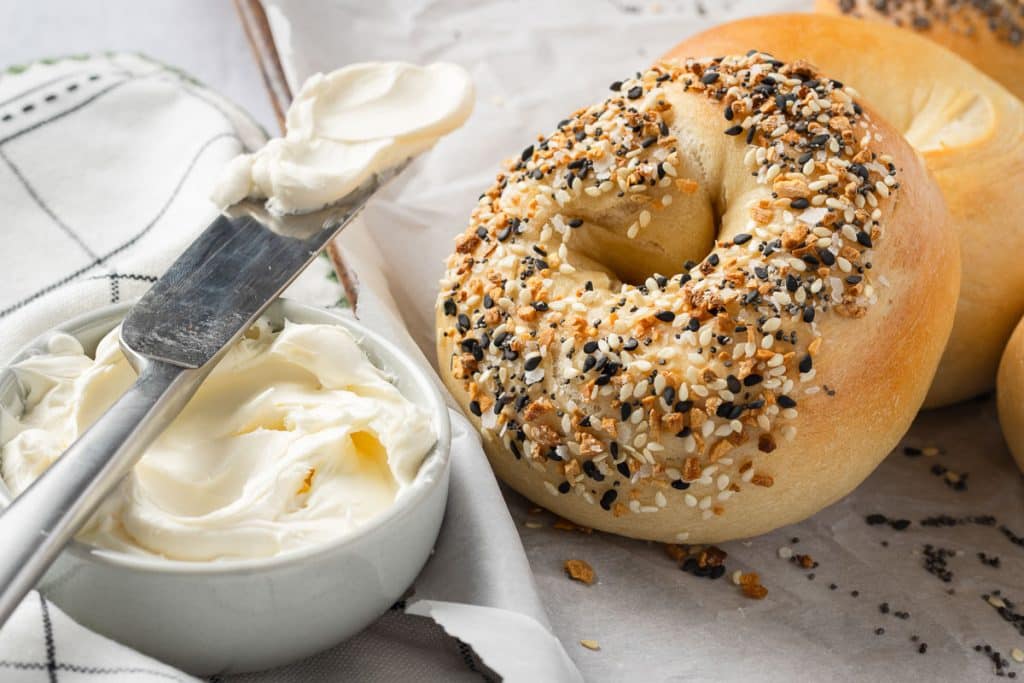
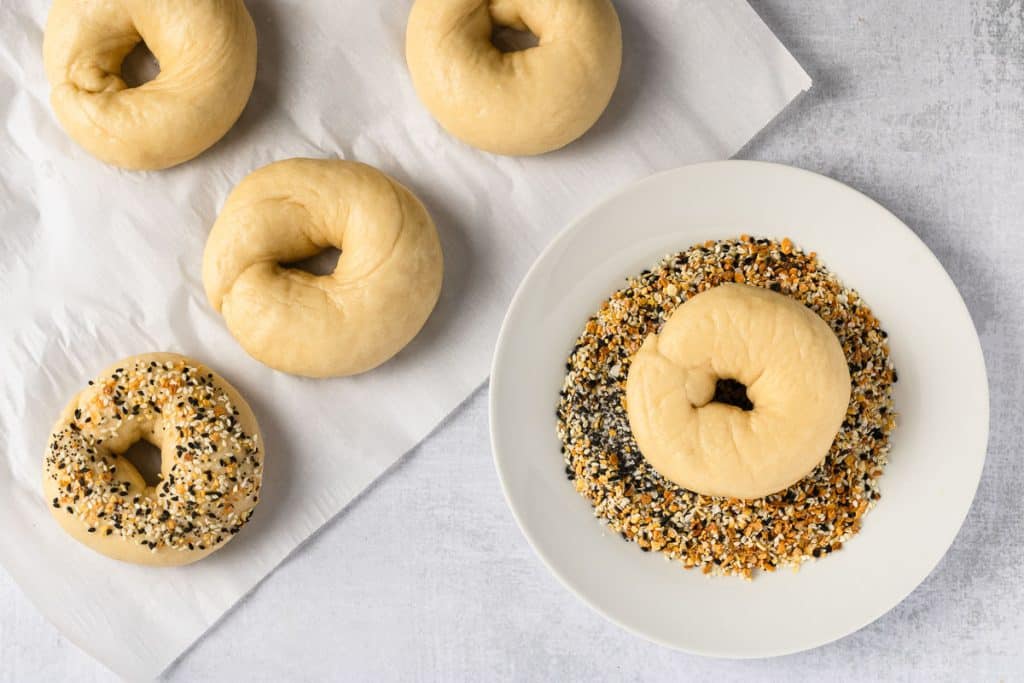
11. When the bagels have cooled so they are not too hot to handle, dip the top of the bagel in the topping of choice and set it back on a new sheet of parchment. The new parchment will help prevent the bagels from sticking after baking. You can also use a silicone mat in place of parchment.
12. Bake the bagels at 425°F (218°C) for 20-25 minutes or until golden brown. They should register about 200°F (93°C)in the center and feel light for their size. A uniform, deep golden color is your visual cue.

Bagel Varieties and Toppings
Add Variety to the Dough
In general, stir dry flavorings such as ground cinnamon (or cocoa, herbs, spice blends, etc.) right into the flour before you add it to the wet ingredients so they’re evenly dispersed. Once the dough is thoroughly kneaded and cohesive—but before the long first rise—gently work in chunkier add‑ins like raisins, chocolate chips, or nuts.
At this point, the dough is firm enough to accept extras without tearing, and the raisins have the full rise to plump and bond with the dough, giving you tidy slices and even distribution in every finished bagel.
Cinnamon Raisin
• 7 g (about one tablespoon) ground cinnamon, whisked into the dry flour
• 75 g raisins (roughly ½ cup), soaked in warm water for 10 minutes, drained, and patted dry before kneading in
Blueberry
• 90 g fresh or frozen blueberries (about ¾ cup) added after kneading; if using frozen, keep them frozen so they bleed less color. Consider reducing the water in the main dough by 10 g to balance the berry moisture
Chocolate Chip
• 90 g mini chocolate chips (about ½ cup) folded in after kneading; mini chocolate chips distribute more evenly than full‑size chips
Jalapeño‑Cheddar
• 60 g finely diced, fresh jalapeños (about ½ cup once seeded)
• 100 g freshly shredded sharp cheddar (about 1 cup, lightly packed)
Fold both into the dough right after kneading. If the cheese is on the dry side, add 5 g of extra water to keep the dough supple.

Add Toppings Before Baking
Savory classics
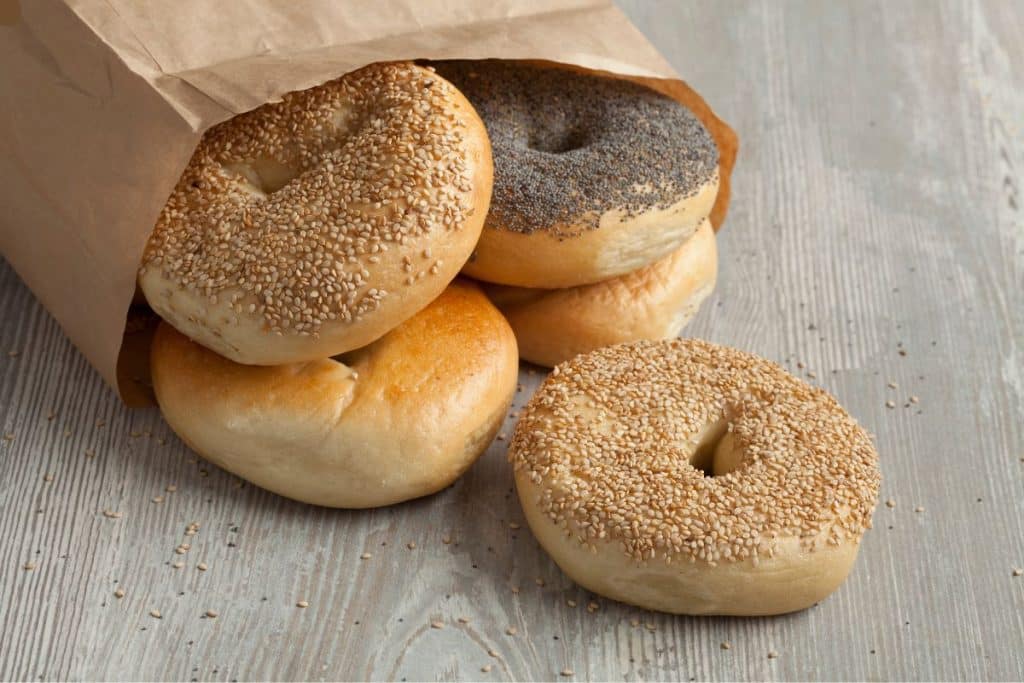
- White or black sesame seeds
- Poppy seeds
- Everything seasoning (sesame, poppy, dried garlic, dried onion, flaky salt)
- Coarse sea salt on its own, or paired with cracked pepper
- Minced dried garlic plus dried chives for a “garlic‑chive” twist
Cheese options
- Shredded sharp cheddar
- Shredded Asiago or Parmesan for a nutty crust
- Smoked Gouda, grated fine so it melts evenly
Sweet toppings
- Cinnamon sugar for a snickerdoodle effect
- Maple sugar crystals with a dusting of oats
- Turbinado sugar plus finely chopped pecans for a praline‑like crunch
- A thin coat of honey right after boiling, then raw sesame seeds—bake until caramelized
Stale bagels?
They can still be used to create something delicious! Bagel chips. Cut your bagel into equally thin slices about ⅛-¼ of an inch and brush them with oil. Place them on a baking sheet at 375°F (191°C) and bake for 5-10 minutes until crispy.
Storage and Freezing
Room‑Temperature Storage
Once the bagels have cooled to room temperature, slide them into a paper bag and then a loose plastic bag or bread box. The paper controls surface moisture so the crust stays pleasantly chewy, while the plastic keeps the interior from drying out. At average kitchen temperatures, they hold their texture and flavor for about two days; after that, they become stale.
Short‑Term Softening
If a bagel feels firm after day two, dampen the crust lightly under running water, set it directly on the oven rack, and heat at 350°F (177°C) for five minutes. The brief steam revives the crumb and crisps the crust without overbaking.
Freezing for Longer Keeping
For anything you won’t eat within forty‑eight hours, it’s best to freeze your sourdough bagels. Let each bagel cool completely, slice it horizontally if you like to toast from frozen, wrap each half or whole bagel in plastic wrap, and gather the wrapped bagels in a zip‑top freezer bag. Removing as much air as possible wards off freezer burn and keeps them tasting fresh for up to three months.
Thawing and Reheating
Take out only what you need. Thaw wrapped bagels on the counter for an hour, or pop sliced, still‑frozen halves straight into the toaster. Whole frozen bagels reheat neatly in a 325°F (163°C) oven for fifteen minutes; unwrap them first so the crust recrisps. A quick mist of water before the oven step gives an extra‑chewy finish.
Make‑Ahead Option
When batch‑baking, cool, wrap, and freeze the same day they’re baked. The closer you lock in that just‑baked moisture, the fresher they’ll taste when you bring them back to life later.
Frequently Asked Questions
The stiff dough makes it easier to shape the dough and creates a tighter crumb. Bagels require lower hydration so do not add more water.
Boiling does three big jobs in sixty seconds before the dough enters the oven.
First, it “sets” the exterior. The hot water instantly gelatinizes surface starches and tightens gluten, forming a thin skin that locks the bagel’s round shape and keeps it from ballooning like bread during oven spring. Because the crust is partially cooked, the interior can keep rising without splitting the ring or closing the center hole.
Second, the water bath controls chew. A brief boil leaves just enough moisture on the surface to slow dry in the oven, giving you that firm, pleasantly elastic crust instead of a brittle one. The longer you boil—up to about three minutes total—the denser and chewier the final bite becomes.
Third, a sugar-water boil jump‑starts flavor and color. Honey, sugar, or malt syrup in the water dissolves onto the crust; when the bagel hits the 400‑plus‑degree oven, those sugars meet proteins in the dough and trigger the Maillard reaction, producing a deep golden hue, glossy sheen, and toasty aroma that define a classic bagel.

Sourdough Bagels
Equipment
- Large pot to boil bagels - 2 quarts or larger
Ingredients
Bagel dough
- 150 grams sourdough starter
- 250 grams water
- 40 grams sugar
- 10 grams salt
- 550 grams bread flour
Water Bath
- 6 cups water
- 1 tbsp honey or sugar
Toppings (Optional)
- Some options are everything bagel seasoning, poppy seeds, sesame seeds, grated cheddar cheese
Instructions
- Start with an active sourdough starter. If you are an active baker, you know when to feed your starter so it is ready. A good rule of thumb is to feed the starter about 12 hours before creating the bagel dough. Just ensure the starter is bubbly and active before using. Scan the QR code for a chart that shows feeding ratios and when you can roughly expect the starter to be ready.
- Combine sourdough starter, water, sugar, and salt in a mixing bowl.
- Using a dough hook, mix in the bread flour. The dough will be stiff, but don't be tempted to add more water. Mix on low, with the dough hook, for 6-7 minutes (or knead 10 minutes by hand).
First Rise
- Cover the dough in the mixing bowl and let the dough rest at room temperature until it doubles in size.At a room temperature of 68℉ (20℃) or less, it should take around 10-12 hours to double in size (which is convenient for an overnight rise). Above room temperature is 70℉ (21℃) degrees, the dough will rise faster and usually takes around 8-10 hours to double.
Shape & Second Rise
- Prepare a baking sheet by lining it with parchment paper.
- Divide the dough into 8 equal pieces and roll them into balls.
- Shape the dough balls using either the “Rope and Loop” or “Poke and Stretch” method.
Boil and Bake
- Preheat the oven to 425°F (218°C) and position the oven rack in the center of the oven.
- Prepare the toppings, if using, by placing them in a shallow container for dipping. Also, prepare a second sheet of parchment to place the bagels on before baking.
- In a large pot, boil 6 cups of water with one tablespoon of honey or sugar and whisk well. The water bath temperature should be about 180-190°F (82-88°C).
- Place one test bagel in a spider strainer and gently add it to the water bath. If it floats within 10 seconds, you are good to continue. Boil the bagels for 60 seconds, 30 seconds on each side. It is easiest to boil no more than 2-3 at a time. If a test bagel won’t float after 10 seconds in the pot, lift it back onto a parchment‑lined tray so it doesn’t soak up extra water. Blot any surface moisture with a clean towel—excess water can make them stick later. Give all the bagels another 15‑20 minutes of proofing before repeating this step
- Remove the bagels from the water with a strainer and rest the bagels back onto the original parchment.
- When the bagels are not too hot to handle, dip the top of the bagel in the topping of choice and set it back on a new sheet of parchment. The new parchment will help so that the bagels don’t stick after baking. You can also use a silicone mat as well in place of parchment.
- Bake the bagels at 425°F (218°C) degrees for 20-25 minutes or until they are golden brown.
Rope and Loop Method
- Roll each ball into a rope or log shape. The dough will need to be long enough to wrap a circle around your fingers, plus an inch or so, so the 2 ends can overlap slightly.
- Adhere the overlapping ends together to create a complete circle (you can use some water to stick the ends if they need more stickiness).
- Using a motion similar to the one used to roll the dough into a rope, roll the 2 ends together making sure they adhere well to each other. Place the circle of dough back onto the parchment for the second rise.
- Cover and let them rise for 30- 60 minutes or until puffy.
Poke and Stretch
- Let the 8 dough balls sit for 10-15 minutes to rest.
- Using your thumb, swiftly press a hole through the center of a dough ball.
- Gently stretch the dough to make a large ring. Work a little section at a time, working around the ring, stretching the dough with both hands. Once stretched, a finger should be able to fit inside the hole. Be mindful that the hole in the center will close up a little after resting and after baking, so you don’t want it too small or the hole will close when baking.
- Place the dough circles back onto the parchment for the second rise.
- Cover and let them rise for 30- 45 minutes.
Notes
Nutrition
Bookmark this page or pin the following image to refer back to this Sourdough Bagel post in the future.
Thanks so much for spending a few minutes of your busy day with me!
To ensure you don’t miss future content, pop your email in the pale green box on the right or click here. I usually send one email weekly, so I won’t inundate your inbox. I’m sensitive to an overflowing email inbox!
We will only use your email address to send you emails, no more than 1-2 weekly. In addition, you will have access to my growing library of knit & crochet patterns and other printables. Check back often as this library will continue to grow. You can unsubscribe anytime by emailing me or clicking on the “unsubscribe” link at the bottom of all emails.
And you can access many of the products I refer to on my Nourish and Nestle Amazon Page. You can access it here.
So, if you’d like to participate in the ‘subscriber benefit’ action, simply subscribe to Nourish and Nestle here or use the form on the right sidebar. It’s slightly towards the top.
I have sent all my subscribers the link to the Subscriber Benefits Library. If you missed it or misplaced it, let me know.
Until next time…