DIY Painted Window: Santa’s Sweet Shoppe Bakery
Hey there pals! Do I ever have a ‘sweet treat’ for you today! I have got to admit, this ‘Santa’s Sweet Shoppe’ painted window is absolutely one of my most favorite projects in some time.
I thought I was pretty much finished decorating for Christmas but then I got a little idea in my head. Do you remember when I said I was planning a very ‘Gingerbread Man and Candy Cane’ kind of Christmas? Well, it all stems from that.
And, despite the fact that my to-do list keeps expanding on a daily basis and I really don’t need to do any ‘creating’ for a while; I just couldn’t let this idea go.
I knew that I needed to find an old window for this idea. Our architectural salvage store is only open on Saturdays, so I told myself that if I went to the salvage store and they didn’t have what I needed I would shelf my idea until next year.
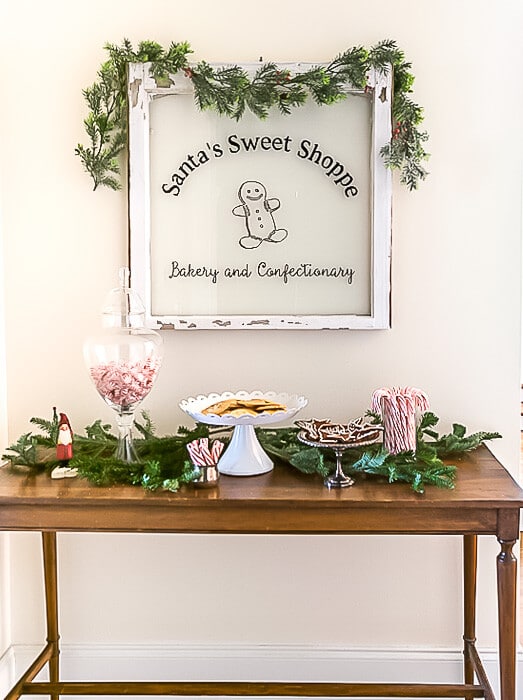
Table of Contents
But, that crafting kismet angel was sitting on my shoulder and, as luck would have it, I found the perfect window.
For your convenience, this post contains affiliate links to products I use, love and highly recommend. If you purchase any product through this site, I may be compensated, but you do not pay one penny more. You can see my full disclosure policy here.
- A clean Window ( I know…Captain Obvious, here)
- A Paint Marker that is suitable for glass, like this
- Your design. I made my design on Publisher. I set the size of my document exactly the size of my window, in this case, 24″ by 24″. The printer used 9 sheets of paper to print the whole 24′ by 24″ design. The gingerbread man was from a collection I purchased from The Hungry JPEG. It is sadly no longer available but look on Google images to see if you can find a gingerbread man that you like.
- Tape
That’s it…that’s all you need to make this painted window!
How I Made my Bakery Painted Window
- It’s really important that your glass is very clean I actually put mine in the shower to clean it off.
- I wasn’t interested in cleaning off any of the ‘chippy’ paint, of which there is quite a bit, but I did need to get the layers of dirt and grime off. Then I also cleaned the glass with glass cleaner, just to make sure it was grime-free.

- Because I painted my image on the back of the glass, I placed my design on the front…right side up.
Just a side note here…You’ll notice that my printed image contains several more graphics than what I finally ended up with. The reason is that I had originally thought to paint the various sweets with different colors of paint.
But…when I gave the paints a try on a spare piece of glass, I really didn’t like how it looked. The brush strokes were very evident and it reminded me of a bargain store window as opposed to the bakery shop window I was aiming for.

- Once I started rethinking my design, I decided to leave of all the images except for the gingerbread man…and I am so glad I went that route.
- To paint your window, tape your design in place on the front of your window. Once it’s in place, turn the window over. Place a towel or something between the design and your surface so that the papers are pushed up against the glass. This will make it easier to follow your design.
- The following image shows the window flipped over. The paper with the design is underneath the glass.

- With the paint pen, trace over your lettering and design. With an alcohol-based paint pen, you can easily fix mistakes with a paper towel dipped in rubbing alcohol. I also used a razor blade a few times to scrape off any errant marks.
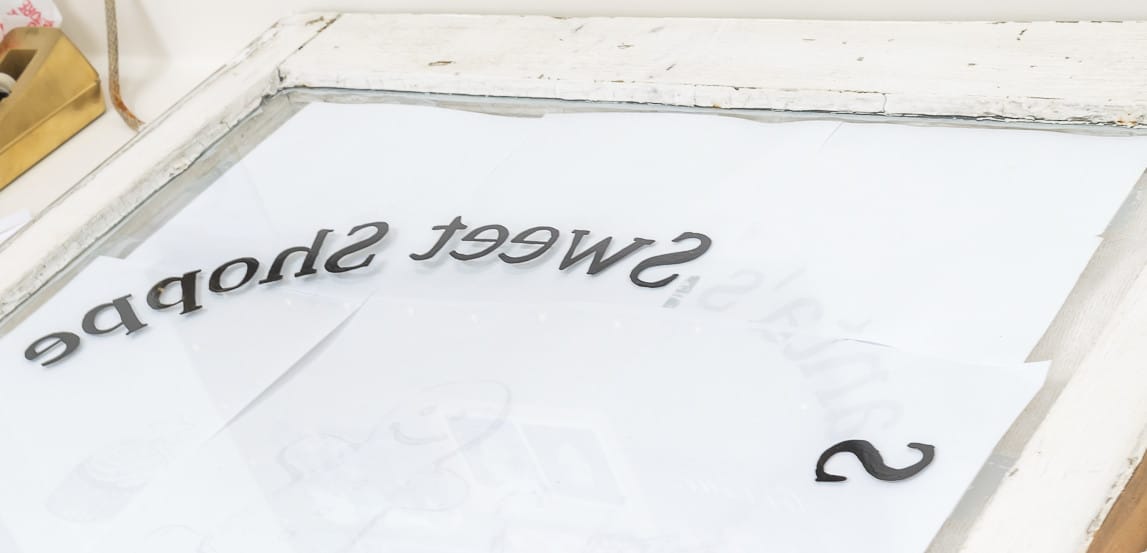

I guess you could paint on the front of the glass, but I opted for the back side because you’d be less likely to see the stroke/brush marks left from the pen (it is smoother looking on the front side) and because I don’t have to worry about using glass cleaner on the letters.

I can’t even begin to describe to you how much I love this little painted window!
And it was really, really easy to make. If you can trace, you can make this painted window.

I haven’t gone full-on into the farmhouse/shabby look, but I think a little chippiness can work just about anywhere. Especially on a Santa’s Sweet Shoppe bakery window.
For more Christmas craft ideas, check out my Christmas Knit Stocking pattern, my Gold-dusted Magnolia Leaf Mantel, or my Wrapping Paper Organizer Cart.
Well, now that I’ve answered ‘the call of the craft’, I guess really don’t have any more excuses to avoid my now longer to-do list. I need to buy some presents, wrap some presents and mail some presents. How about you? Where are you with your December to-do list?

Bookmark this page or pin the following image if you’d like to refer back to how to make this Santa’s Sweet Shoppe painted window.
Thanks again for spending a few minutes of your busy day with me today.
Please know that I welcome each and every comment that comes my way. If you want to make sure you don’t miss future content, pop your email in the beige box up on the right or click here. I usually send out 2-3 emails a week, so I won’t inundate your inbox…believe me, I’m sensitive to an overflowing email inbox!
By subscribing to Nourish and Nestle, we will only use your email address to send you emails (no more than 2-3 per week) that will keep you up to date with the latest news and content on the site. In addition, you will have access to my growing library of knit & crochet patterns, as well as other printables. This library will continue to grow, so check back often.
And please know that you can unsubscribe at any time by emailing me or clicking on the “unsubscribe” link at the bottom of all of our emails.
You can access many of the products I refer to in all of my posts on my Nourish and Nestle Amazon Page. You can access it here.
So, if you’d like to get in on the ‘subscriber benefit’ action, simply subscribe to Nourish and Nestle here or using the form on the right sidebar. It’s towards the top a bit. I have sent all my subscribers the link to the Subscriber Benefits Library. If you missed it or misplaced it, drop me a line.
Until next time…
Hugs,



That is absolutely adorable! I want one!
Thanks Nicki…soooo easy to make! Give it a whirl!
Hugs and Kisses and thanks for coming by.
Lynn
I love your gingerbread man window!! it is the cutest, dont know where I’ll get a window but I need one bad!!! lol thanks so much
Hi Debbie,
Check your salvage stores, ReStores, junk shops, ‘antique’ stores. I see them everywhere. And I just truly do love that window! I take down a picture and hang it my kitchen and it just makes me happy. But, did you notice my typo? Truthfully, I am a bit of spelling accuracy snob, so this one really does trouble me.
Oh, well. Not enough to not hang it up every year, though.
Hugs, Lynn
Lynn, Your Santa Sweet Shoppe sign is so adorable! Love the little gingerbread man. I was just digging around looking to see if I had any paint markers yesterday. Found and old dried out one. Need to get another for another project I’m working on.
I picked up a small window at Goodwill and wanting to paint something on it for the master bathroom, I think using the paint marker would be a better idea. Thanks for sharing! Pinned!
Hey there Linda! Miss chatting with you! The paint marker is so the way to go on this! I had a really hard time not having the brush strokes show and the pen really too care of that. Have fun with your project. What will you make?
Hugs and thanks for coming by.
Lynn
Hi Lynn, Miss chatting with you too. We all stay so busy then with the holiday’s upon us makes us even that much busier.
I’m not quite sure what I’m going to make yet, it is for our master bath if we even get the remodel ever finished, guess we got to get back to it before we can get finished, LOL. But I wanted to use one of my thrifty finds, little window frames and add Baths 5cents or something on that order. Guess I got plenty of time to figure it out. (-;.
Oh my gosh, this is the cutest thing ever! Now I need to get an old window! This is such an awesome Christmas decoration, my friend!
Thanks Robin, I am so tickled with it! And really, so easy to make. With your crazy skills, you could do it with your eyes closed. Find yourself a window and have at it!
Hugs, LYnn
Seriously Lynn! This window is darling. It makes me dream of all kinds of cute ideas for an old window. Now I need to find one! 🙂
Hey there Tammy…go find yourself a window a have fun. It was so very easy to make and I love the finished product. Makes me feel all happy and cozy.
Hope you are progressing well in your preparations!
Hugs, Lynn
Lynn, This is the cutest idea for a small window without panes! I’ve passed so many of these up at flea markets and antique stores, but not any more!!
Thanks Carol. Funny, I purchased a different one first, with one pane running down the middle. But then I realized that I really wanted one with out panes. So now I need to figure out a project for this other one.
Thanks for visiting my friend.
Hugs,LYnn
I love the look of your window sign. Great job!
Hi Linda, thanks for your kind comments. I do love that sign! It’s one of those things that i will look forward to bringing out each year.
Thanks for visiting.
Merry Christmas.
Lynn
I have always wanted to do this on the stack of windows I have in the garage. You make it seem so easy. Can hardly wait to try it! Grinned and Pinned! Thanks
Hi Cindy, if you have some windows you can whip these out in no time…they are so very easy to make. Have fun!
Lynn, that is just darling! Love the little window with its message. I’m with you…love the chippy shabby look. I haven’t gone all farmhouse-y either, but we can all enjoy a little chippy shabby. This fills that bill perfectly. Pinned. Visiting from BFifty group.
Absolutely love it! What a beautiful & fun holiday window sign!
Happy Holidays!
Aw thanks Randi…hung it up today!! Made me so happy to have it up again. Thanks for visiting my friend. Hugs, Lynn
Brilliant! Perfect for the holidays Hope you had a great thanksgiving.
Maria
I did Maria and hope that you did as well!
What a sweet idea. It is a great way to celebrate your theme of the season.
Thanks Debra…one of my all time favorite crafts!
I love your adorable painted window for the holidays and great tutorial too. Pinned to share. This would make an adorable gift!
Thanks so much Marie, I do love my window. I have an extra one if i decide to make one for a gift. Thanks so much for swinging by my friend.
Hugs, Lynn