
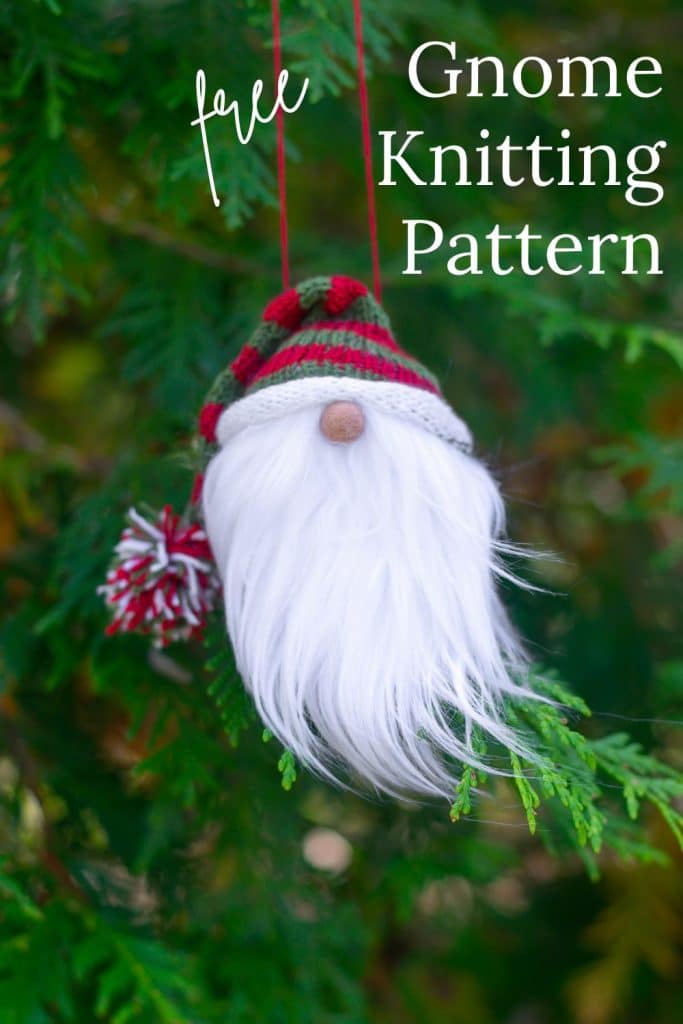
Gnome Knitting Pattern – Christmas Ornaments

Use this free, printable gnome knitting pattern and make some festive gnome ornaments for your Christmas Tree or for gifts.
Let’s get this out of the way first. Thanks to the arbitrary rules of the English language, these Knit Gnomes could just as easily be Knit Knomes or Gnit Gnomes! AMIRIGHT? I mean, who made these rules?
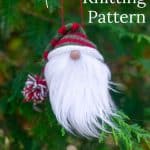
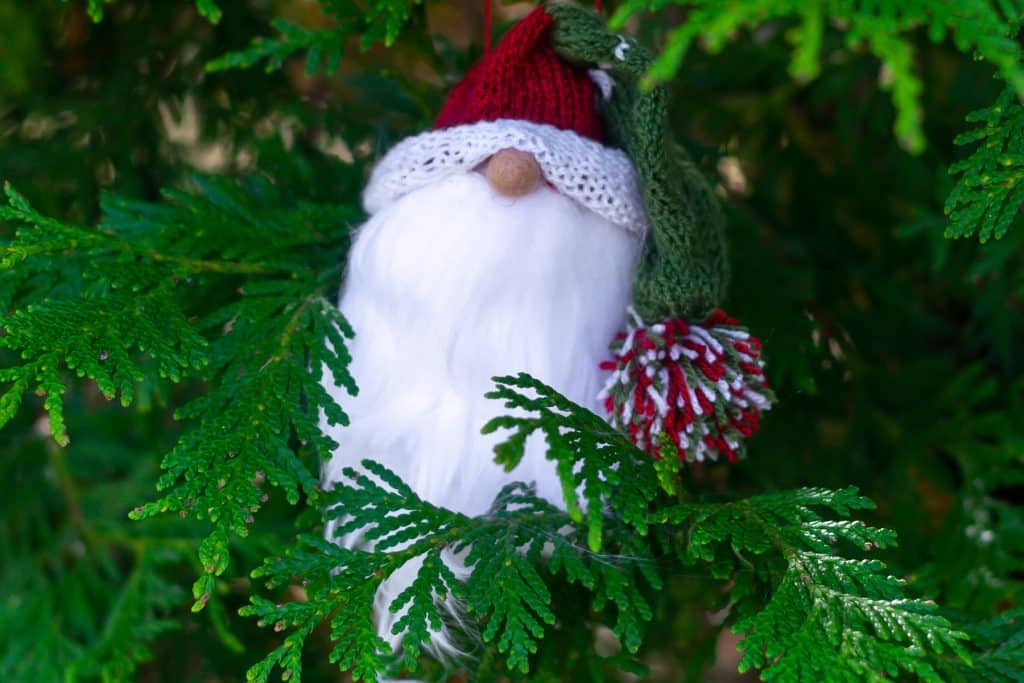
O.K., back to business. Knit the head and hat of this charming and festive little gnome, and then add a bit of fur and a small pom pom for a nose. Alternatively, if you’d rather knit the gnome gnose 😉, I have instructions for that, too.
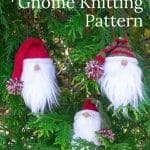
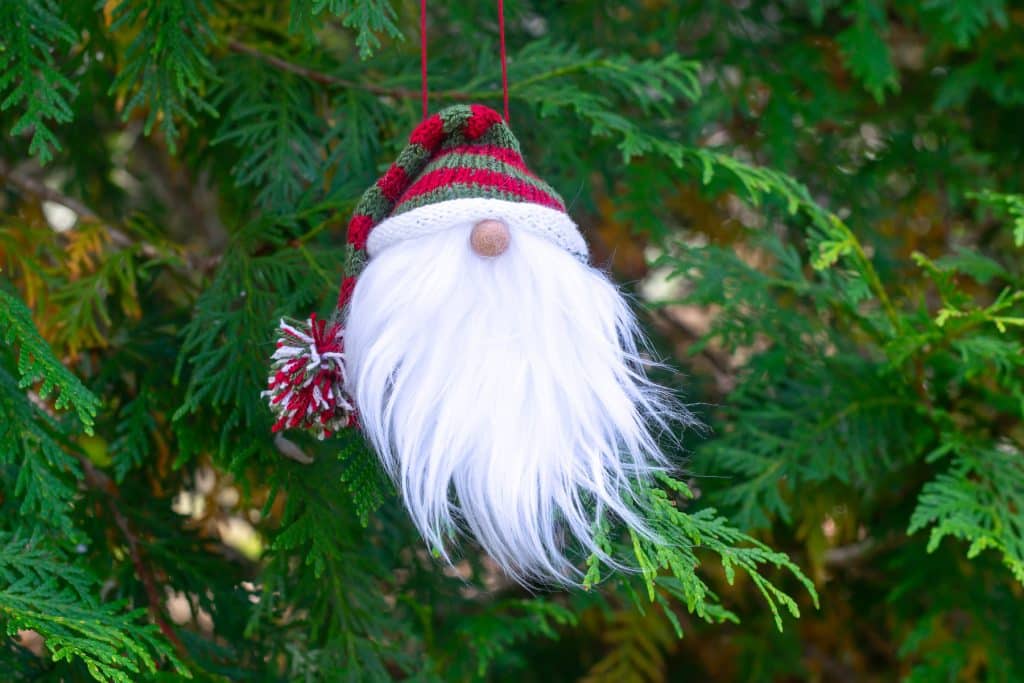
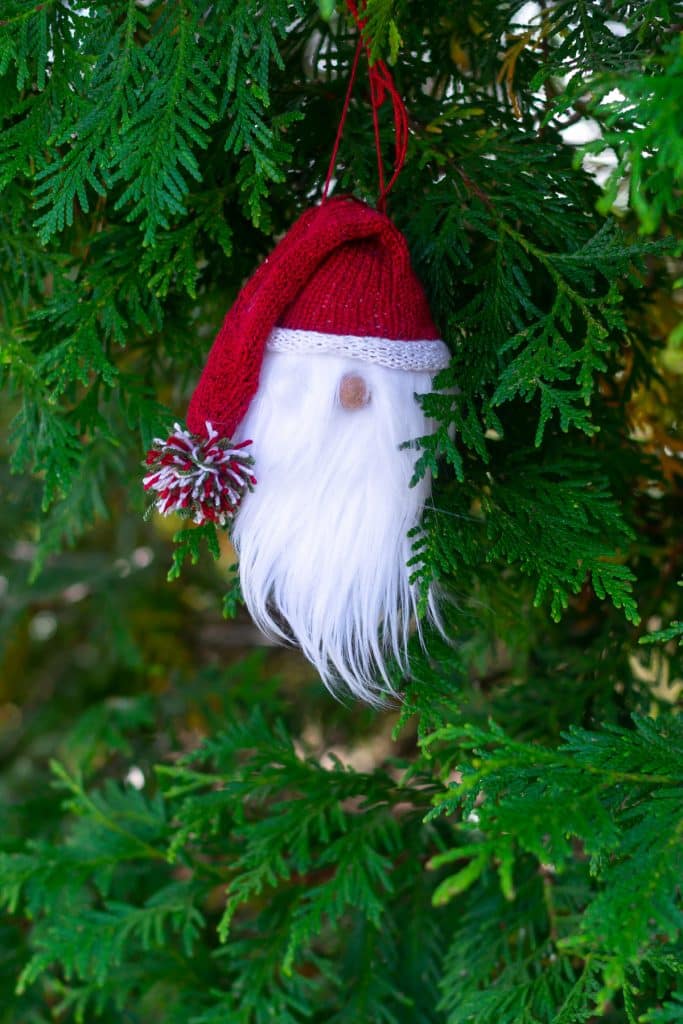
Even though I made them with the same materials, each of these silly little gnomes seemed to have its own personality. I pulled the hat closer around the nose of the guy at the bottom, which really gives him a bit of a ‘renegade gnome’ appearance. The other two seem more ‘buttoned up’ gnomes.
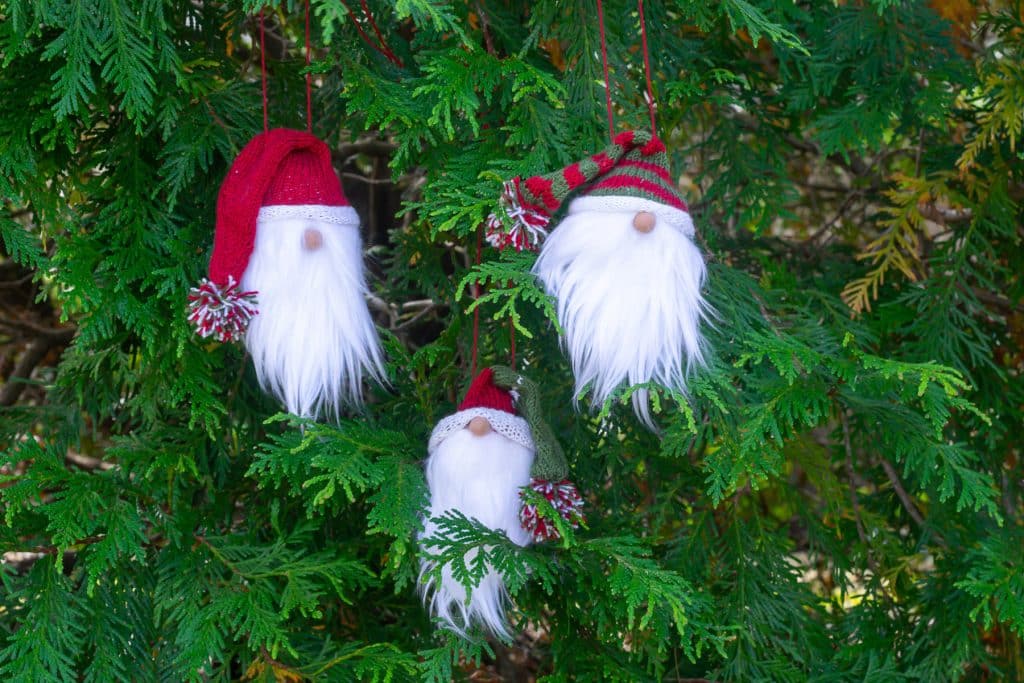
Table of Contents
Looking for more Christmas Knits?
The head and hat of this gnome knitting pattern use double-pointed needles for the hat’s small tubes and the head’s small sphere. If you need a refresher or a tutorial on using double-pointed needles, pop on over to this post.
These little fellows work up quickly and are a fun change from more involved knit projects. And not for nothing, this gnome knitting pattern can use the many bits and bobs of yarn you have in your yarn stash. Get creative, and feel free to substitute, but here’s what I used.
Want a printable, ad-free version of the pattern? Pop on over to the Library or click the button below and it will automagically appear in your inbox.
material to make knitted gnome ornaments
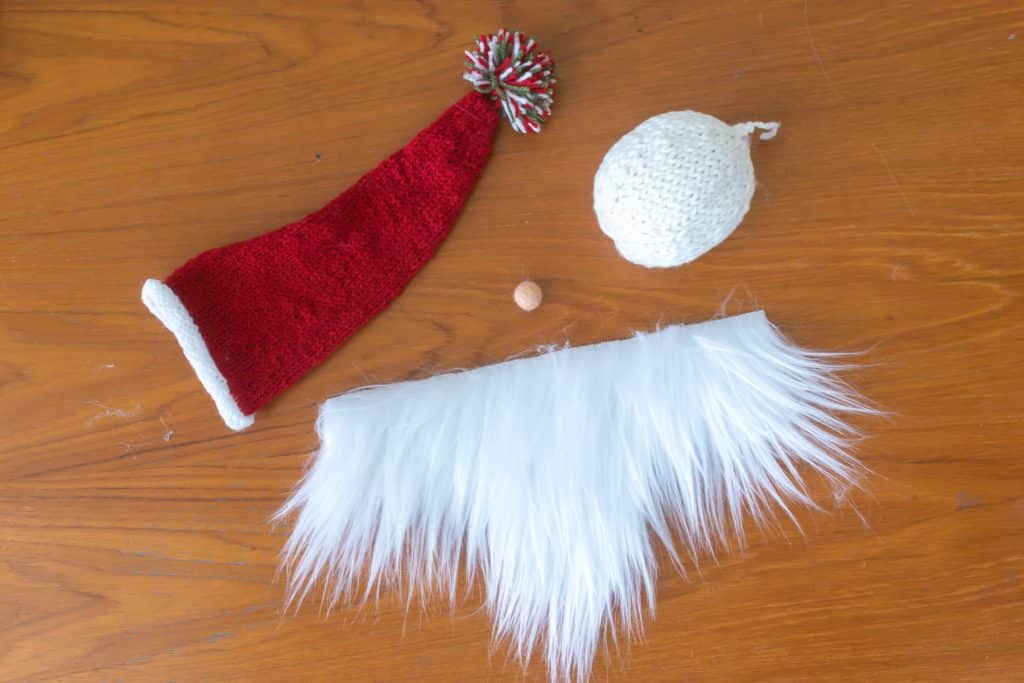
Knit Gnome Head Material:
- Worsted Weight Yarn. I used scraps of Lily’s Sugar n Cream Cotton leftover from washcloths. Some of the gnome heads are made of multiple colors, as I just tied on a new color when one finished. The head will not show, so the color doesn’t matter. The fiber doesn’t matter, either! Use up what you have. The pattern is written using a worsted weight gauge, so adjust accordingly if you use another weight.
- Size US 5 (3.75mm) Double-Pointed Needles
- Fill for the head. I didn’t have ‘fill’ per se, but I did have batting. So I just pulled apart pieces of batting and stuffed them in the wee head. If you don’t have either, use cotton balls that you pull apart, bits of bulky/super bulky/chunky yarn or even old panty hose to stuff the gnome heads.
- Darning/Tapestry Needle
For the Gnome Beard and Nose:
- 1/6 of a yard (6 inches ) of faux fur. That would be enough for seven gnome beards.
- I also purchased extra-small, felted pom poms (cameo color) for the nose, but I’ll give directions if you’d rather knit the nose.
- Craft Glue I used Elmer’s Craft Bond Quick Dry
- Beard pattern (download here)
Gnome Knitted Hat Materials:
- Sock/Fingering Weight Yarn. I used Woolike red, green, and white
- US 4 Double-Pointed Needles
- Darning/Tapestry Needle
stitches used
- Stocking Stitch (st st)
- Knit in the Front and Back (kfb): Knit in the front and back of the same stitch
- Pick Up Left (pul): put your left needle through the stitch two rows below the stitch on the right-hand needle. Lift it up on your left needle and knit it in the back loop.
- Pick up Right (pur): put your right needle into the stitch under the first stitch on your left needle. Pick up the loop and put it on your left needle. Knit this new stitch in the front loop
- Knit 2 Together (k2tog)
gnome head knitting pattern
Gauge: 8 stitches over 2 inches
- Cast on eight stitches onto one DPN
- Split stitches over four needles and hold in the round. Ensure that stitches aren’t twisted.
- Round 1: Join and work in the round; kfb eight times (16 stitches)
- Round 2: Knit all
- Round 3: *k2, pul, pur, k2; rep from * four times (24 stitches)
- Round 4: Knit all
- Round 5: *k2, pul, k2, pur, k2; rep from * four times (32 stitches)
- Round 6: Knit all
- Round 7: *k2, pul, k4, pur, k2; rep from * four times (40 stitches)
- Rounds 8 through 18: Knit all
- Round 19: *k1, k2tog, k4, k2tog, k1; rep from * four times (32 stitches)
- Round 20: Knit all
- Round 21: *k1, k2tog, k2, k2tog, k1; rep from * four times (24 stitches)
- Round 22: Knit all
- Round 23: *k1, k2tog, k2tog, k1; rep from * four times (16 stitches)
- Round 24: Knit all
- Stop here and stuff the head.
- Round 25: *k2tog four times (8 stitches)
- Cut the yarn, leaving a good 8-inch tail. Attach a tapestry or darning needle and pull the yarn through all the loops on the still on the double-pointed needles. Pull the yarn and weave it in to close the head securely.
gnome hat knitting pattern
gauge: 16 stitches and 18 rows over 2″.
- Cast on 44 stitches on one of the double-pointed needles
- Split stitches over four needles and hold in the round. At the same time, ensure that stitches aren’t twisted.
- Round 1: join and knit all stitches in the round
- Work the first eight rows for a rolled brim in a different color, if desired.
- Continue to work, knitting in the round, using one or several colors.
- Round 18 and every even row: k2tog, then knit remaining stitches (1 decrease on every even row)
- Round 19 and every odd row: knit all
- Continue until ten stitches are remaining.
- Cut yarn, leaving a good 8-inch tail. Attach a tapestry or darning needle and pull the yarn through all the loops still on the double-pointed needles, on DPN at a time. Pull the yarn and weave to close the stocking hat’s top securely.
for the pom pom:
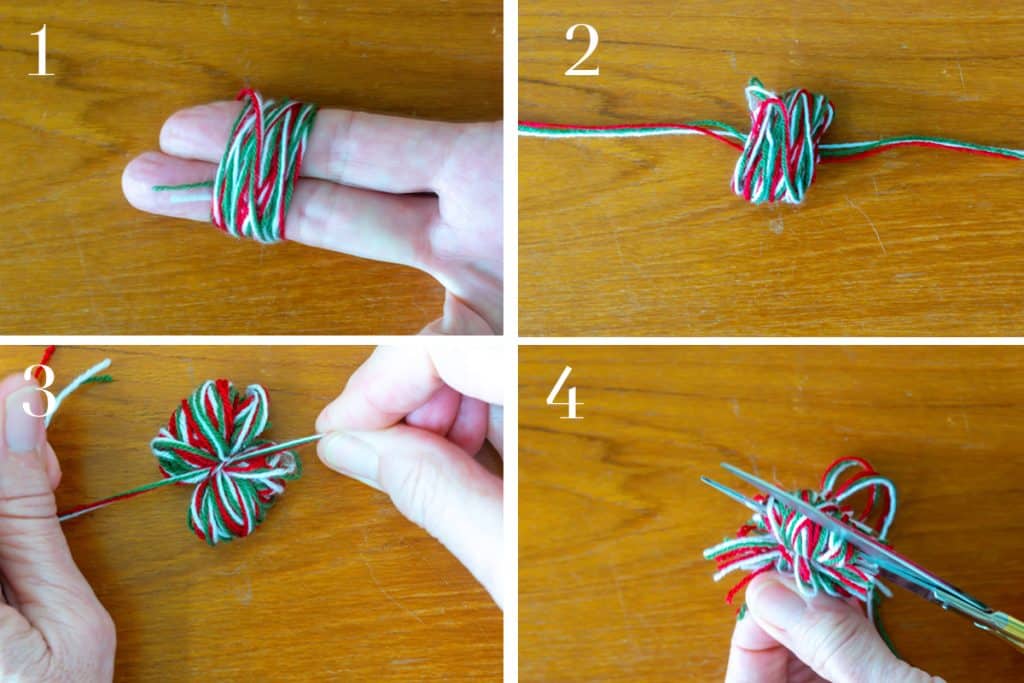
- Cut a 10″ – 12″ piece of yarn and lay it on a flat surface. If I’m using multiple colors, I hold all the yarn together and cut it so that the 10″- 12″ piece is multicolored.
- Wrap yarn around two fingers 85 times. If you use more than one color of yarn, divide 85 by the number of colors and wrap that many times. For instance, if you use 3 colors (85/3 = 28), wrap the 3 colors held together 28 times.
- Remove the wrapped yarn from your fingers and carefully lay it in the center of the 10″ – 12″ piece of yarn. Center the wrapped yarn so that the center of the one long piece is in the center of the wrapped yarn
- Using the one long piece, tie it tightly around the bundled yarn.
- Using sharp scissors, cut all the loops. Shaking the pom-pom occasionally helps you see what needs to be trimmed.
- With your scissors, clean up any stray yarn, shaping it to be as round as possible.
- Thread the tail from the hat together with the tail from the tassel onto a tapestry or darning needle. With the needle, go from the top of the hat down. Turn the hat inside out and tie a big knot with all the yarn tails.
- Weave in any loose threads.
gnome nose knitting pattern (optional)
- Use sock/fingering weight yarn and US 4 Straight or DPNs
- Place one slip knot on a needle
- Row 1: Kfb (2 stitches)
- Row 2: Kfb twice (4 stitches)
- Row 3: Kfb four times (8 stitches)
- Row 4: K2tog four times (4 stitches)
- Row 5: K2tog twice (2 stitches)
- Row 6: K2tog
- Bind off. Pull the two ends together and shape your knitting into a ball. Thread both ends together through a darning needle to attach to the head once the fur beard has been glued on.
cut the fur
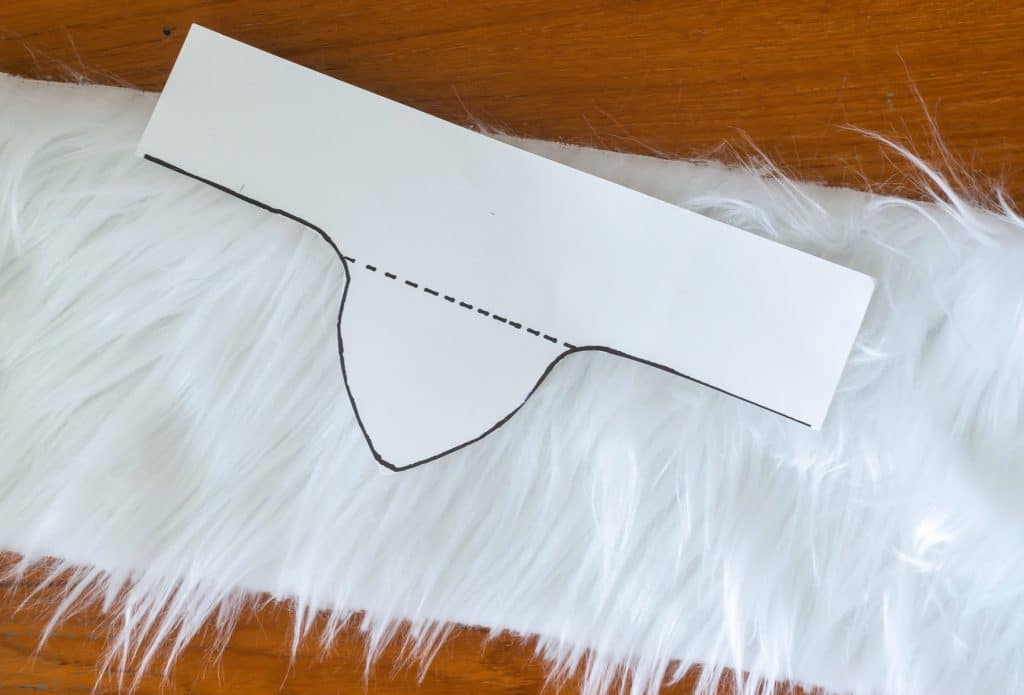
- Cut the faux fur using the pattern on the last page. I made the pattern a little wide to account for fatter gnome heads. Trim it as necessary to fit your head
- Place the pattern at the top of the fur, and at the same time align the point in the beard with the direction that the fur is ‘growing’. See the image above for an illustration.
- Trace the pattern on the back of the fur. Try to cut just the fabric; avoid cutting the fur. You can get your scissors just underneath the fabric and snip along.
- You can also cut out a small piece of fur, as indicated by the pattern’s point below the dotted line. Gluing that on the back of the big fur piece covers the backside of the fabric on your gnome.
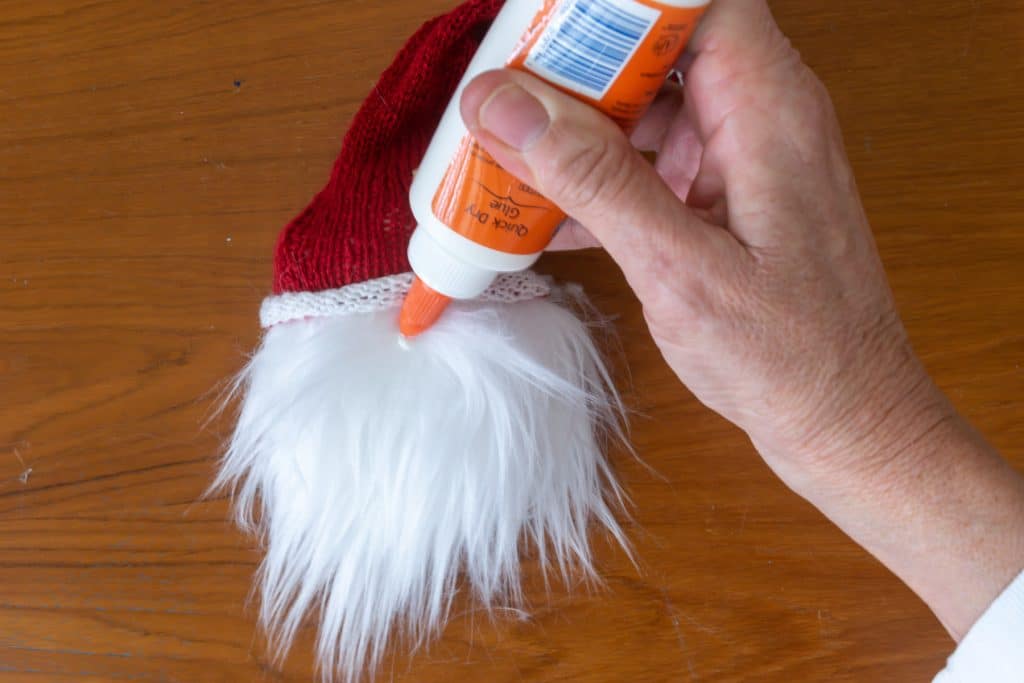
Assemble the Gnome
- Spread a generous amount of glue onto the back of the fur beard.
- Wrap the fur around the knit head, covering at least three-quarters of the head. Let the glue dry before proceeding.
- Place the hat on your gnome, gluing it in place.
- Then, find the beard’s center and follow the center line up to the hat. Part some of the beard hair and place a good dollop of glue to hold the nose in place. If you knit your gnome nose, you can use the threaded needle to attach the nose where you would have glued it.
Bookmark this page or pin the following image to refer back to this Christmas Gnome Knitting pattern in the future.
Thanks so much for spending a few minutes of your busy day with me!
To ensure you don’t miss future content, pop your email in the pale green box on the right or click here. I usually send one email weekly, so I won’t inundate your inbox. I’m sensitive to an overflowing email inbox!
We will only use your email address to send you emails, no more than 1-2 weekly. In addition, you will have access to my growing library of knit & crochet patterns and other printables. Check back often as this library will continue to grow. You can unsubscribe anytime by emailing me or clicking on the “unsubscribe” link at the bottom of all emails.
And you can access many of the products I refer to on my Nourish and Nestle Amazon Page. You can access it here.
So, if you’d like to participate in the ‘subscriber benefit’ action, simply subscribe to Nourish and Nestle here or use the form on the right sidebar. It’s slightly towards the top.
I have sent all my subscribers the link to the Subscriber Benefits Library. If you missed it or misplaced it, let me know.
Until next time…


I am in love with these darling gnomes!! Now, I just need to learn to knit, or gnit! 🙂
I will happily teach you to gnit gnomes!