
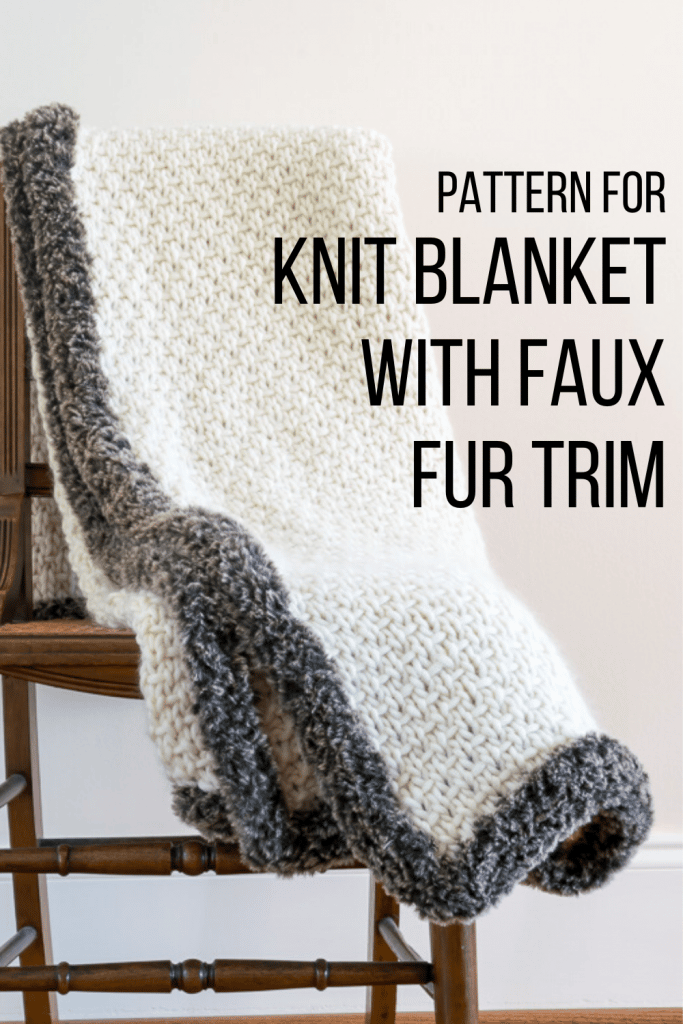
Knitted Blanket Pattern: Half-Linen Stitch & Faux Fur
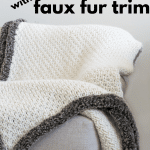
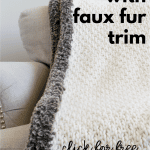
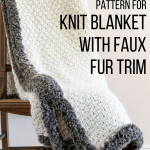
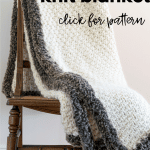
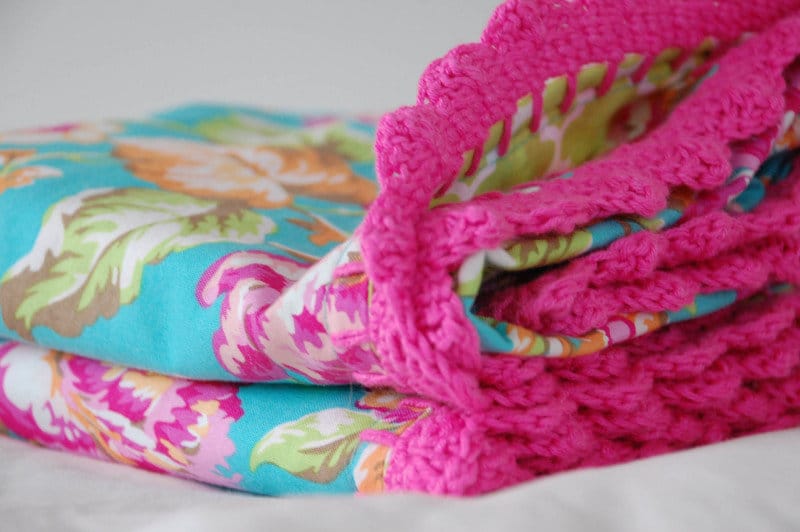
This Knitted Blanket Pattern uses the half-linen stitch knit with size 19 circular needles and is trimmed with a faux fur applied i-cord. Optional instructions to finish this blanket with seed stitch instead of the faux fur applied i-cord are also included.
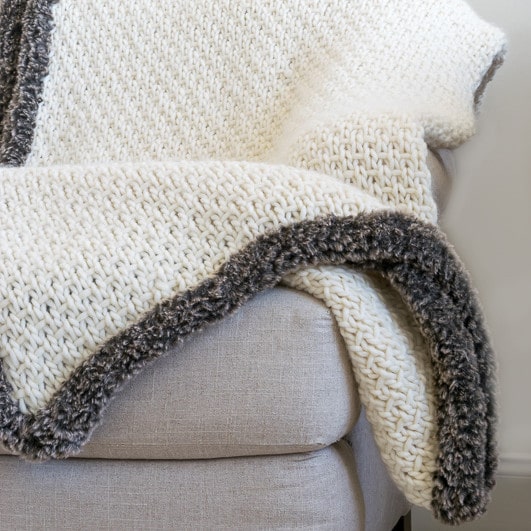
While I loved the quick knit of this Chunky Knit Blanket and the lovely diagonal woven pattern of this Diagonal Basketweave Stitch Blanket, the faux fur trim on this Half-Linen Stitch Knitted Blanket Pattern makes it one of my all-time favs!
It was a relatively quick knit blanket that used the half-linen stitch and a chunky/super bulky yarn. If the half-linen stitch sounds familiar to you, it is because I recently published this Knit Purse Pattern which also used the Half-Linen Stitch.
Table of Contents
If you are making this blanket as a gift, pop on over and grab these free, printable gift tags to make your knit gift just that much more special. Or consider one of these care tags, detailing the yarn fiber content and washing instructions.
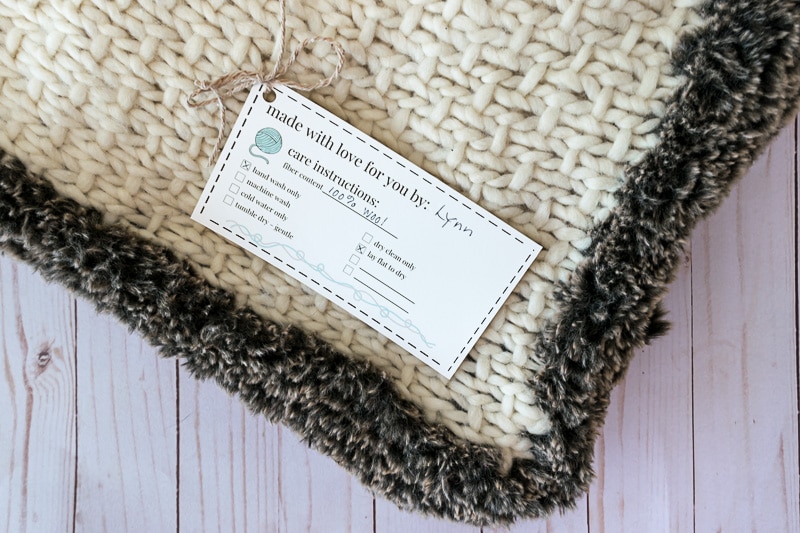
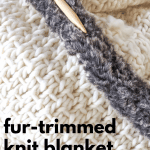
However, let’s be honest! I like the half-linen stitch and all, but this knitted blanket pattern is so fun because of that faux fur edge around it! I used Sirdar’s Alpine in Brindle and knit a 5-stitch applied i-cord to give the fur trim a little heft. Sirdar’s Alpine is sooo soft…I was really pleasantly surprised. I expected faux fur that would be kind of scritchy- scratchy. This was anything but scratchy! It is rabbit fur soft and a delight to knit with. So much so that I am actively pondering additional projects to use it.
But, if you’d rather not put ‘the fur on it’, you can still knit the half-linen stitch blanket pattern, but I’ll give you instructions to add seed stitch at all sides to prevent rolling and finish the blanket nicely.
Material to make a Half-Linen Stitch Blanket with Faux Fur Trim (blanket measures 52” by 52”)
Some of these links may be affiliate links and I may earn a small commission off of the sale of these products to help defray the costs of operating this site, but the price you are charged is not affected. You can see my full disclosure policy here.
20 skeins of Lana Grossa Ragazza Lei (880 yards total). I used the color 14 (Raw White). Sadly, it has since been discontinued. This Wool and Gang Crazy Sexy Wool looks pretty similar, but you may have to make some changes depending on your gauge. You would need 10 skeins. of it.
My yarn stockist recommended Rowan Big Wool (you would 10 skeins of it) and Cascade Boliviana Bulky (you’d need 5 skeins). Both of them are plied yarns, while the Ragazza Lei was not plied. In general, look for a Super Bulky/Super Chunky.
5 skeins Sirdar Alpine (Brindle). The yarn seems pretty popular, so you may have to look around. I’ve purchased it through Amazon and LoveCrafts.
I use circular knitting needles whenever possible when I knit blankets and throws. This knit blanket pattern uses size US 19 Circular Knitting Needles (15mm) Circular (40 inches long)
7-Inch Double Point, Size US 15
Gauge is 9 stitches and 11 rows = 4 inches in half-linen stitch
Stitches and Techniques Used:
Half-Linen Stitch
- K: Knit
- P: Purl
- WYIF: with yarn in front
- SL 1: slip the next stitch from left-hand needle to right-hand needle, purlwise
Applied I-Cord
Seed Stitch (optional)
- Row 1: K, P, K
- Row 2: K, P, K
- Repeat these rows
Instructions for Knitted Blanket Pattern:
Subscribers to Nourish and Nestle have access to the Subscriber’s Benefit Library and the printable PDF of this and all my other knit patterns. You can access the Library here or subscribe to Nourish and Nestle here for access to it.
To see the video showing some of the detail of the pattern, go to https://youtu.be/HITPgc4N-XI
( If you will not be putting the fur trim on the blanket, you will want to add seed stitch all the way around to finish the blanket nicely and prevent any rolling. The half-linen stitch doesn’t roll as much as stockinette, but it will still roll a wee bit. To knit the seed stitch border, after casting on knit 3 rows of the seed stitch before working the half-linen stitch described below. Additionally, add a K, P, K at the beginning and end of each row. Stop the half-linen stitch at 48″ and finish the last 3 rows in seed stitch. )
Half-Linen Stitch for the Body of the Knitted Blanket Pattern:
Cast on 111 stitches with Lana Grossa Lei and your size 19 circular knitting needles.
1st row : *K1, WYIF SL1* Repeat until last stitch, K1
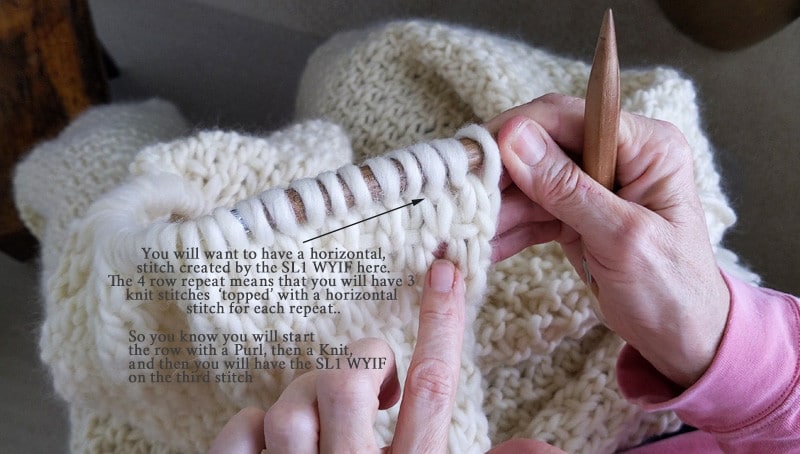
2nd row: Purl all
3rd row: P1, *K1, WYIF SL1* Repeat until last 2 stitches, K1, P1
4th row; Purl all
Repeat these 4 rows until work 50”
Cast off loosely.
Now comes the fun part! Let’s put some fur on that knit blanket!
Knit Applied I-Cord to edge the Knit Blanket Pattern:
For detailed instructions on knitting an applied i-cord, as well as the related videos and printed pattern, see How to Knit an Applied I-Cord
Regarding picking up your stitches, your tension will determine how frequently you should pick up stitches on your knitted blanket to avoid puckering of the fabric or flaring of the i-cord. Just gauge from time to time as you go along, adjusting as necessary.
Using double-pointed needles, cast on 5 stitches using the Sirdar Alpine.
After the 5 stitches, insert the needle, with the point closest to the last stitch you just cast on, into the edge of the blanket. Your tail and working yarn will be at the same end.
Don’t start your i-cord at a corner; come in an inch or two.
Wrap the working end of the yarn, not the tail from the cast-on, around the needle and pull through the fabric, resulting in 6 stitches on the needle.
Slide your 6 stitches to the opposite end of the needle. The working yarn will be at the end of the 6 stitches. By gently pulling this yarn up from the end of the row to work the stitches at the beginning of the row, you are forming the tube of the i-cord.
Knit the first 4 stitches, then Knit the next 2 together through the back loop (K2 Tog TBL), resulting in 5 stitches on your needle.
Put your needle under the next stitch on your fabric, wrap your yarn around the needle and pull the yarn through, resulting in 6 stitches again.
Push the 6 stitches to the other end of the needle and repeat the process until you reach the corner.
Taking the I-Cord Around the Corners of Your Knitted Blanket Pattern:
At the corner, we will work the i-cord a little differently to get a crisp turn. All in all, we will work 3 stitches into each corner.
1. Work up through the corner stitch as you have been. (1st stitch in the corner)
2. Slide your stitches down and K4, K2T TBL, but don’t pick up the 6th stitch…leaving only 5 stitches on your needle.
3. Slide those 5 stitches down and knit them, but this time when you get to the end of the row, add the 6th stitch by pushing your needle through the fabric and picking up a stitch, in the same place you did in step 1. (2nd stitch in the corner)
4. Slide those 6 stitches down and K4, K2T TBL, but don’t pick up the sixth stitch, leaving only 5 stitches on your needles.
5. Slide those 5 stitches down and knit them, but this time add the 6th stitch by pushing your needle through the fabric and picking up a stitch, in the same place you did in step 1 and step 3.(3rd stitch in the corner)
This will complete your corner stitches and you can knit the rest of your i-cord as you had been previously.
Attaching the Beginning and End of the Applied I-Cord:
When your i-cord comes back around and you meet up at the beginning of it, knit the 4 stitches and the K2T TBL, resulting in 5 stitches. Move those 5 stitches to the other end of the needle and knit the 5 stitches.
Slide those 5 stitches to the end again and cast off.
Once the stitches have been cast off, cut your yarn, leaving a 1-2 foot tail.
Use a crochet hook to weave the beginning and end of the i-cord together. Normally I would recommend grafting the beginning and end of the i-cord, but the fuzzy nature of this yarn made that difficult and really not necessary. That being said, if you would rather graft them, then check out my post and video on applied i-cords.
Weave in all the yarn tails on your knit blanket and enjoy!!
Blocking your Blanket
Once you’ve spent the time to create your beautiful knit blanket, make sure you finish it properly by blocking it. The active blocking time will only take 30-45 minutes, with another 1-2 days of dry time, so plan accordingly. Follow this link for instructions on how to block your knitting and the materials I use.
Once again, if you’d like to have the printable PDF of this Knitted Blanket Pattern sent to your email inbox, click the button below.
Want to be able to refer back to this Fur-Edged Knitted Blanket Pattern in the future? Bookmark the page or pin the following image. And if you do make the blanket, make sure to come back and share your image on the pin!
If you want to be ‘in the knit know’ and you’d like to be notified of the publication of any knit or crochet pattern before the rest of the world, you can do that here.
Thanks so much for spending a few minutes of your busy day with me!
To ensure you don’t miss future content, pop your email in the pale green box on the right or click here. I usually send one email weekly, so I won’t inundate your inbox. I’m sensitive to an overflowing email inbox!
We will only use your email address to send you emails, no more than 1-2 weekly. In addition, you will have access to my growing library of knit & crochet patterns and other printables. Check back often as this library will continue to grow. You can unsubscribe anytime by emailing me or clicking on the “unsubscribe” link at the bottom of all emails.
And you can access many of the products I refer to on my Nourish and Nestle Amazon Page. You can access it here.
So, if you’d like to participate in the ‘subscriber benefit’ action, simply subscribe to Nourish and Nestle here or use the form on the right sidebar. It’s slightly towards the top.
I have sent all my subscribers the link to the Subscriber Benefits Library. If you missed it or misplaced it, let me know.
Until next time…


Hi, I really like this blanket pattern and plan to use it for a blanket for my son. I am confused by the third row of the pattern. In my sample the end doesn’t seem to come out right. I am doing the seed stitch for three stitches, then P, K, WYIF SL1 and repeating k, wyif sl 1 part. When I get to almost the end before the last three seed stitches it doesn’t work right to k, slip 1 and then end on a P. I seem to need to go from a k to a p. Am I reading the pattern wrong?
Thanks, Joelle
Thanks for that head’s up Joelle! I’ve edited the pattern to correct that.
I consider myself a seasoned knitter but have never used size 19 needles. I am getting ‘holes’ in the pattern and am following directions as instructed. Any thoughts?
Hi Karen,
When you look at the finished pictures of my blanket, you do see ‘holes’…it is not a tight fabric. Are your ‘holes’ bigger? Did you swatch to test your gauge? You might be a looser knitter and may need to size down on the needle.
Let me know…
Lynn
I downloaded your wash cloth / dish cloth pattern and love working with cotton yarn — the feel, they way it knits . . . so I am wondering if you think I could find a nice cotton yarn to use for this this beautiful blanket pattern?
Thank you,
Holly
Wesley Chapel, NC
Hi Holly…let me ponder that!