
DIY Faux Concrete Planter & DIY Flexible Medallions
Figuring out how to make flexible medallions and how to get the best ‘faux’ concrete look was a good, creative challenge for me. And, I’m loving the end result…so a ‘win’ there too! So, let’s dive into the details for this DIY Faux Concrete Planter with DIY Flexible Medallions!
Oh, those dreaded Science Fair projects!
This project did end up having a wee bit of a science fair feel to it, but I truly didn’t set out to do a science experiment.
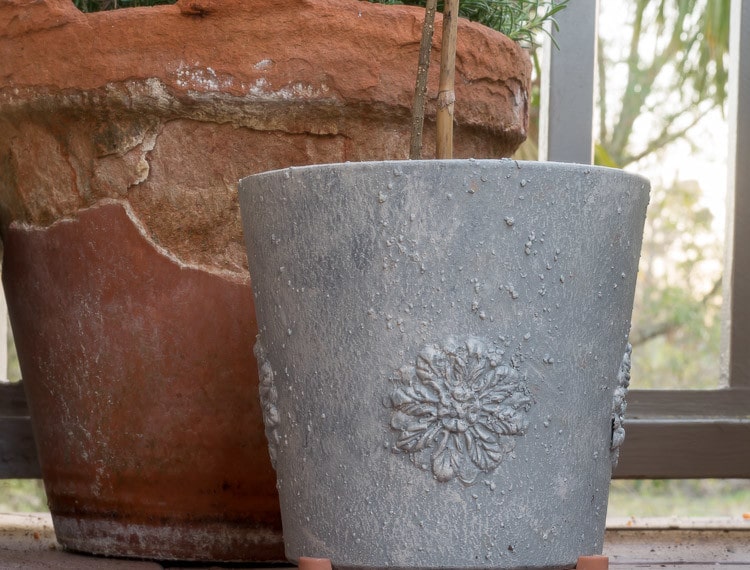
Table of Contents
All I wanted was a pretty stone/concrete pot with some sort of decoration/medallion in which to plant my new baby Olive Tree. I thought, “how hard can that be to find?” Turns out they are not hard to find, but when I saw the price tags…well, let’s just say that I really didn’t want to spend that kind of money on a flower pot.
In one of my searches, I ran across the perfect-shaped pot (for $3.98, mind you), and then, well, it just started snowballing from there.
With pots in hand, I next needed to figure out how to DIY flexible medallions. The glue I used for so many projects was all I needed, but it took me a while to figure that out.
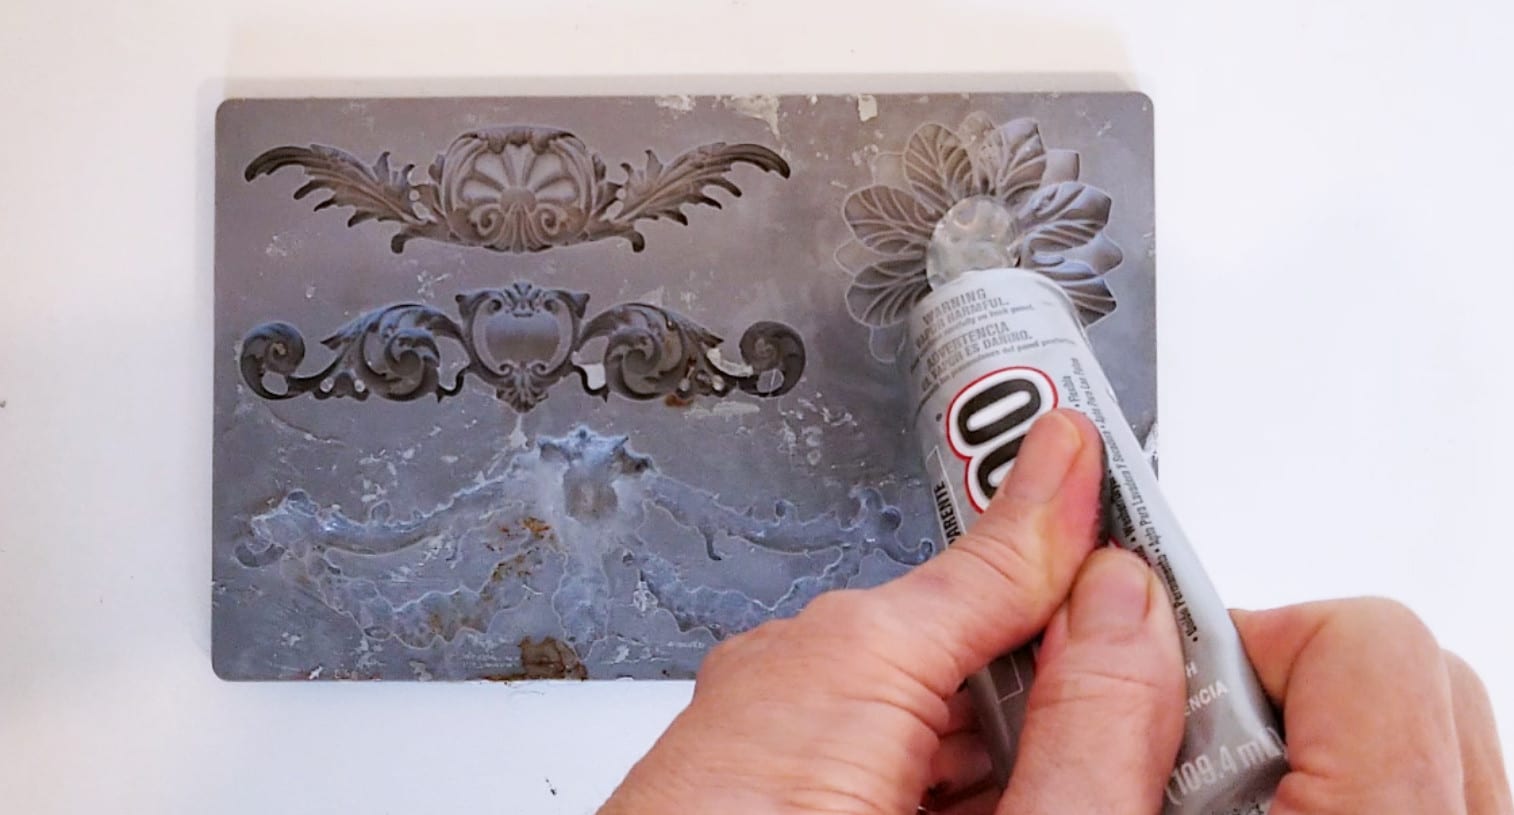
So, consider this my gift to you…I will save you time and money, cut through all my failed experiments and just give you the knowledge…all you need to make perfect, flexible medallions is the ubiquitous E6000 Industrial Strength Adhesive and a silicone mold. If you don’t have E6000 laying around your house right now, then you need to hightail it to your local craft or hardware store (who are we kidding, if you’re like me you’ll just order it from Amazon!) and purchase a tube or two, whether you make these medallions or not.
E6000 is my go-to adhesive for so many projects.
But, back to the project…I had a silicone form already, so once I figured out what the medium for my medallions would be, it was just a matter of making four of them, attaching them to my pot, and giving the pots the DIY Faux Concrete treatment.
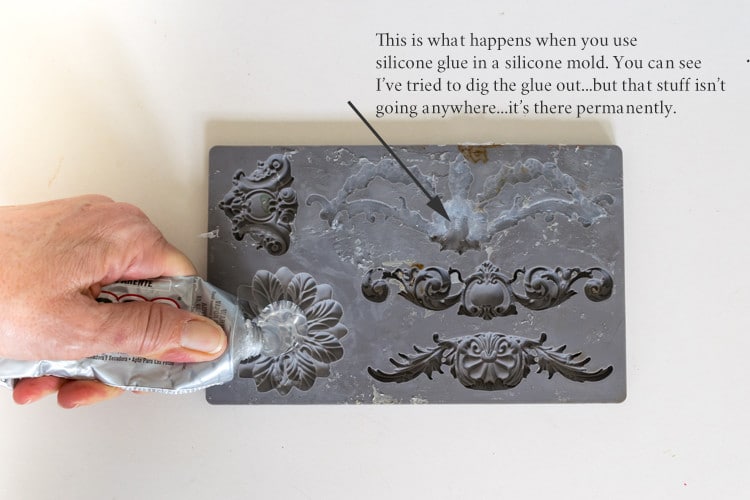
Just a quick word here…in case you don’t want to just take my word for it and feel like doing your own experimenting, I get it. But save yourself the time and $ and don’t use silicone glue…turns out that silicone REALLY adheres to silicone, as…permanently…as in, you will ruin that mold and never be able to use it again…so I’ve heard anyway. ?
Materials Needed for DIY Faux Concrete Planter with Flexible Medallions:
Some of these links may be affiliate links and I may earn a small commission off of the sale of these products to help defray the costs of operating this site, but the price you are charged is not affected. You can see my full disclosure policy here.
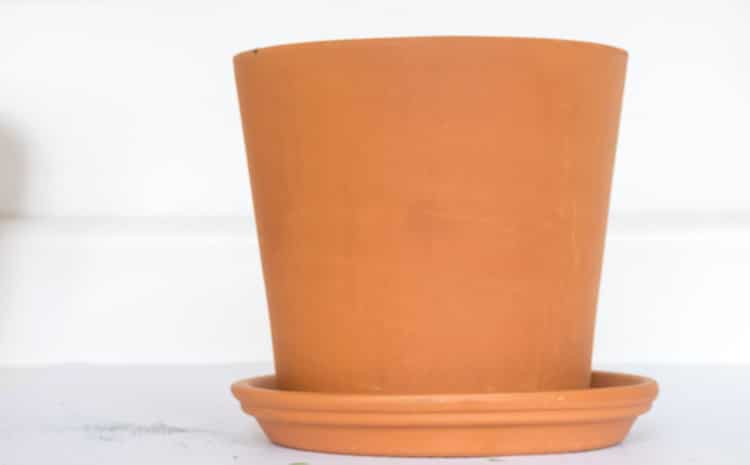
- Terra Cotta Pot, I used the 7.5″ Flair Cylinder Pot I purchased at Lowe’s. For what I wanted this was the perfect pot as it didn’t have the rim on top and was tapered less than traditional pots.

- 1-2 tubes of E6000. I used a little over one tube to make and glue 8 medallions (for 2 pots).
- Silicone Molds. It looks like the mold I used, Iron Orchid Moulds Baroque 3, may have been discontinued. But Iron Orchid makes many other molds that you can check out on Amazon or Etsy. These molds can be used for fondant to decorate a cake and make furniture appliques and medallions for your pots!
- ArtMinds Outdoor Concrete Paint
- Black and brown acrylic paint (optional…I used to make the concrete paint a little less blue)
- Black or brown spray paint…I used up several almost empty cans
- A stiff bristle brush or wax brush
- For whitewash (optional), I used my existing acrylic paints (white, black, brown, yellow) to make a ‘sandy’ color. If you don’t have those colors and need to purchase the sandy color, check out Martha Stewart Oat, Craft Smart Tan, Folk Art Linen, or DecoArt Fawn.
- Rustoleum Ultra Cover Matte Clear
If you can’t find what you need, Michaels will have supplies for most every crafting need under the sun. You can order online here and have it shipped or you can pick it up at your convenience.

How to Make Flexible Medallions:
- This part is so EASY.
- Squirt a bit of E6000 glue into your mold (they call it a ‘mould’)
- Bang the mold on your counter to settle the glue and bring air bubbles to the top.
- Poke the air bubbles with a toothpick. BUT…don’t stress about the air bubbles. I was going for a rough concrete look and knew that there would be little imperfections and the concrete paint will cover up most any little imperfections anyway.
- Let dry for 2-3 hours and peel it out, then repeat for as many medallions as you want.

How to Apply Medallions to the Pot:
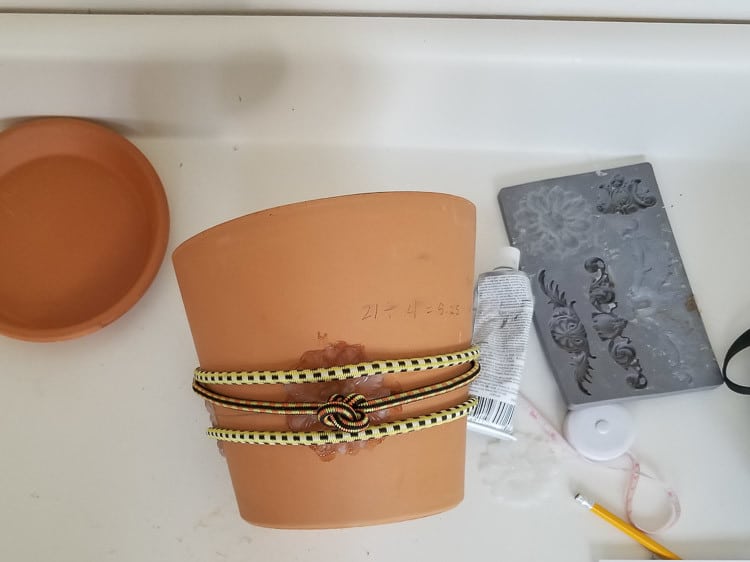
- Figure out where you want your diy flexible medallions to be. I had the center of my medallions 3″ up from the bottom of the pot, so I measured and drew a line around the circumference of the pot 3″ up from the bottom.
- My circumference was 21″ and since I wanted 4 medallions equally spaced, I divided 21″ by 4, so I spaced my medallions every 5.25″ apart and marked those spots on my pot.
- Using the E6000, I glued medallions on the pot. Once again, don’t stress if glue oozes out under the medallion as the concrete paint will cover all that up.
- I used 3 bungee cords to hold my medallion in place while it was drying and then repeated it 4 times…I didn’t really try to get more medallions under the bungees but give it a try.

How to Paint Faux Concrete Planter:
- I gave my pots and saucers a quick spray of black spray paint. I just used up 4-5 cans of almost empty black, metallic black and blackish brown spray paints…BONUS POINTS FOR CLEANING OUT THE SPRAY PAINT SHELF!!
- Mix up the concrete paint. You can use the paint right out of the jar, but it was a little too blue for me so I added in some brown and black acrylic paint to tone the blue down. If I had to come up with a recipe, I would say about 1 TB of each of the brown and the black for 1/3 cup of the concrete paint.
- I also didn’t try to thoroughly incorporate the brown and black, instead leaving some unmixed to give the final color of my faux concrete planters some depth.
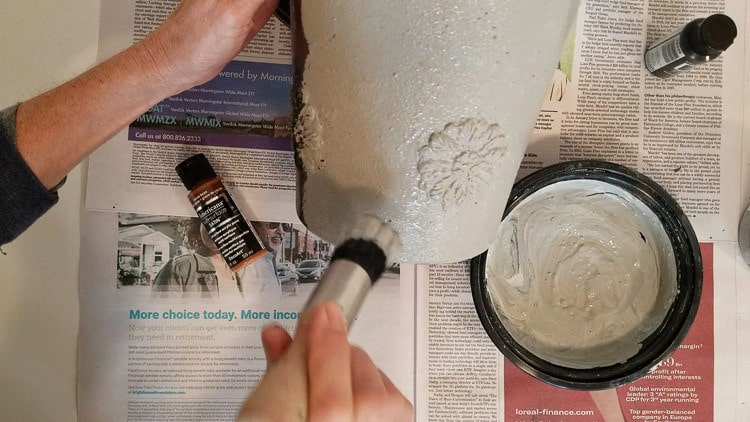
- Use a wax brush to dab the paint on your pot.

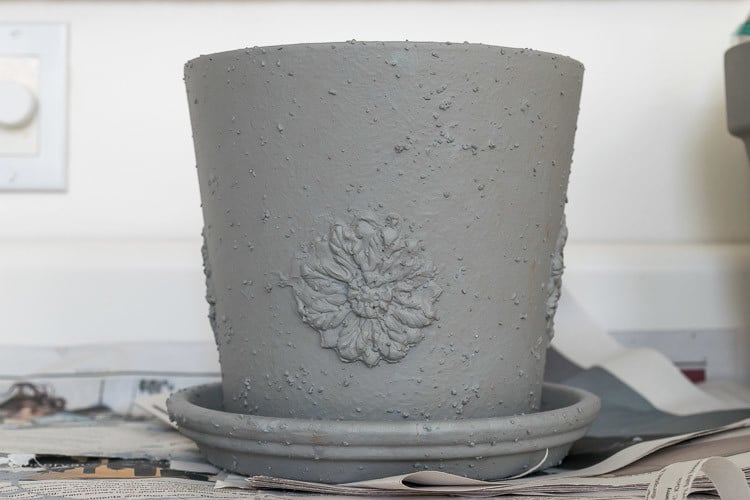
- Once the paint is dry, you could leave your DIY Faux Concrete Planter as is or give it a whitewash.

- If you leave it as is, make sure to give the entire pot, inside and out, 2 coats of an acrylic sealer.
- If you are going to whitewash, I found that a true white was too stark, so I mixed up a sandy color using white, yellow, brown, and black. You could do the same or purchase a sandy color; I listed some in the materials list above.
- To whitewash your pot, use a dry brush technique to wipe most of the paint off the brush before you apply it to your pot.
- And once again, seal the entire pot before you use it or the paint will bubble.

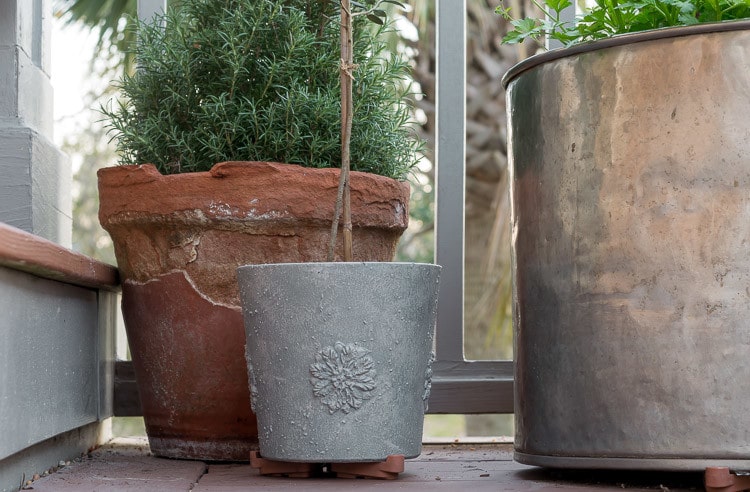
Total aside here…I can’t even tell you how much I LOVE that chipped up terra cotta planter in the background. It had a lovely layer of moss on it last year, but I had to kill it when everything became invested with spider mites (damn those little beasts). Because of that, I decided to create some DIY aged terra cotta pots that appear mossy!
You can see the full video for this project here.
Do you want to try a DIY Faux Concrete Planter (flexible medallions optional)?
 for a DIY faux concrete planter plus instructions to make DIY Flexible Medallions to embellish your planter. #diy #easy #garden #planter #pot #faux #concrete #medallion #tutorial #video")
Thanks again for spending a few minutes of your busy day with me today. Please know that I welcome each and every comment that comes my way. If you want to make sure you don’t miss future content, pop your email in the beige box up on the right or click here. I usually send out 1 email a week, so I won’t inundate your inbox…believe me, I’m sensitive to an overflowing email inbox!
When you subscribe to Nourish and Nestle, be assured that we will only use your email address to send you emails that will keep you up to date with the latest news and content on the site. In addition, you will have access to my growing library of knit patterns, crochet patterns, as well as other printables. This library will continue to grow, so check back often.
Please know that you can unsubscribe at any time by emailing me or clicking on the “unsubscribe” link at the bottom of all emails.
Did you know that you can access many of the products I refer to in all of my posts on my Nourish and Nestle Amazon Page? You can access it here.
So, if you’d like to get in on the ‘subscriber benefit’ action, simply subscribe to Nourish and Nestle here or using the form on the right sidebar. It’s towards the top a bit. I have sent all my subscribers the link to the Subscriber Benefits Library. If you missed it or misplaced it, drop me a line.
Until next time…
Hugs,


Beautiful, Lynn! Love the effect of the concrete and the tutorial is easy to follow! Pinned!
Thanks julie, it was a fun project!
That’s stunning and your tutorial was so easy to follow. Thank you
Thanks so much Michelle! I love how they turned out…and my baby olive seems happy too!
Just gorgeous. I love this look. Especially when you want o give a plant and not spend an arm and a leg on the pot too.
Thanks Patti…I’m pretty thrilled with how they turned out!
Lynn these are so pretty. They add tons of character to an already pretty pot that was painted with so much age and patina.
Thanks Mary…I had a great time figuring ‘it all out’ and now that they are done, I am do love my ‘new’ pots. My baby olive trees are very happy in their new pots. I would imagine you are a pro at growing olives!
What a great project! I was brainstorming ideas of how to beautify simple clay pots, and this is brilliant. Well done, Lynn. (What a lovely blog you have!)
Aw thanks Robin! And I am glad this was helpful! Like you, I had been noodling ideas and am thrilled with how these turned out.
Have a great day my friend.
Hugs,
Lynn
The molds are easy to use paper clay in the molds then and expensive things like e6000 save the money and use paper clay. Just dust the mold with corn starch add some clay to fill the mold pull out and let dry or add to the surface and let dry in place. Use glue like the e6000 or wood glue or even thick tacky glue works well along with painters tape to hold the paper clay in place on that curved surface and let the glue dry. Please don’t take offense to the post I just think you should not spend the money on that part of the project and you can then add more detail if you want its cheaper!
Hi Teresa,
No offense was taken! I always welcome more cost-effective ways to do things. Question about paper clay though, is it waterproof? This pots are outdoor pots, which is why I looked for a medium that would withstand all the elements.
Thanks, Lynn
I personally prefer paper clay myself. I like the way it naturally cracks to look old. I have also used hot glue if you want a much quicker medallion. I do seal the pot before I glue the medallion on or before painting it to prevent issues. As long as you seal the medallion with whatever waterproof sealer you have, it’ll be on there forever. I use either E6000 (for hot glue medallions) or wood glue for paper. You can put the paper clay ones on while still moldable because once they dry, you can’t mold them.
Wow! I am definitely going to check the paper clay out! Thanks so much Maureen!
Hi Lynn, I am new to your blog. I have been looking for a way to make flexible molds for yonks. Little did I know that my favourite glue would do the trick. On another note, what font is it that you use to sign Lynn at the end of your post. Love it.
Suzanne (Australia)
Hi Suzanne from Australia! I am so very glad to have you here.
It was quite a discovery about that glue, wish I would’ve figured it out earlier as I would’ve said sooo much money. And the font of my signature is Brotherhood. Way back when I started the blog, I had to purchase a license to use it. But it may be free now.
Many hugs, my friend.
Lynn