
Read a Knit Pattern: with pattern examples

This post provides guidance on how to read a knit pattern. Additionally, a free, printable Knitting Term Abbreviations chart is available for download.
You learned how to cast on, how to knit, how to purl, how to bind off and you are ready to put your newly found skills to good use! So, you head to your LYS and find the cutest pattern and the yummiest yarn and are ready to get your needles busy.
But, when you sit down with your pattern, your eyes go all wonky…what the heck is a tbl anyway? And what’s with all those asterisks?
Not to worry, my friend. Print off the Knit Abbreviations Chart and spend a few minutes with this post and I’ll have you confident in your ability to read a knit pattern. The first three patterns are washcloth patterns, which are fairly straightforward. For a more ‘involved’ pattern, read on to the last pattern which is a blanket pattern that has a chart.
Let’s look at a couple of knit patterns to learn how to read them.
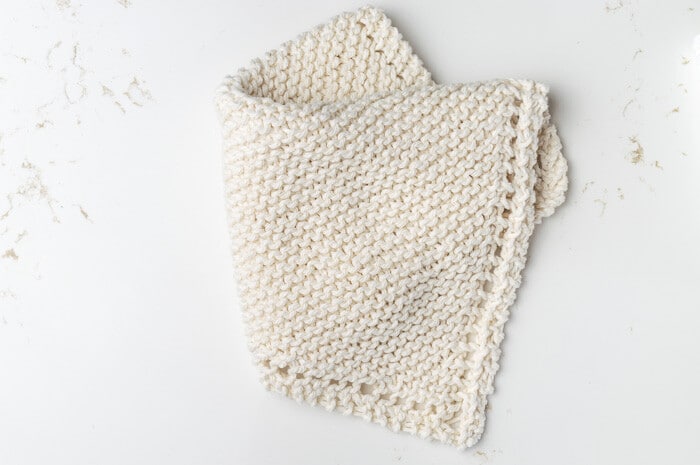
This first pattern is a great project for beginning knitters.
You can see this post for this washcloth and get the pattern on the Garter Stitch Washcloth post.
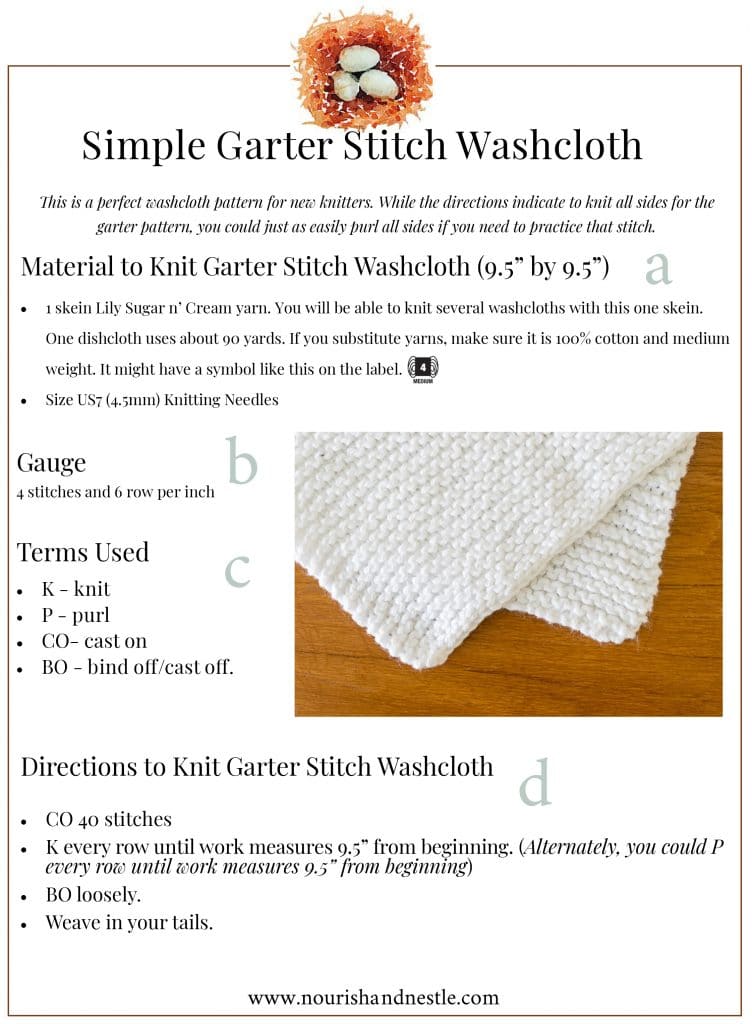
Table of Contents
![]() To knit the exact washcloth, Lily’s Sugar n’ Cream yarn is recommended. But if we wanted to substitute, we should look for a Medium Weight yarn. The label may also have this symbol
To knit the exact washcloth, Lily’s Sugar n’ Cream yarn is recommended. But if we wanted to substitute, we should look for a Medium Weight yarn. The label may also have this symbol ![]()
We will need 90 yards of this yarn to knit this washcloth and that cotton yarn is recommended. A US 7 or 4.5mm straight knitting needle is recommended.
![]() With the needles and yarn indicated, knit a swatch in garter stitch; you should get 4 stitches and 6 rows to the inch. The post detailing this pattern shows exactly how to count rows and stitches for Garter Stitch.
With the needles and yarn indicated, knit a swatch in garter stitch; you should get 4 stitches and 6 rows to the inch. The post detailing this pattern shows exactly how to count rows and stitches for Garter Stitch.
If you knit up a gauge swatch and discover that it has fewer stitches per inch than indicated, remember that if you want more stitches you should use a smaller needle. If your swatch shows more stitches per inch, you should use a larger needle. The larger your needles, the larger your stitches will be and therefore fewer of them will fit into an inch
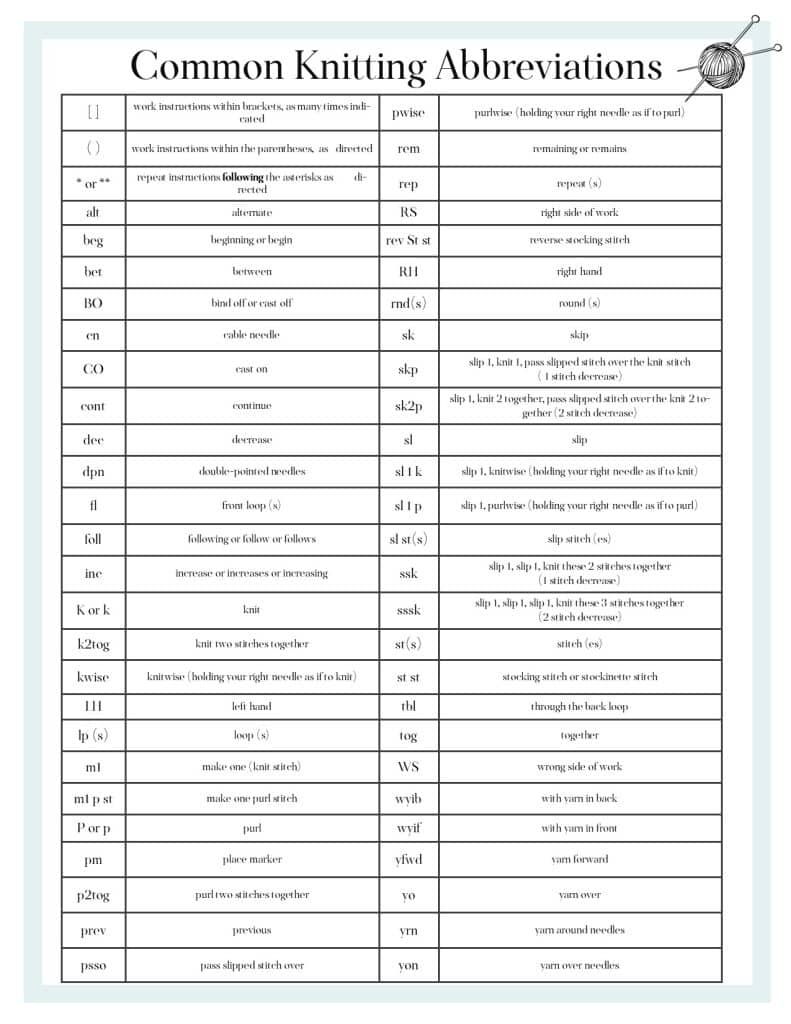
![]() Many patterns will list the different stitches used. That being said, a cheat sheet of Knitting Abbreviations is handy to have on hand. You can find this one in the Benefits Library, or click the button below to have one sent to your email inbox.
Many patterns will list the different stitches used. That being said, a cheat sheet of Knitting Abbreviations is handy to have on hand. You can find this one in the Benefits Library, or click the button below to have one sent to your email inbox.
As it relates to these 4 terms, we covered them in the four preceding posts, which you can see here:
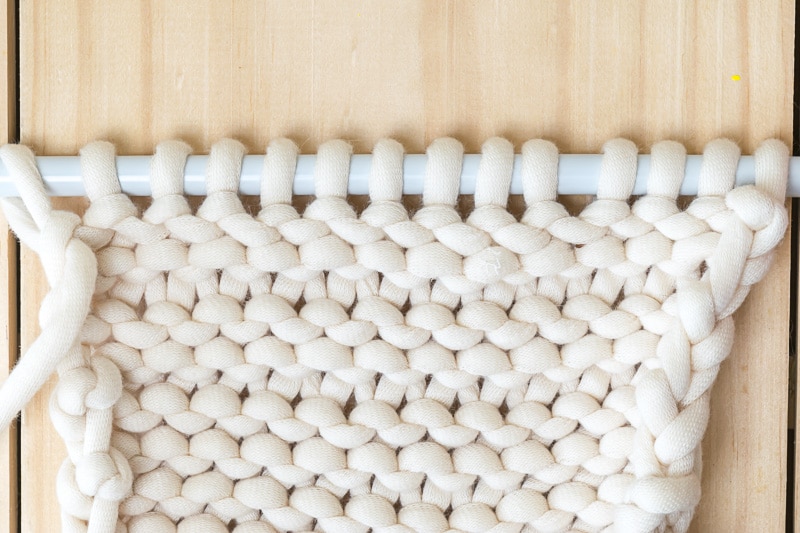
![]() After you cast on 40 stitches you will begin to knit, horizontally across a row. Because you are knitting the garter stitch, you will knit every row. (Since the purl is just the backside of the knit stitch, you could also purl every row and achieve the same pattern). Assuming you are knitting, when you get to the end of one row, turn your work and knit the next row. You will repeat this until your work measure 9.5″ from where you started. Then you will cast off and weave in your ends.
After you cast on 40 stitches you will begin to knit, horizontally across a row. Because you are knitting the garter stitch, you will knit every row. (Since the purl is just the backside of the knit stitch, you could also purl every row and achieve the same pattern). Assuming you are knitting, when you get to the end of one row, turn your work and knit the next row. You will repeat this until your work measure 9.5″ from where you started. Then you will cast off and weave in your ends.
Let’s figure out how to read this next washcloth knit pattern.
You can see the post and pattern for this washcloth on the Hand Knit Washcloth post.
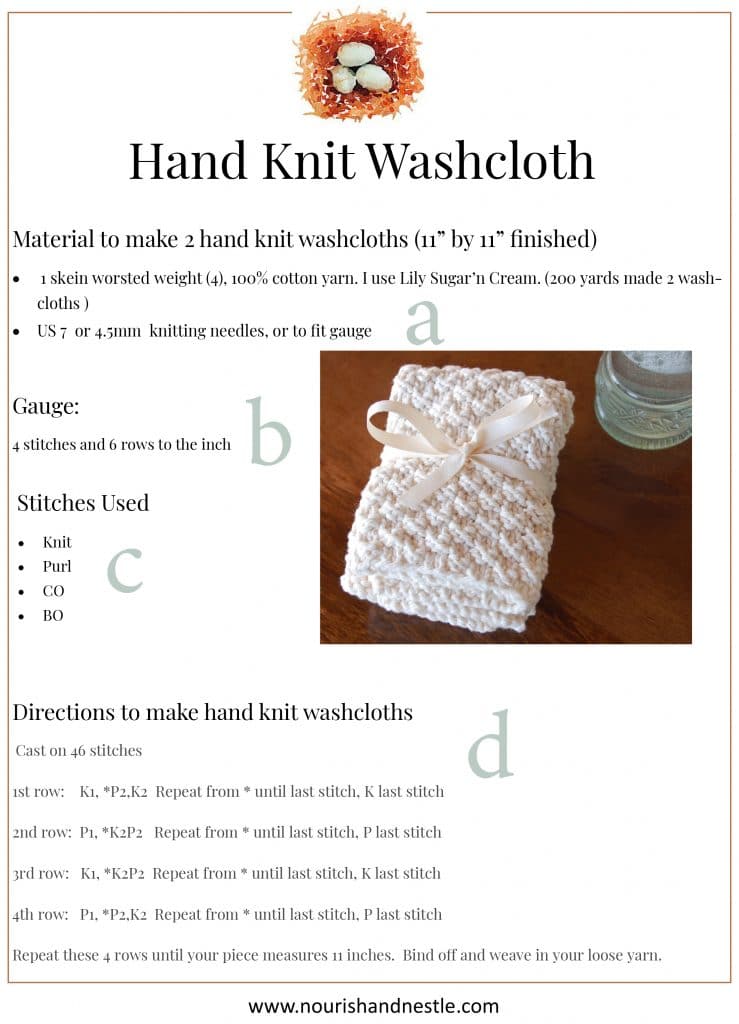
![]() This pattern indicates that you will be able to knit one 11″ X 11″ washcloths from a skein of the Lily’s Sugar n’ Cream yarn and that with 200 yards you will be able to knit two of the washcloths. This pattern recommends a US7 (4.5mm) straight needle.
This pattern indicates that you will be able to knit one 11″ X 11″ washcloths from a skein of the Lily’s Sugar n’ Cream yarn and that with 200 yards you will be able to knit two of the washcloths. This pattern recommends a US7 (4.5mm) straight needle.
![]() Unless otherwise indicated, work your gauge in the project’s pattern.
Unless otherwise indicated, work your gauge in the project’s pattern.
![]() Once again, these are the knit stitches you will be using.
Once again, these are the knit stitches you will be using.
![]() After you’ve cast on 46 stitches, you will begin to work the pattern as indicated. So let’s talk about the first row; how would you work this? “K1 *K2, P2 repeat from asterisk until last stitch, K last stitch.”
After you’ve cast on 46 stitches, you will begin to work the pattern as indicated. So let’s talk about the first row; how would you work this? “K1 *K2, P2 repeat from asterisk until last stitch, K last stitch.”
Remember that an asterisk means to repeat the stitches after the asterisk as instructed. In this case, we will work a K1 and then repeat the P2, K2 pattern for the rest of the row until the last stitch, which will be a K1.
Then we will work rows 2-4 in a similar manner, paying attention to the pattern repeat on each row.
When we reach the fifth row, we will go back and repeat the first row. For the sixth row, we will work on row two and so on. We will just keep repeating these 4 rows until we reach 11 inches, at which point we will cast off and weave in our ends.
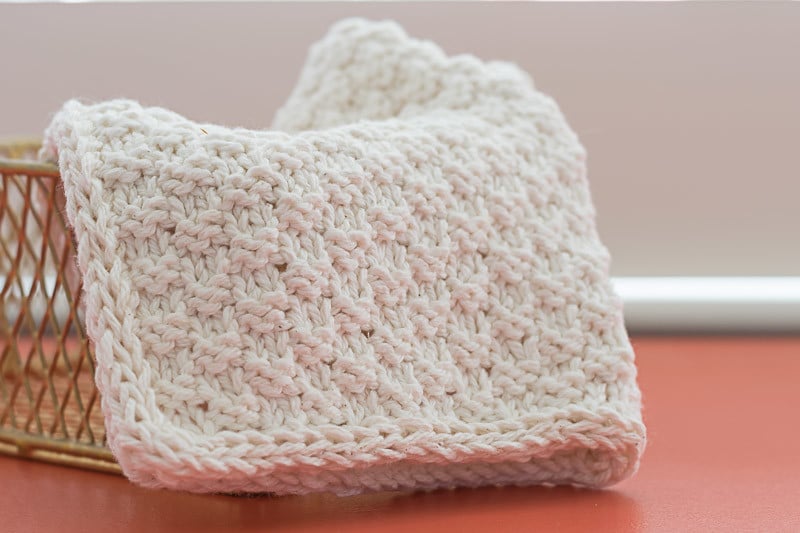
This next pattern has a little more to it. Let’s take a look.
The post and pattern for the Daisy Stitch Washcloth.
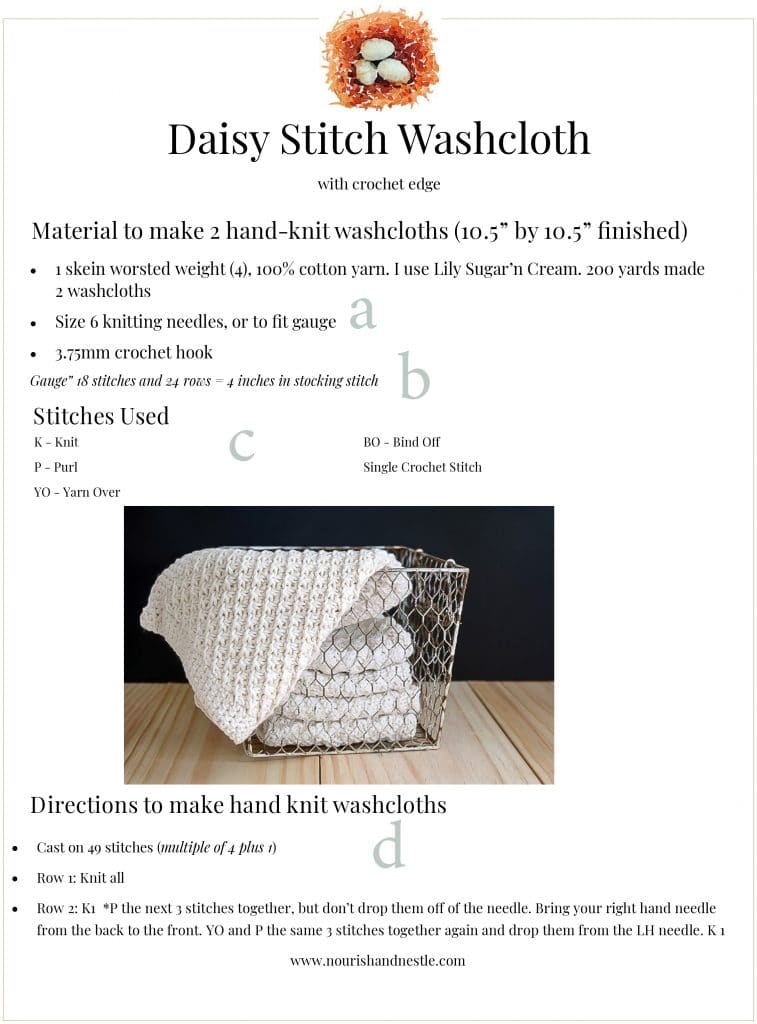
![]() In addition to the yarn and knitting needles, this pattern uses a crochet hook for an optional crochet edge.
In addition to the yarn and knitting needles, this pattern uses a crochet hook for an optional crochet edge.
![]() Once again, work your gauge in the pattern, in this case, it is the daisy stitch. Working the gauge in a new pattern is also a good way to get to know the stitch before you dive into your project.
Once again, work your gauge in the pattern, in this case, it is the daisy stitch. Working the gauge in a new pattern is also a good way to get to know the stitch before you dive into your project.
![]() There is a new knit term to know, the YO (yarn over). We are also told we would use the single crochet stitch for the optional edging.
There is a new knit term to know, the YO (yarn over). We are also told we would use the single crochet stitch for the optional edging.
![]() We are told how many to cast on and we see a new piece of information…multiple of 4 plus 1. When knitting a repeating pattern, you will often see the multiple information. This is important to know if you decide to resize the pattern.
We are told how many to cast on and we see a new piece of information…multiple of 4 plus 1. When knitting a repeating pattern, you will often see the multiple information. This is important to know if you decide to resize the pattern.
So in this case, the daisy stitch is knit over 4 stitches. The ‘plus 1’ is added at the end of the row and is important for symmetry, but is not a part of the pattern. You can see that the cast on of 49 stitches is a multiple of 4 plus 1 (48 + 1). So, say you wanted this washcloth to be bigger. You could make it 53 cast-on stitches or 57 cast-on stitches, but not 56. Does that make sense?
Then the rest of the pattern is pretty self-explanatory; we knit across the 1st row and then follow the pattern as written for the second row, noting the asterisks which tell us to repeat what follows the asterisks.
This last pattern introduces a variety of new knit pattern concepts
You can see this Argyle Baby Blanket here.
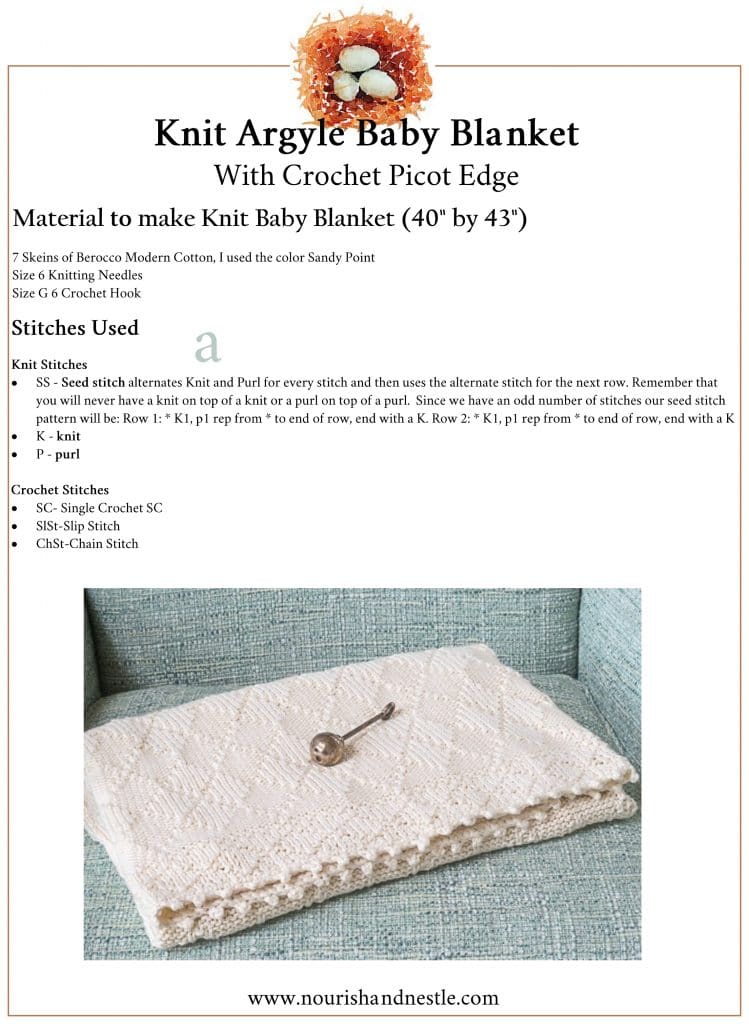
![]() This baby blanket pattern has more information to it than the last patterns we looked at. We will ignore the crochet for the time being, and just focus on the knitting. This pattern uses Seed Stitch and gives a bit of detail about it.
This baby blanket pattern has more information to it than the last patterns we looked at. We will ignore the crochet for the time being, and just focus on the knitting. This pattern uses Seed Stitch and gives a bit of detail about it.
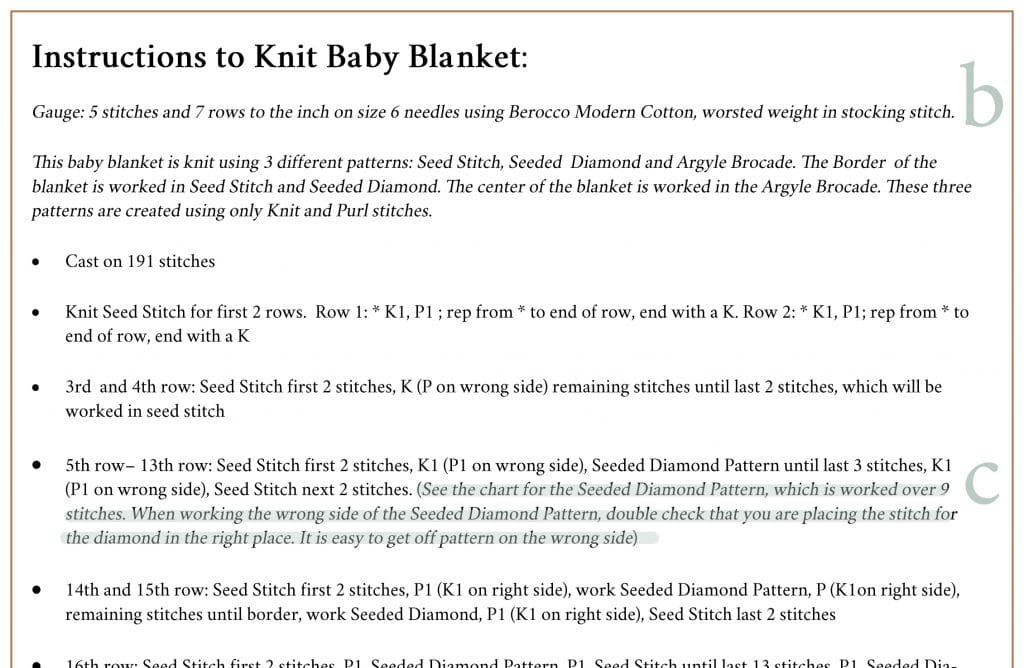
 The second page of the pattern shares the gauge, which is knit in stocking stitch: Gauge: 5 stitches and 7 rows to the inch on size 6 needles using Berocco Modern Cotton, worsted weight in stocking stitch.
![]() I like to talk a little about what to expect in my patterns. I think it helps to know that this blanket is knit using three different patterns.
I like to talk a little about what to expect in my patterns. I think it helps to know that this blanket is knit using three different patterns.
As we read the directions, we see the use of asterisks, which we know means that this is a repeating part of the pattern.
The information for rows 5-13 tells us that there is a chart that we need to follow: (See the chart for the Seeded Diamond Pattern, which is worked over 9 stitches. When working the wrong side of the Seeded Diamond Pattern, double-check that you are placing the stitch for the diamond in the right place. It is easy to get off pattern on the wrong side)
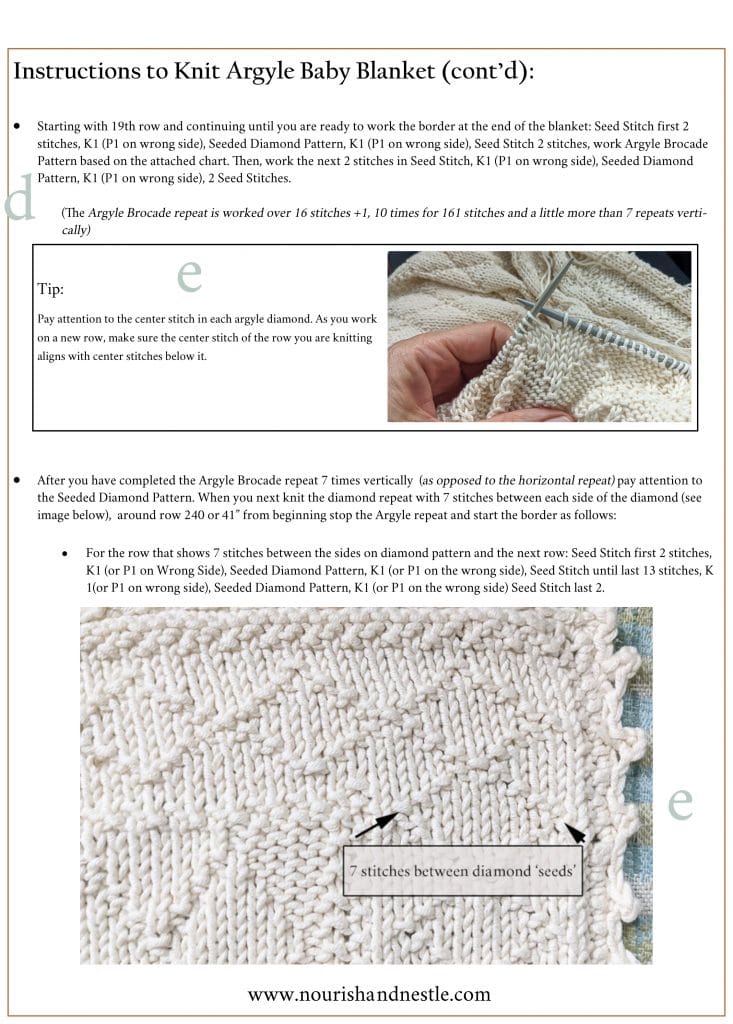
![]() We talked about repeating patterns and multiples earlier, here’s another example of that. This part of the blanket pattern has a multiple of 16 plus 1. There is also a vertical repeat of a little more than 7 repeats of the Argyle Brocade in this blanket.
We talked about repeating patterns and multiples earlier, here’s another example of that. This part of the blanket pattern has a multiple of 16 plus 1. There is also a vertical repeat of a little more than 7 repeats of the Argyle Brocade in this blanket.
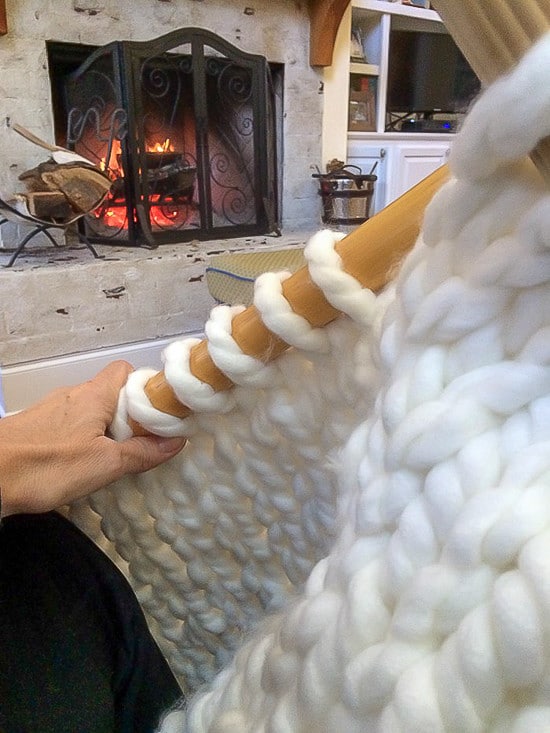
![]() I like to provide as much visual guidance as possible in my patterns and appreciate pattern developers who do the same. Oftentimes, a picture truly is worth a thousand words. Look for pattern developers who write patterns that you find easy to interpret.
I like to provide as much visual guidance as possible in my patterns and appreciate pattern developers who do the same. Oftentimes, a picture truly is worth a thousand words. Look for pattern developers who write patterns that you find easy to interpret.
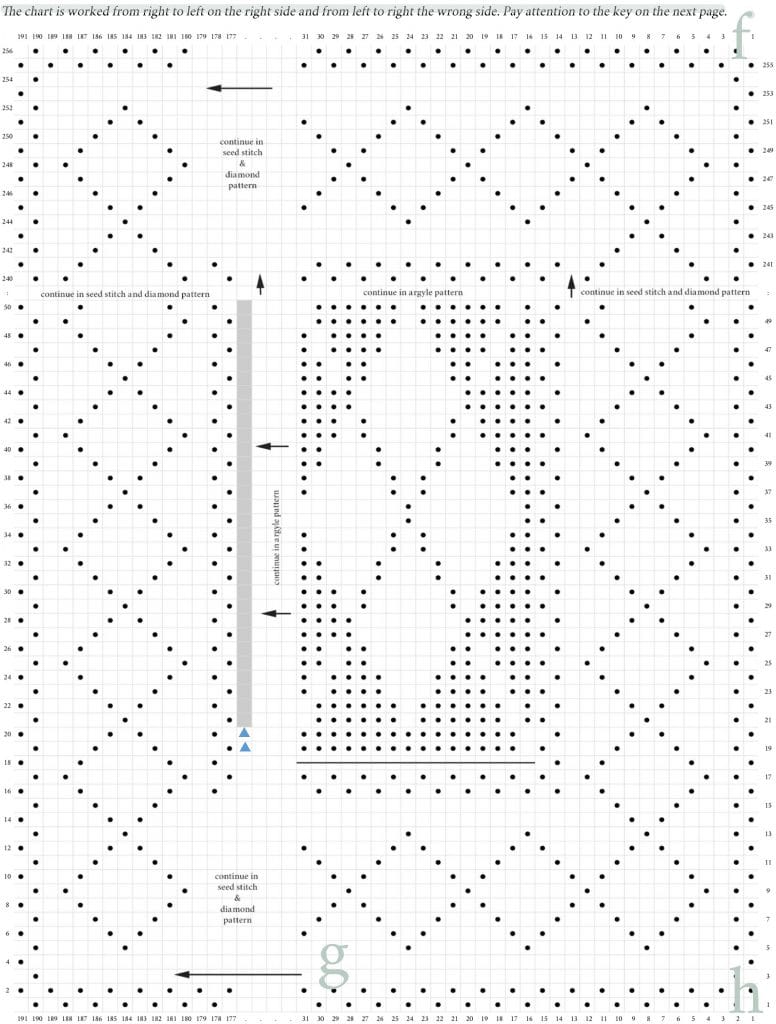
![]() Not all charts are worked the same way. There should be information telling you how the chart is worked.
Not all charts are worked the same way. There should be information telling you how the chart is worked.
This highlighted text says: The chart is worked from right to left on the right side and from left to right on the wrong side. Pay attention to the key on the next page.
![]() Obviously, the entire 191 stitches cannot be replicated on a piece of graph paper. Once the repeat and pattern are established, the pattern will often skip to the next pertinent information.
Obviously, the entire 191 stitches cannot be replicated on a piece of graph paper. Once the repeat and pattern are established, the pattern will often skip to the next pertinent information.
![]() You can see that along the right side of the page, the rows are all odd-numbered while on the right side they are even-numbered. Just another reminder that this chart is worked from right to left on the right side and from left to right on the wrong side.
You can see that along the right side of the page, the rows are all odd-numbered while on the right side they are even-numbered. Just another reminder that this chart is worked from right to left on the right side and from left to right on the wrong side.
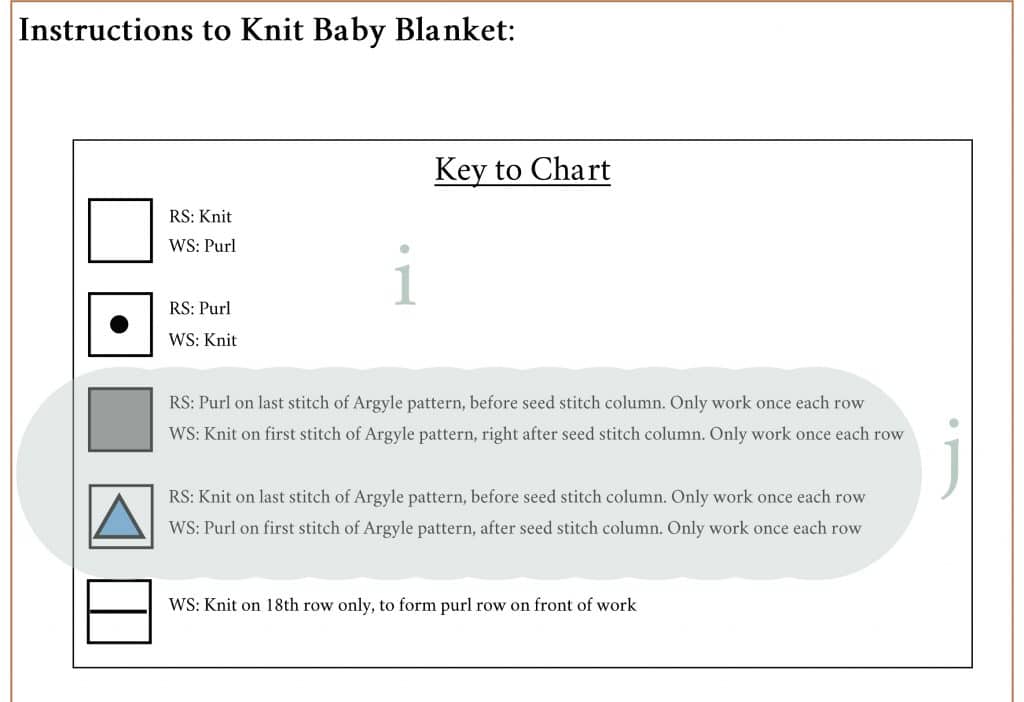
You made it to the last page! This is the key to the chart.
![]() Once again, another reminder that the chart is worked from right to left on the right side and from left to right on the wrong side.
Once again, another reminder that the chart is worked from right to left on the right side and from left to right on the wrong side.
![]() This highlighted area specifies how to treat the +1 in the 16+1 repeat. You can see that it is worked only once for each row and is meant to keep the pattern symmetrical.
This highlighted area specifies how to treat the +1 in the 16+1 repeat. You can see that it is worked only once for each row and is meant to keep the pattern symmetrical.
Wow! That was ALOT of pattern reading! Is your head spinning?
Like anything else, the more you spend time with Knit Patterns, the more comfortable you will get reading and understanding them!
If you want to learn how to knit or are looking to brush up on your knitting skills and knowledge, pop over to the How to Knit page, which houses all of the posts that teach knitting skills. Or, you could go ahead and visit each one by clicking the links below.
All About Knitting
- All About Yarn, including different fibers and weights, how to read a yarn label, and a Yarn Weights Chart
- All About Knitting Needles, including material, sizes, styles, and a Needle Conversion Chart.
- How to Cast On Using the Long-Tail Method, including calculating how much yarn is needed to cast on and how to make a slip knot.
- How to Knit the Knit Stitch
- How to Knit the Purl Stitch
- How to Knit the Seed Stitch
- How to Bind Off, including how to weave in your loose ends.
- How to Read a Knit Pattern, including a Common Knitting Abbreviations Chart.
- This simple Garter Knit Dishcloth will let you put all your new skills to good use!
- How to Block Your Knitting.
- Common Knit Errors; How to Prevent or Diagnose and Fix Them
- Join yarn using the Russian Join
- How to seam pieces of knit fabric with the Mattress Stitch (for sweaters, tops, pillows, etc…)
- How to Knit in the Round with Circular Needles
- How to Knit in the Round with Double-Pointed Needles
- How to Knit in the Round using the Magic Loop Technique.
- Organize Your Knitting with these free printables.
- Check out our Gift Ideas for Knitters.
And once again, don’t forget to grab the Common Knitting Abbreviations Chart. Subscribers can access it in the Benefits Library (your super-secret password will be in the most recent email I’ve sent you). OR, click the button below to have it automagically dropped into your inbox.
So, please…take a minute to let me know if this post was useful in helping you learn to read a knit pattern. Is there something else you would like to know? I am constantly updating these posts and want to make sure that I provide the information that is needed.
To refer to this guide on how to read a knit pattern, bookmark this post or pin the following image.
Thanks so much for spending a few minutes of your busy day with me!
To ensure you don’t miss future content, pop your email in the pale green box on the right or click here. I usually send one email weekly, so I won’t inundate your inbox. I’m sensitive to an overflowing email inbox!
We will only use your email address to send you emails, no more than 1-2 weekly. In addition, you will have access to my growing library of knit & crochet patterns and other printables. Check back often as this library will continue to grow. You can unsubscribe anytime by emailing me or clicking on the “unsubscribe” link at the bottom of all emails.
And you can access many of the products I refer to on my Nourish and Nestle Amazon Page. You can access it here.
So, if you’d like to participate in the ‘subscriber benefit’ action, simply subscribe to Nourish and Nestle here or use the form on the right sidebar. It’s slightly towards the top.
I have sent all my subscribers the link to the Subscriber Benefits Library. If you missed it or misplaced it, let me know.
Until next time…

Hi Lynn,
I forgot my password and do not have an easy way to change this.
Could you please guide me.
Thank you,
Patty
Hi Patty,
I sent you an email.
Hi Lynn: Oops, just about spelled your name the way my sister’s name is spelled 😀 I subscribe to your newsletter and find it very helpful. Today I ran into a “glitch” I can’t seem to find a resolution for on your blog. I’m going to try one other site to try and figure out why I’m feeling “lost” with a particular pattern — I may need some guidance from you if I don’t find an answer there. You have such fun projects listed — I’ve been knitting for almost 70 years but still run into times when I want something “really simple and fast” — love your blog for finding those!
Hi Karen, I’m glad to try to help you! What is your glitch?