
Twisted Knit Stitches: Diagnose, Prevent & Fix

This post discusses what Twisted Knit Stitches are, how to prevent a twisted knit stitch and how to fix twisted stitches when knitting. Plus, how to put knit stitches back on needles so that they aren’t twisted.
Knit Errors And How to Prevent And Fix Them
This is one of 5 posts that address certain knit errors; how to diagnose, prevent, and fix them. See the other posts here:
Twisted stitches are a common knit error, especially among beginner knitters. They happen most commonly when you knit into the wrong leg of your stitch, when you wrap your yarn the wrong way and when you put your stitches back on your needles after having taken them off.
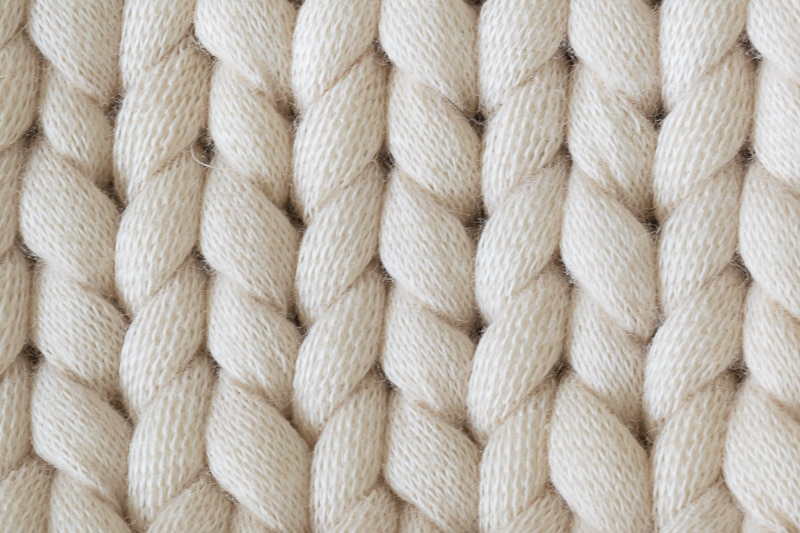
Before we talked any more about twisted knit stitches, let’s talk about how a knit stitch should look.
Anatomy of a Knit Stitch
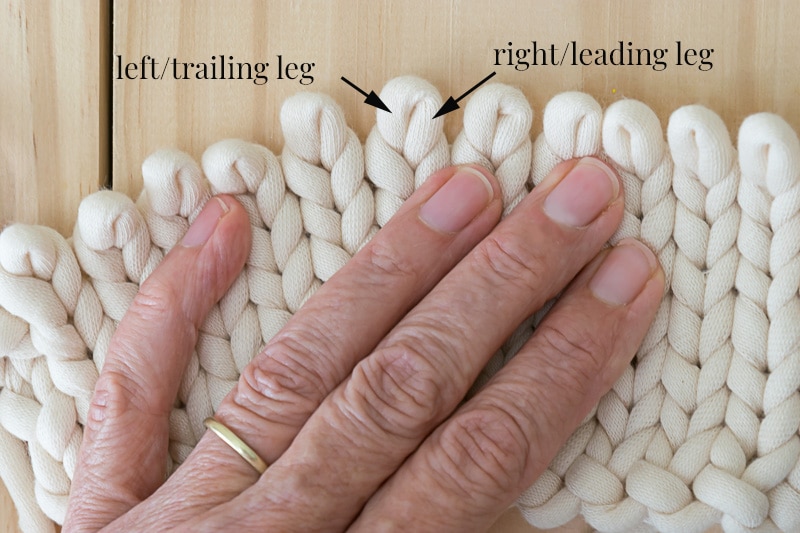
Table of Contents
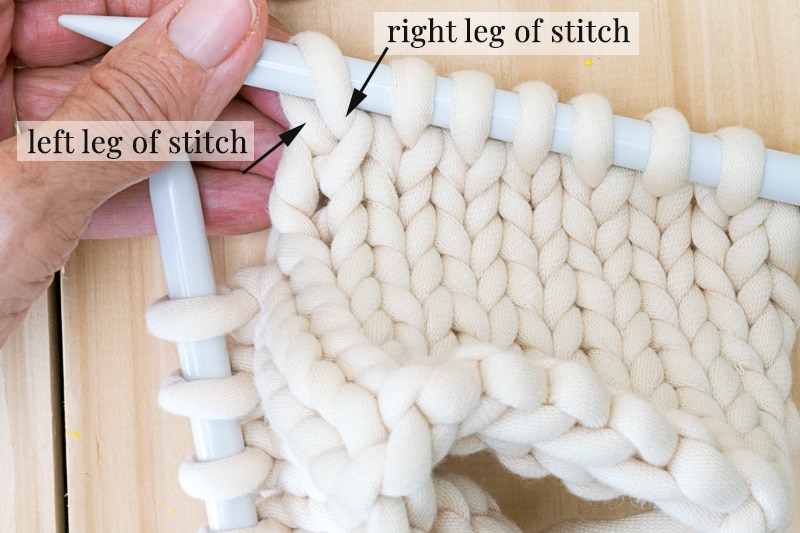
How stitches should ‘sit’ on your knitting needle
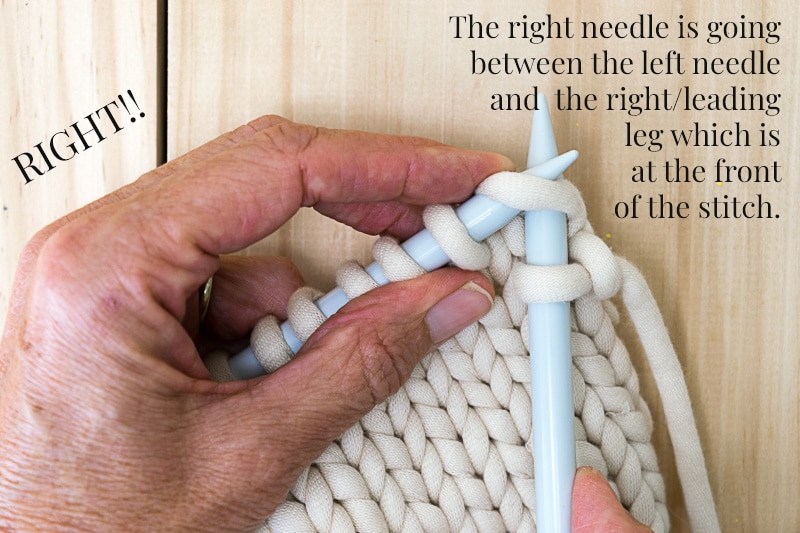
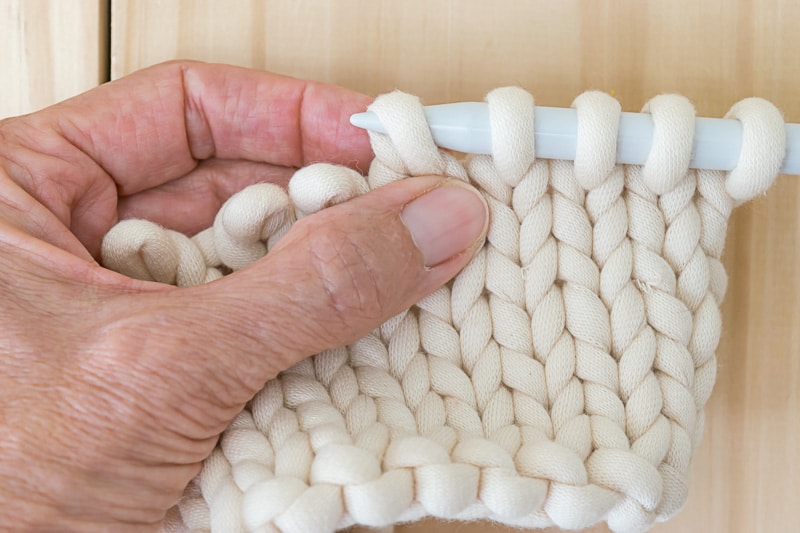
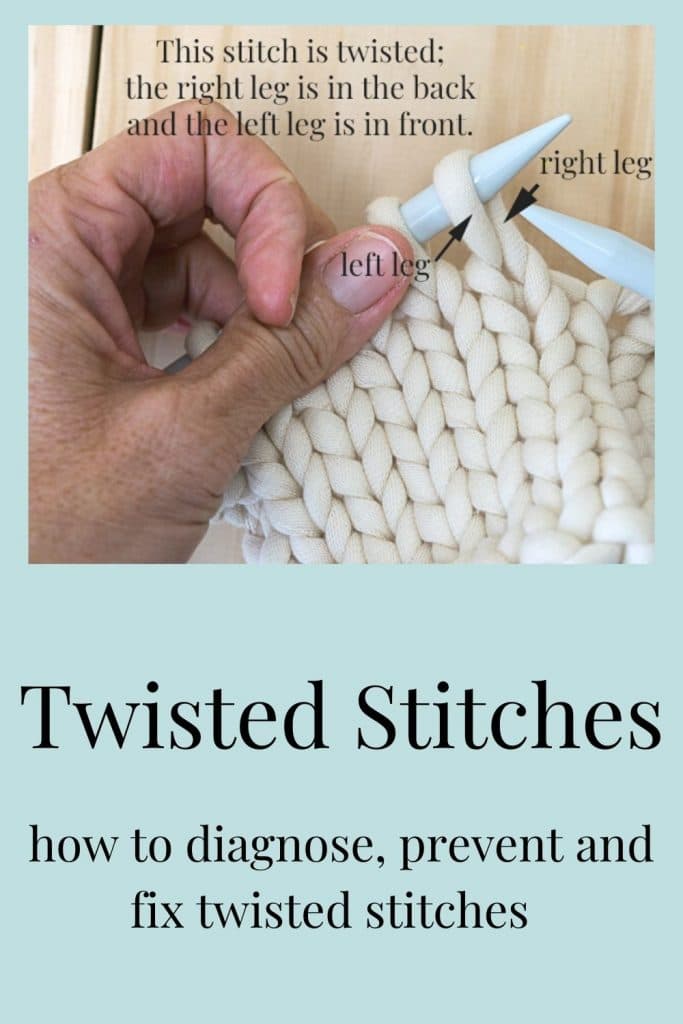
Whether you are looking at your work from the knit side or the purl side, the right leg of each knit stitch should ‘sit’ in front or toward you, and its left leg in the back, away from you. In Western/English knitting, that right leg is also known as the ‘leading leg’ and is the stitch that you will knit and purl into. The left leg is also known as the ‘trailing leg.”
Twisted Stitches
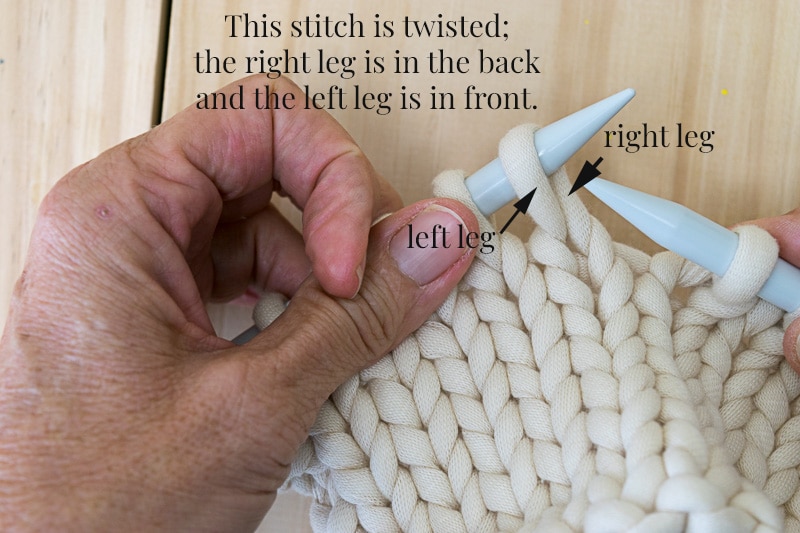
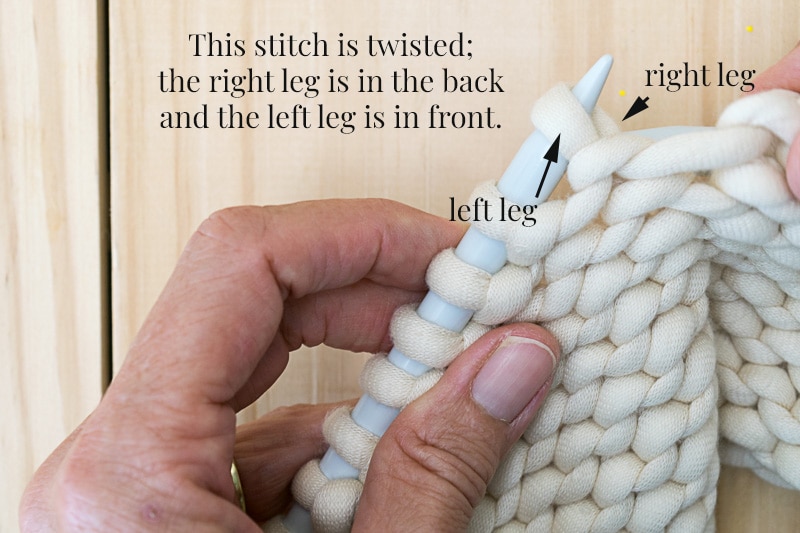
As a general rule, your stitches should ‘sit’ on your needles in one specific way. When your stitch isn’t sitting so that the right leg is forward, it is twisted. And before we go further, there are some patterns where you want a twisted stitch. But unless you are instructed specifically to ‘knit into back leg’, then your pattern will assume that you will be knitting into the front, right leg.
Diagnosis
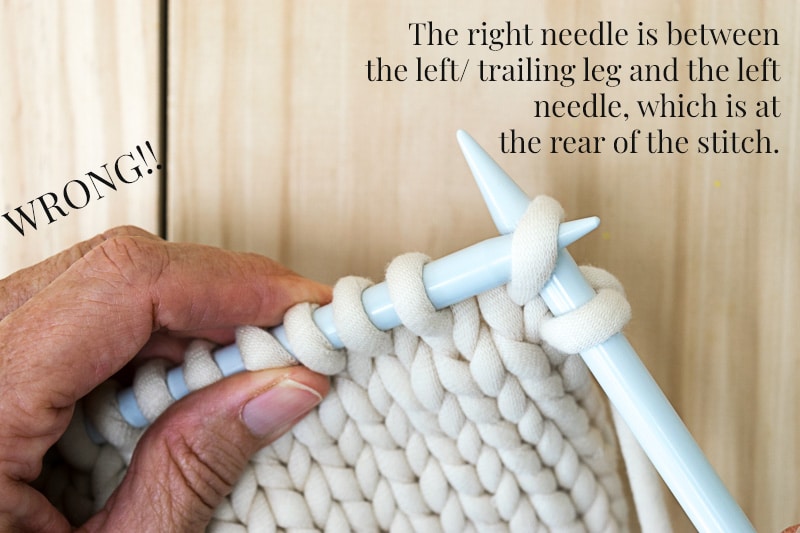
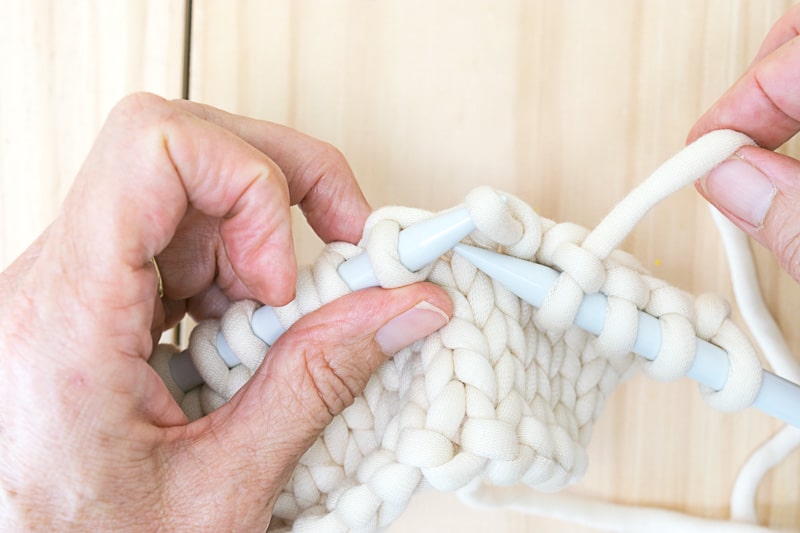
As you are knitting, if you notice that the right leg of the stitch you are getting ready to work is in the back; then you, my friend, have a twisted knit stitch. The leading leg is the left leg in the image below, as opposed to the right leg. If you knit into the left leg, you will continue to twist the stitches.
The same holds true for the purl side. If the right leg of the stitch is in the back, it is twisted.
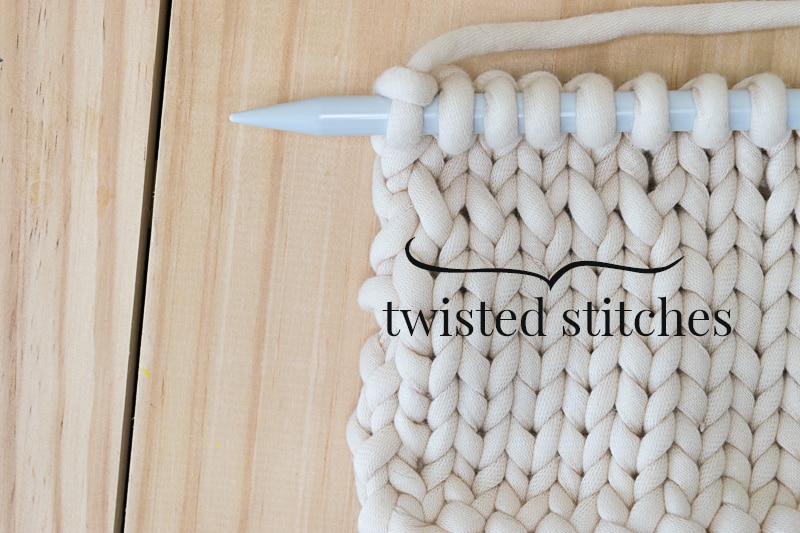
Like all knit errors, it is best to catch twisted knit stitches as you are working them so that you can immediately fix them, as addressed below. But, if you didn’t catch them while you were working, you will notice that several aren’t facing the right way and appear…well…twisted.
Prevention
- Prevent twisted stitches by knitting into the leading leg. In Western/English knitting, that should always be the right leg.
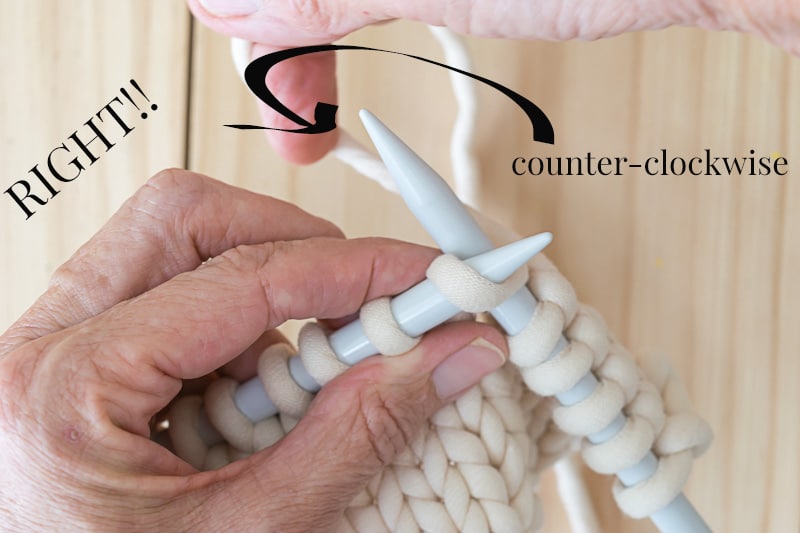
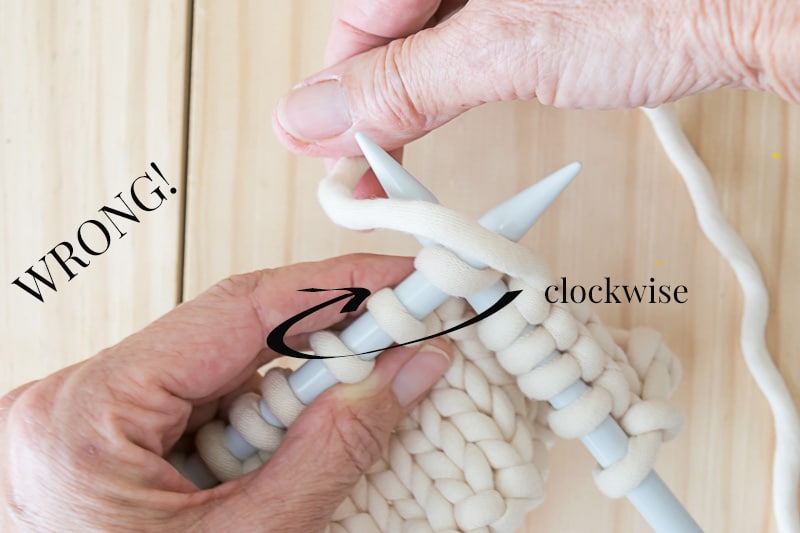
- You can also twist a stitch by wrapping your yarn around the needle from the front to the back (clockwise), as opposed to from the back to the front (counterclockwise). Always wrap counterclockwise.
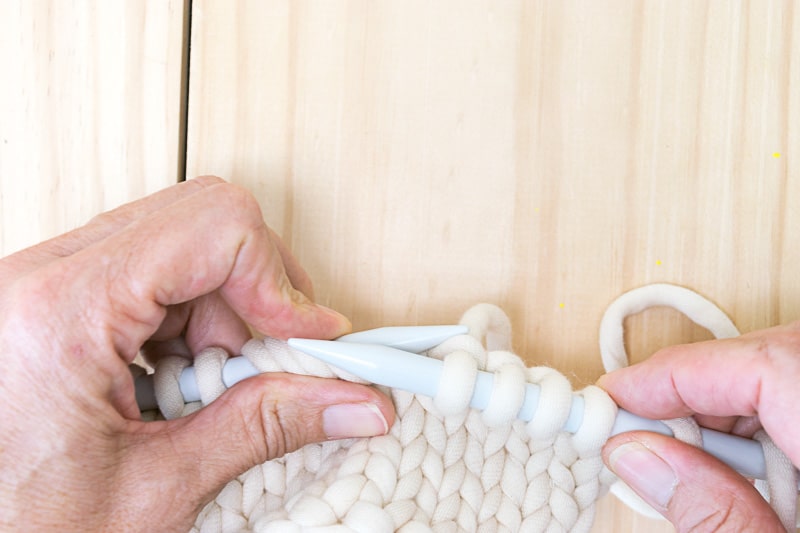
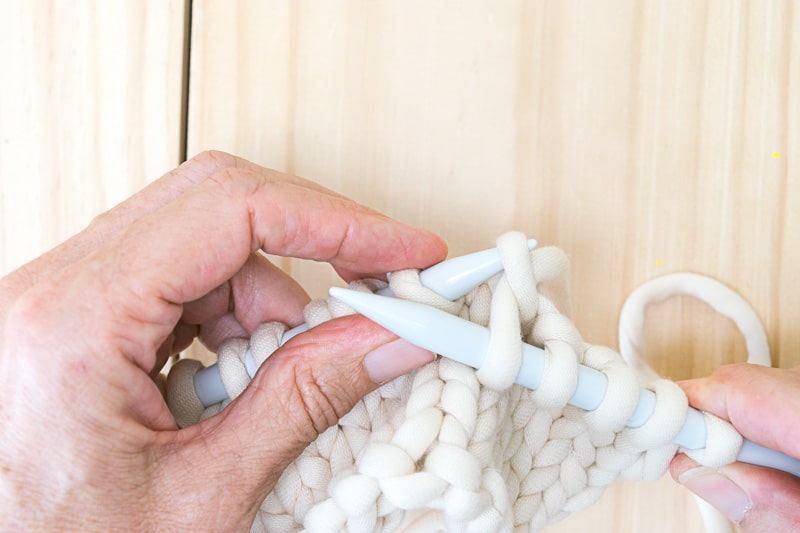
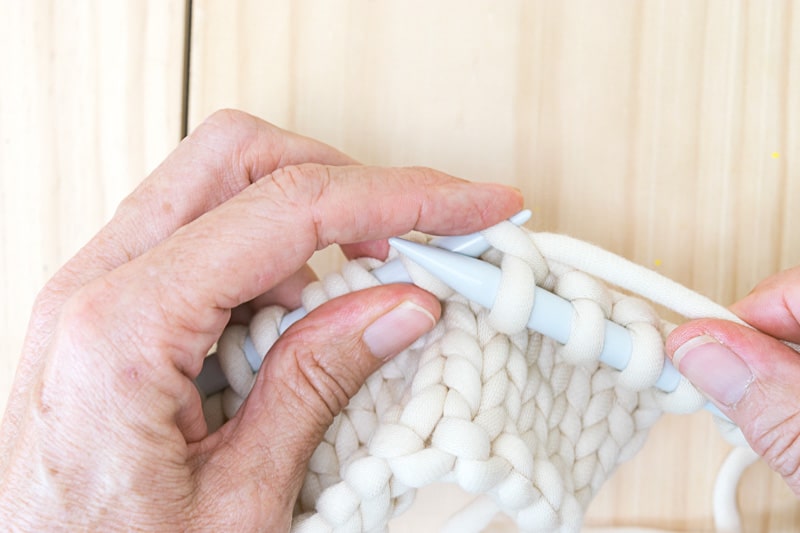
- Twisted knit stitches also happen when you are putting stitches back onto your needle, after ripping out several rows, several stitches or picking up one dropped stitch. When you place your stitches back onto your needles or before you knit them, adjust them so that the right/leading leg is sitting in front.
The Fix
If you catch your twisted stitches while knitting them, simply turn them so that they are sitting correctly. If you find them later on, you can do one of the following. These cures are also useful to correct any number of knit errors or knit mistakes.
Drop Down
You can drop down (a forced dropped stitch) if you notice your twisted stitch is just a couple of stitches, several rows back. Put a stitch marker one stitch down past the twisted stitch so that you don’t go too far. And keep the rest of your stitches on the needles.
Then follow the suggestions for the Dropped Stitch ‘Cure’
Tink
Whoever came up with this name was more clever than I am. Tink is simply ‘knit’ spelled backward. To tink you simply un-knit:
Insert your needle into the stitch directly below and behind the stitch that you want to unknit
Pull the stitch off your working needle and onto your left needle

With your right hand, gently pull the yarn from the tinked stitch
Repeat until you have knit back to the twisted stitch. Simply reseat so that it is sitting with the right leg in front.
Frog
And if ‘tinking’ wasn’t already clever enough, the knitting cognoscenti decided ‘rip it, rip it’ sounds like a croaking frog. Hence the name ‘frogging’ for when we take our work off of the needles and just start ripping. Some knitters weave a thinner knitting needle or piece of yarn into their work where they want to stop ripping, a lifeline of sorts. I couldn’t count the number of times I have frogged, but haven’t used a lifeline yet.
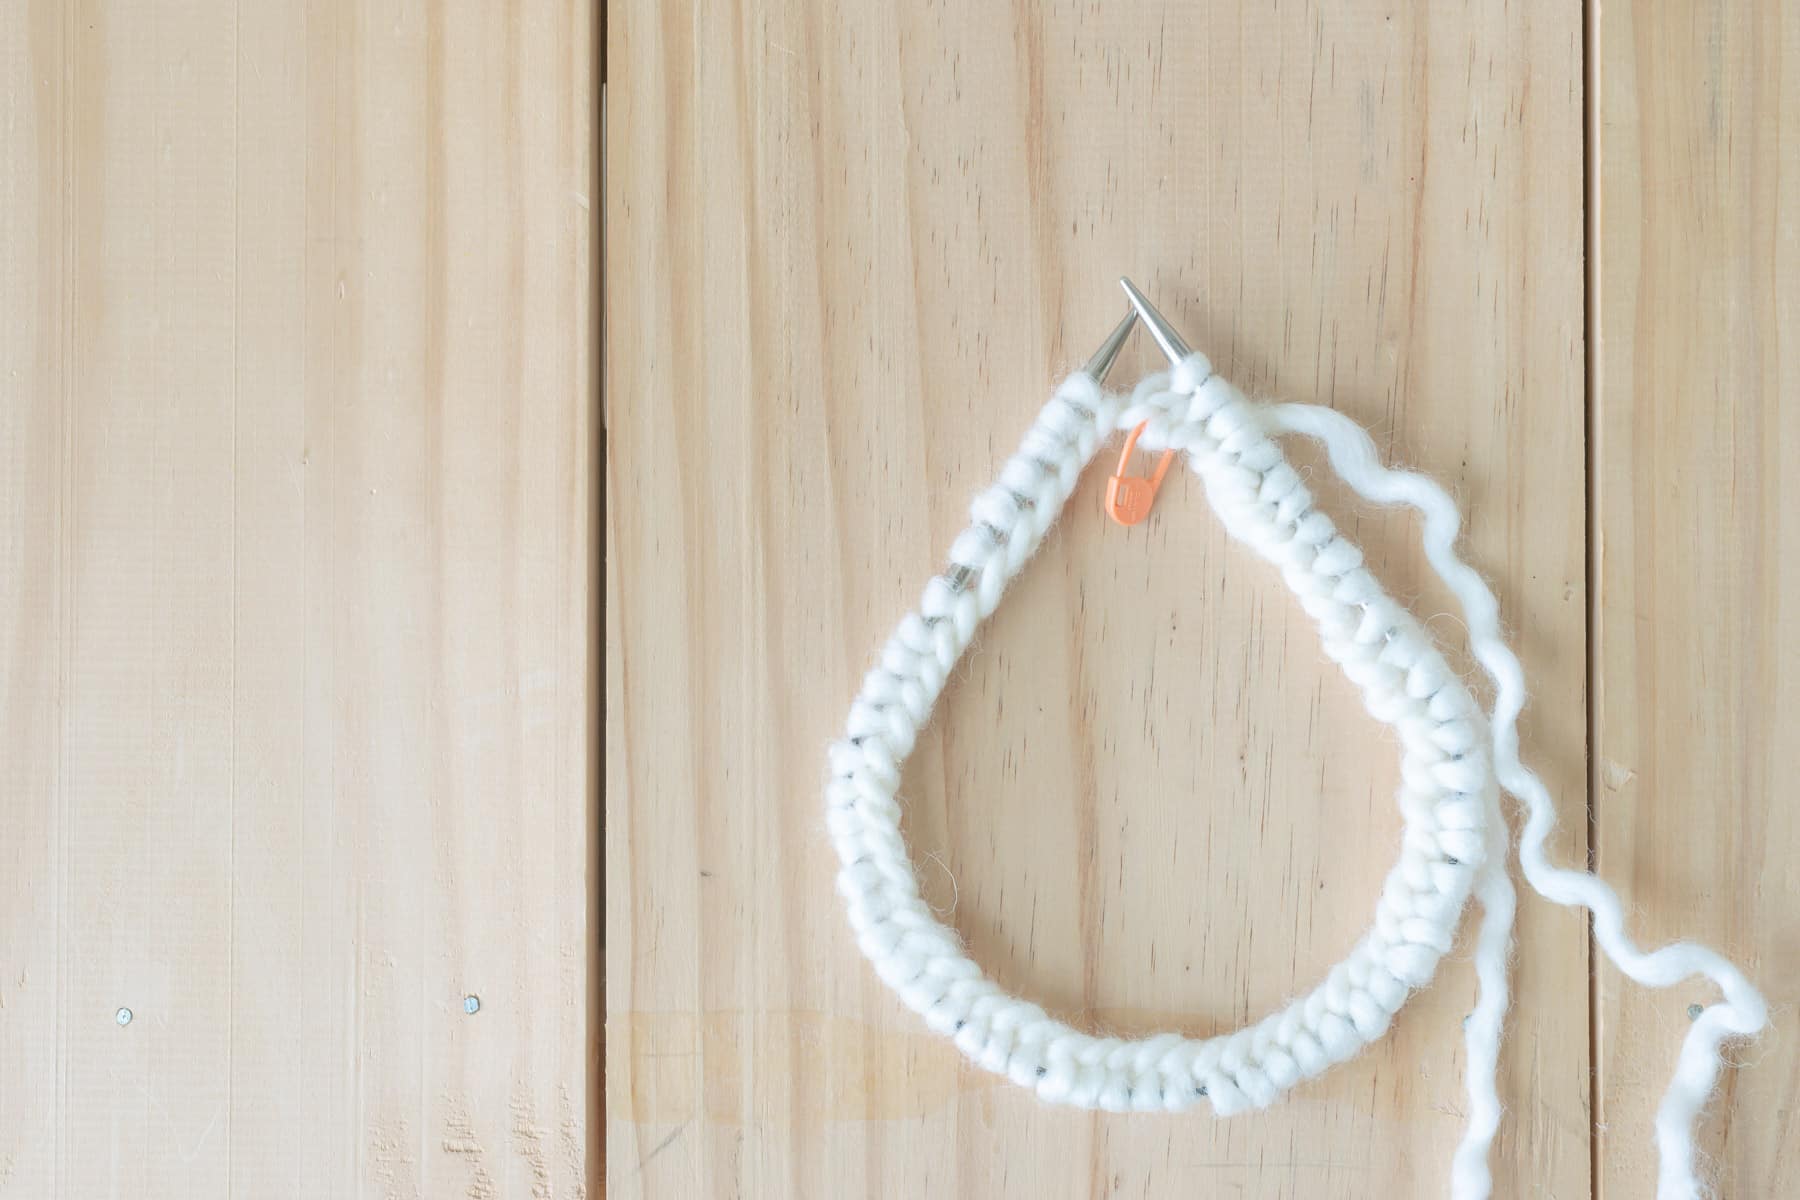
With frogging, the two biggest challenges are not going too far and not twisting stitches again as you put them back on your needle. Picking up the stitches on a needle smaller than the one you’re knitting with makes it easier. Make your focus just getting the stitches back onto a needle, and don’t worry if you pick them up twisted; they can be turned as you knit them onto the correct needle.
Watch this short video to see how to get the stitches back on the needles correctly. The last thing you want is for them to get twisted again!
If you want to learn how to knit or are looking to brush up on your knitting skills and knowledge, pop over to the How to Knit page, which houses all of the posts that teach knitting skills. Or, you could go ahead and visit each one by clicking the links below.
All About Knitting
- All About Yarn, including different fibers and weights, how to read a yarn label, and a Yarn Weights Chart
- All About Knitting Needles, including material, sizes, styles, and a Needle Conversion Chart.
- How to Cast On Using the Long-Tail Method, including calculating how much yarn is needed to cast on and how to make a slip knot.
- How to Knit the Knit Stitch
- How to Knit the Purl Stitch
- How to Knit the Seed Stitch
- How to Bind Off, including how to weave in your loose ends.
- How to Read a Knit Pattern, including a Common Knitting Abbreviations Chart.
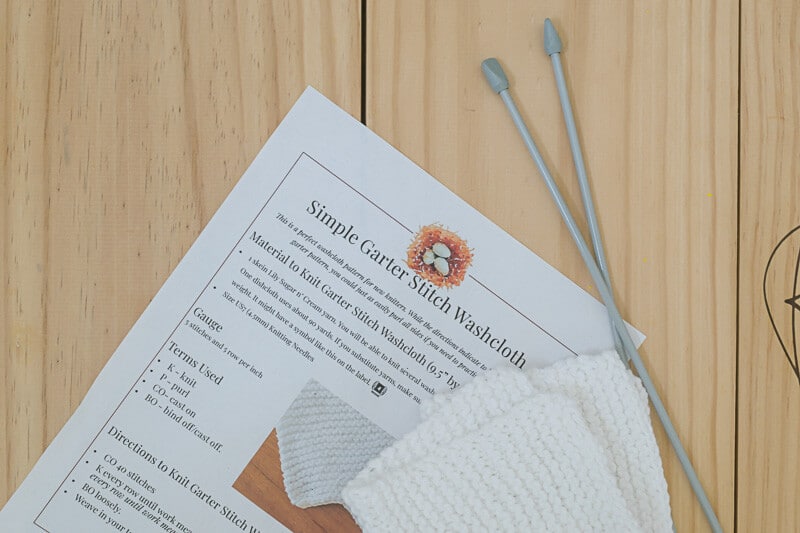
- This simple Garter Knit Dishcloth will let you put all your new skills to good use!
- How to Block Your Knitting.
- Common Knit Errors; How to Prevent or Diagnose and Fix Them
- Join yarn using the Russian Join
- How to seam pieces of knit fabric with the Mattress Stitch (for sweaters, tops, pillows, etc…)
- How to Knit in the Round with Circular Needles
- How to Knit in the Round with Double-Pointed Needles
- How to Knit in the Round using the Magic Loop Technique.
- Organize Your Knitting with these free printables.
- Check out our Gift Ideas for Knitters.
To refer back to how to fix twisted stitches in knitting, bookmark this page or pin the following image.
Thanks so much for spending a few minutes of your busy day with me!
To ensure you don’t miss future content, pop your email in the pale green box on the right or click here. I usually send one email weekly, so I won’t inundate your inbox. I’m sensitive to an overflowing email inbox!
We will only use your email address to send you emails, no more than 1-2 weekly. In addition, you will have access to my growing library of knit & crochet patterns and other printables. Check back often as this library will continue to grow. You can unsubscribe anytime by emailing me or clicking on the “unsubscribe” link at the bottom of all emails.
And you can access many of the products I refer to on my Nourish and Nestle Amazon Page. You can access it here.
So, if you’d like to participate in the ‘subscriber benefit’ action, simply subscribe to Nourish and Nestle here or use the form on the right sidebar. It’s slightly towards the top.
I have sent all my subscribers the link to the Subscriber Benefits Library. If you missed it or misplaced it, let me know.
Until next time…


Hi, Lynn,
Happy New Year. Thank you so much for this lesson. A friend of mine asked me to give her knitting lessons, so I am brushing up on the basics and how to explain them. I am a self-taught knitter, so some of my techniques are a little different. I somehow instinctively put ripped out stitches back on the needle in the correct direction, so this “right leg in front” will be a great way to explain it to her. She will love the terms “tinking” and “frogging.” I will also need to direct her to your Nourish and Nestle. Great way to start the week!
Happy New Year to you too, my friend.
I am so glad that this will be helpful! I am self-taught too, and still struggle to put my yarn overs going the right way! I know you and your friend will enjoy your little knitting circle! Wish I lived closer, I’d love to join in.
And tell her we’d love to have her! That Bridget washcloth or this one are great washcloths for beginners.https://nourishandnestle.com/hand-knit-washcloths/
Happy Knitting, my friend
Lynn
Lynn,
I want to thank you for the myriad of knitting posts! I am a very beginning knitter who has searched the internet looking for solutions to my knitting problems. I am never able to find lessons that are understandable and helpful 🥺 Your lessons, though, have answered all my concerns! It’s like you were able to predict exactly what a beginning knitter would need to know. Your explanations are so clear, with accompanying pictures to aid in comprehension. You are a wealth of knowledge and I so appreciate you sharing it with people like myself. Thank you, thank you!
Good Morning, Tricia
You have made my day! I’m thrilled that my series of lessons was so helpful to you! That was my sole motivation and I’m so happy the lessons addressed your concerns. I have a couple of projects aimed towards new knitters if you need some projects.
And, please don’t hesitate to reach out if you have further issues.
Thanks so much for reaching out! Comments like yours let me know that I’m producing content that is helping!
Hugs, Lynn